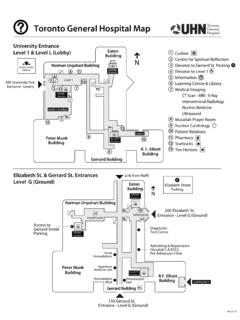
Transcription of How to Self-Bandage Your Leg(s) and Feet to Reduce ...
1 Form: D-8519. How to Self-Bandage Your Leg(s) and Feet to Reduce Lymphedema (Swelling). For patients with lower body lymphedema who have had treatment for cancer, including: Removal of lymph nodes in the pelvis Removal of lymph nodes in the groin, or Radiation to the pelvis Read this resource to learn: Who needs self-bandaging Why self-bandaging is important How to do self-bandaging Disclaimer: This pamphlet is for patients with lymphedema. It is a guide to help patients manage leg swelling with bandages. It is only to be used after the patient has been taught bandaging by a clinician at the Cancer Rehabilitation and Survivorship (CRS) Clinic at Princess Margaret Cancer Centre. Do not Self-Bandage if you have an infection in your abdomen, leg(s) or feet. Signs of an infection may include: Swelling in these areas and redness of the skin (this redness can quickly spread). Pain in your leg(s) or feet Tenderness and/or warmth in your leg(s) or feet Fever, chills or feeling unwell If you have an infection or think you have an infection, go to: Your Family Doctor Walk-in Clinic Urgent Care Clinic If no Walk-in clinic is open, go to the closest hospital Emergency Department.
2 2. What is the lymphatic system? Your lymphatic system removes extra fluid and waste from your body. It plays an important role in how your immune system works. Your lymphatic system is made up of lymph nodes that are linked by lymph vessels. Your lymph nodes are bean-shaped organs that are found all over your body. Large groups or chains of lymph nodes can be found in your neck, under your arms and in your groin (see picture to the right). Having surgery to remove lymph nodes, or radiation treatment to areas in your body where you have lymph nodes, can prevent fluid from flowing properly. This can cause swelling called lymphedema. The Lymphatic System Circles show where clusters (groups) of lymph nodes are in your body. It is normal for lymph nodes to be removed during cancer treatment. How does self-bandaging help with lymphedema? If you had surgery and/or radiation treatment for cancer, the areas that may have swelling include your feet and leg(s).
3 Wrapping your body with bandages (compression), helps move the lymph fluid in the direction of the heart. The goal of bandaging is to: Help Reduce your swelling Help prevent the swelling from getting worse The short stretch bandages that you should use are designed for patients with lymphedema. Ask the CRS Clinic staff for a list of places where you can buy these bandages. 3. When should you wear the bandages? To be most useful, bandages should be worn during the day and when you exercise. It is common for the bandages to slip down with movement. The bandages can also slip if your leg becomes less swollen as you wear them. You may need to wrap the bandages again if this happens. You may also bandage at night, once you are comfortable wearing them. What should you do before you start? Clean your skin with soap and water and pat it dry. Make sure to dry between your toes. Check your skin for any breaks (cuts) or redness.
4 If needed: Clean the cut and apply a bandage. Do not wrap with compression bandages until the skin has healed If there is redness, follow the instructions above. It may be an infection. Do not wrap with compression bandages until the infection has gone. Apply moisturizer (lotion) to your skin. This will help you to avoid itchiness, irritation and skin breakdown. Apply a skin lotion to your leg and foot . Rub it into your skin very well. Pull on the tubular cotton sock (stockinette). It will prevent the lotion on your skin from being rubbed off by the bandage. Make sure you are in a comfortable position while bandaging to avoid any back discomfort. Please follow instructions given by the clinic staff at the CRS Clinic. 4. Have all your supplies ready before you begin Leg foot and ankle padding padding Toe gauze Short stretch bandages Tape Stockinette Foam for ankles Bandaging supplies may include: 1. Stockinette (tubular cotton) to protect the leg and foot 2.
5 Padding (soft white artiflex/castor padding or foam) to help with pressure of the bandages 3. Gauze (white, 4cm and/or 6xcm) bandage for your toes 4. Short stretch bandages for your feet and legs (beige, 8 cm, 10 cm and/or 12 cm). 5. Kidney-shaped foam for swelling behind your ankles Bandaging supplies may differ based on your specific needs. You will only be given the supplies you need. Ask a doctor, clinician or therapist at the CRS Clinic for the pamphlet called How to Care for Your Bandages . 5. Step 1. Bandaging the toes Put the stockinette (tubular cotton). on your leg. Pull it back to bandage your toes. Begin with the 4 cm toe gauze and wrap it once around the base of all your toes. Wrap the big toe first. Start from the bottom of the toe nail and wrap around the toe two to three times towards the base of the toe. Do not stretch gauze as you bandage the toes. Wrap the gauze around the base of all the toes again.
6 Wrap the 2nd toe (the one next to your big toe) the same way as the big toe. Continue wrapping each toe the same way. The 4th and 5th toe can be wrapped together or you can leave the 5th toe unwrapped. 6. Option: Toe Wrap with Adhesive (sticky, glue-based) Gauze You can use adhesive (sticky or glue-based) gauze to bandage your toes separately. Wrap around each toe without pulling the gauze. You can leave the 5th toe unwrapped if you choose. When you finish bandaging your toes, check your blood flow by doing the following test: Press on the big toenail. It should lose some colour or turn pale. The colour will return after a few seconds when you release the toe. If this does not happen you may have bandaged too tightly. You will need to remove the bandage and wrap it more loosely. The toe bandages should feel comfortable. You should have no pain or discomfort. 7. Step 2. Foam for ankles If the skin around your anklebones is thick and spongy, you may have been given two pieces of foam (kidney-shaped) to help with the swelling.
7 Place the foam behind the anklebones. Wrap the 6 cm larger gauze around the foam so that it does not slip. Pull the stockinette back over the ankle and foot . 8. Step 3. Applying padding to the foot and leg With the 10cm padding: Wrap around your foot beginning at the base of the toes. Wrap around the foot again moving closer to the ankle. Cover the whole foot . Overlap the padding by half with each wrap. Continue with this padding up the leg in the same way. Make sure the back of the knee is well padded and protected. You may have been given an extra piece of padding for this area. Continue the padding to just under the groin (about two finger widths below groin). Try to smooth out the wrinkles in the padding as best as you can. Do not use tape as it may tear the padding. 9. Step 4. Bandaging the foot and ankle Bandage #1. Try to keep your foot at a 90-degree angle when you wrap the foot . Begin with the 8 cm bandage (beige).
8 Wrap around the foot at the base of the toes without pulling. This will secure the bandage. Now wrap two to three more times, pulling the bandage across the top and across the bottom of the foot . Give a gentle pull on the bandage at each half turn to keep even pressure. Continue with the same bandage across the top of the foot toward the back of the ankle. 10. Wrap the bandage around the back of the ankle and across the top of the foot . Always give a gentle pull on the bandage at each half turn to keep even pressure. Bring the bandage around to the bottom of the foot . Then across the top of the foot again, moving the bandage closer to the heel. This pattern of wrapping is called a figure 8 . Always give a gentle pull on the bandage at each half turn to keep even pressure. Repeat this figure 8 pattern around the foot and ankle until the arch of the foot is covered. The number of times you repeat the figure 8 pattern will depend on how much swelling you have in your foot .
9 Continue with the remaining bandage around your ankle and up your lower leg. Overlap the bandage by half with each wrap. Always give a gentle pull on the bandage at each half turn to keep even pressure. Tape the end of the bandage to prevent it from loosening. 11. Step 5. Bandaging the leg Bandage #2. Take a 10 cm bandage: Wrap around just above the ankle without pulling. This will secure the bandage. Wrap again and gently pull across the front and then the back of the leg. Overlap the bandage by half with each wrap. Always give a gentle pull on the bandage at each half turn to keep even pressure. Continue with the same bandage. Bend the knee slightly if possible. Wrap the bandage over the knee. Then wrap below the knee and finally above the knee in a figure 8 pattern. Continue wrapping the upper leg and tape the end of the bandage to prevent it from loosening. Always give a gentle pull on the bandage at each half turn to keep even pressure.
10 12. Bandage #3. Take another 10 cm bandage. Feel your ankle and lower leg and start the bandage where it feels soft. Wrap in the opposite direction to the previous bandage. Wrap around the lower leg without pulling. This will secure the bandage. Wrap again and gently pull across the front and then the back of the leg. Overlap the bandage by half with each wrap. Do the figure 8 wrap over the knee (as described before). This will help with knee movement. Always give a gentle pull on the bandage at each half turn to keep even pressure. Place your weight on the leg that you are bandaging, if possible. Continue wrapping to the top of the leg and tape the end of the bandage to prevent it from loosening. 13. Option: Added Bandage You may have been told to add another bandage. If so, wrap the added bandage in the same way starting below the knee. Continue bandaging toward the upper leg and tape the end of the bandage to prevent it from loosening.