Transcription of How to Set Up and Infuse Your TPN - fvfiles.com
1 How to Set Up and Infuse your TPNIf you have any problems with your infusion, please call us. Fairview Home Infusion 612-672-2233 or 1-800-642-8845 Important: Do not change any of the supplies listed here. Keep supplies away from your home care nurse or persons trained by Fairview Home Infusion may give you IV medicines. If an untrained person gives you IV medicine, this could cause serious problems, including death. Call your nursing service if someone needs these instructions with every you are deaf or hard of hearing, please let us know. We provide many free services including sign language interpreters, oral interpreters, TTYs, telephone amplifiers, note takers and written 1 of 10 Getting ready1. Remove the TPN bag from the refrigerator 6 to 8 hours before use. This allows time for the contents to warm up to room temperature.
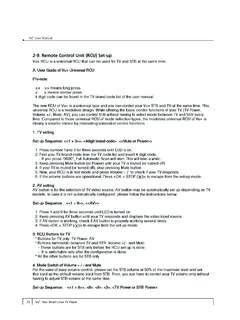
2 Do not warm the bag in the microwave, with direct sunlight or hot water. Let it warm up naturally. 2. Read the label on the TPN bag. Check for your name and the discard, or use-by, date. If the date has passed or any part of the label is wrong, do not use the TPN. Call your Home Infusion pharmacy :1. Wash your hands before touching Scrub the hub Clean the end cap on your IV line for 15 seconds before connecting to Gather these supplies:a. IV tubing with micron filter b. TPN/Lipid bag at room temperaturec. CADD pump, instructions and 4 AA batteriesd. Two syringes of sodium chloride (saline solution)e. One syringe of Heparin Lock Flush (if needed)f. Alcohol pads, thermometer4. Wash your hands well for 15 seconds. Use liquid soap or hand foam if your nurse suggests Check your temperature and record 2 of 10 Gather these supplies to set up and Infuse your TPN Adding insulin or vitamin K to the TPN bag (add before multi-vitamins)1.
3 Gather these supplies: Alcohol pads Prefilled insulin syringe and one-inch (22 gauge) needle that came with the syringe Prefilled vitamin K syringe and the needle that came with it in the brown plastic bag your TPN bagIf you are adding insulin and vitamin K, add the insulin Wash your hands well for 15 seconds. Use liquid soap or hand Read the label on the syringe. Check to be sure your name, the medicine name, and the dose are correct. Also check the discard, or use-by, date. If the date has passed or any of the information is wrong, do not use the syringe. Call your Home Infusion pharmacy Take the plastic cover or rubber tip off the syringe. Do not touch the Attach the needle to the syringe by twisting it With a fresh alcohol pad, scrub the short rubber or plastic port at the bottom of your TPN bag.
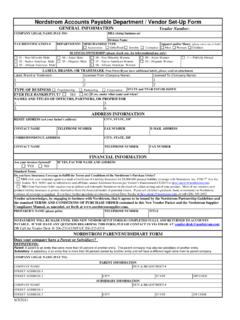
4 Scrub for 15 seconds and let air Take the cover off the needle by pulling it straight off. Do not twist it off and do not touch the Insert the needle into the port. Inject (push) all of the liquid into the bag. Remove the needle and syringe from the Throw the empty needles and syringes into your sharps container. 10. If you are adding vitamin K, repeat steps 3 to 9. Adding vitamins to the TPN bag1. Gather these supplies: Alcohol pads Two vials of vitamins with caps of different colors. Two 10-ml syringes with needles TPN bag2. Wash your hands well for 15 seconds. Use liquid soap or hand Open one Use a fresh alcohol pad to scrub the top of the vial. Scrub for 15 seconds and let air dry. 5. Use a fresh alcohol pad to scrub the short rubber or plastic port at the bottom of your TPN bag.
5 Scrub for 15 seconds and let air Take the cover off one of the needles by pulling it straight off. Do not twist it off and do not touch the Draw back the plunger to fill the syringe with 5 ml air. For children s multivitamins, follow your nurse s 3 of 10 Supplies for adding vitamins to your TPN8. Use the tip of the needle to pierce the center of the opened vial. Push all the air into the Keep your thumb on the plunger of the syringe. Turn the vial upside down, and then withdraw all the liquid from the Tap the side of the syringe, moving any air bubbles to the top. Inject these back into the vial. This way, you will make sure that all the air is out of the syringe. It s okay to have tiny bubbles on the inside of the syringe. 11. Remove the needle and syringe from the vial. 12. Insert the needle into the center of the port.
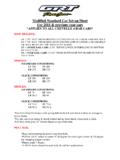
6 Push all of the liquid into the bag. Remove the needle and syringe from the Throw the empty needle and syringe into your sharps Take up the second syringe and vial. Repeat steps 3-13. Mixing lipids and TPNIf your TPN bag has a lipid chamber (with white, milky liquid), check these things before using it: The white liquid at the top should look like milk, without brown streaks or cracking. The liquid at bottom will look clear or slightly yellow. It should not look murky or milky or contain any solid pieces. If you notice anything unusual, do not use the TPN. Call your Fairview Home Infusion you complete the above checks, mix the two chambers. Do this just before hooking up your TPN for the day:1. Pull on the rubber tube, then pull the silver strip from between the two Gently knead the bag until the liquids are well mixed.
7 Once mixed, TPN is only good for 24 4 of 10 Pull the silver strip from between the two chambersAttaching the tubing1. Remove the IV tubing from its package. Pull the blue clip from the cassette, then tear off the white paper Holding the TPN bag, remove the seal from the large middle port at the bottom of the bag. Once the seal is removed, do not touch or clean the open port. Do NOT use the clamped port. 3. Take the cover off the tubing spike. Push and twist the spike into the middle port of the bag. CADD pump setup and operation; priming your tubing1. Make sure the pump is stopped and powered off. Using your fingers, the pump key or a coin, turn the knob on the battery door counterclockwise to open the battery door on the top of the pump. Note: If the batteries are already in place, go to step 4.
8 2. While holding the pump at an angle, place 4 AA batteries in the pump from the bottom up. Match the + and markings on the batteries with the markings on the pump. 3. Using your fingers, the pump key or a coin, close the battery door by turning the knob on the battery door Press and hold the power switch to turn the pump The pump will beep after completing self-tests and Ready To Begin will appear on the home 5 of 10 Twist the spike into the middle portInsert AA batteries from the bottom up, matching the + and- markings6. Open the cassette latch to a 90 degree angle. 7. Attach the TPN tubing cassette to the pump by connecting the hooks on the cassette to the hinge pins on the bottom of the Place the pump on a firm, flat surface and press down on the cassette so it fits tightly against the Lift the cassette handle into the closed position.
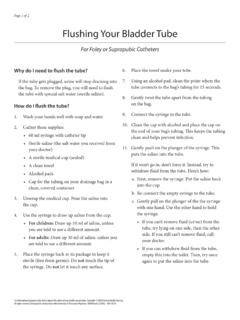
9 10. Make sure the cassette is attached correctly. The top of the cassette should line up evenly with the bottom of the pump and be securely If the screen says Reset Reservoir volume to ____ ml select Ye s. The pump will reset to the volume needed to run your TPN for the Prime tubing? will appear on the home screen. Select Ye Disconnect tubing from patient, open clamps, then press Prime appears on the home screen. Select Prime. Let the filter hang straight down while priming. 14. When the liquid reaches the end of the tubing, select Stop priming. If Continue priming appears on home screen select 6 of 10 Open the cassette latch to a 90 angleList the cassette handle into the closed positionLet the filter hang straight down15. Start infusion will appear on the home screen. Select No.
10 16. At this point, make sure that the Reservoir Volume number in the left corner of the status bar at the top of the pump screen matches the number on the TPN label. The bag label will say Res Vol instead of Reservoir volume. Note: If the Reservoir volume does not match the Res Vol on your TPN bag, see Reset reservoir volume by hand below. Otherwise go to Connecting and infusing TPN. Reset reservoir volume by hand1. Select Select Reset Reservoir Reset reservoir volume to ____ml? will appear on the home screen. Select Ye Select Back to return to the home Double check that the reservoir volume on the screen matches the res vol on your TPN the reservoir volume on the screen and Res Vol on your TPN label match, you are ready for Connecting and infusing TPN. Warning: If the reservoir volume on the screen still does not match the Res Vol on your TPN label, STOP.