Transcription of HyperFire Instruction Manual
1 Instruction Manual Copyright: January 2017 1 RECONYX, Inc. Table of Contents I. Table of Contents .. 1 II. Camera Overview .. 2 III. HyperFireTM Specifications .. 3 IV. HyperFireTM Controls & Parts Diagram .. 5 V. Batteries & Memory Cards .. 6 VI. Setup & Programming .. 11 VII. Mounting Your Camera .. 18 VIII. Locking & Securing Your Camera .. 19 IX. Aiming Your Camera .. 20 X. Image Data Information .. 22 XI. Additional Camera Options .. 23 XII. Troubleshooting .. 25 XIII. Warranty, FCC, and Safety Information .. 28 XIV. Your Information and Camera Warranty Registration .. 30 XV. Copyright & Trademark Information .. 31 2 Camera Overview Congratulations on purchasing a RECONYX camera. RECONYX has been the leader in digital wildlife cameras since 2002. Your HyperFire camera is a state-of-the-art digital camera, Passive Infrared (PIR) motion detector, and a night time infrared illuminator all contained in a secure, rugged, and weather-resistant case.
2 Whether you are using the camera for scouting deer or studying wildlife, you will find that using the HyperFire camera in conjunction with MapView Professional or BuckView Advanced software will be one of your most valuable tools in gathering and analyzing data. Thank you for putting your trust in us! Contents of this package: HyperFire Camera BuckView Advanced or MapView Professional software (CD-ROM) Adjustable bungee cord for mounting camera. This Instruction Manual . Moisture absorbing desiccant system (Professional cameras only) Other things you will need: Secure Digital (SD or SDHC) Memory Card 12 AA Batteries NOTE: The HC600 & PC900 cameras will only operate on either NiMH rechargeable batteries or Energizer AA Ultimate Lithium batteries. A computer, television, digital picture frame or other device to view your pictures Optional: Windows PC to install BuckView or MapView software NOTE: If you have any questions or concerns relating to the operation or functionality of your camera, please contact our Technical Service Department by email at or by calling toll free 866-493-6064.
3 3 RECONYX, Inc. HyperFire Specifications HC500 HC600 PC800 PC900 Illumination Range at night Lo-glow Infrared up to 50 feet No-glow Covert Infrared up to 60 feet Lo-glow Infrared up to 70 feet No-glow Covert Infrared up to 60 feet Images 1080P HD or MP color images by day; monochrome by night InstaOn Trigger Speed 1/5 second RapidFire NearVideo Up to 2 frames per second SD Card Capacity Up to 32GB: (4GB = approx 10,000 pictures) NOTE: under normal use 2GB or 4GB cards are adequate. Software Included BuckView Advanced MapView Professional Moisture Absorbing Desiccant System Available for purchase Included Time-Lapse Surveillance 1, 5, 15, 30, or 60 minute intervals Virtually any number of seconds, minutes, or hours Motion Sensor Scheduling ON or OFF 15 minute increments within all 24 hour periods Start Delay n/a Up to 12 weeks Conformal Coated Electronics n/a Included Customization Options (additional charges may apply) n/a Wireless Trigger and IR Illumination Extender, External Power and Trigger Jacks, Focal Distance, Telephoto lens, Custom Motion Detector Lens, Custom Colors, other modifications available Warranty 1 year 2 years 4 BuckView ADVANCED The HC500 and HC600 HyperFire Cameras include the new BuckView Advanced mapping and image management software with Google Maps technology.
4 This allows you to geographically organize and access your images, and helps you to pattern and understand animal movements and behaviors. In addition to camera locations, you can add food plots, tree stands and more. Our exclusive "quick tag" will allow you to tag specific bucks and add them to your "Hit List". BuckView Advanced also enables you to easily upload and share your RECONYX photos to Facebook and Twitter . Refer to the BuckView User Guide, accessible within the software, for more information. BuckView requires a personal computer running Windows XP , Windows Vista , or Windows 7 . MapView Professional The PC800 and PC900 HyperFire Cameras include the latest MapView Professional mapping and image management software with Google Maps technology; allowing you to geographically organize and access your images, and helping you to pattern and understand animal movements and behaviors.
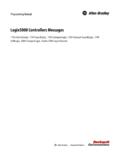
5 In addition to camera locations, you can add nesting sites, bait stations, food sources and more. Our exclusive "power tagging" will allow you to easily define metadata and tag your images with data specific to your research project. Once your image data is specified you can easily export your data for further analysis using other software systems. In addition, the RECONYX Professional Configuration software allows advanced programming of your Professional Series camera, with a near infinite combination of settings available. For more information, refer to the MapView Professional User Guide, accessible within the software. MapView Professional requires a personal computer running Windows XP , Windows Vista , or Windows 7 . 5 RECONYX, Inc. HyperFire Controls & Parts Diagram Infrared Array Handle PIR Motion Detector Padlock Loop Padlock Loop IR Mask WalkTest Light Camera Lens Latch Backlit LCD Status/Menu Panel Battery Bays Weatherproof Gasket - Card In Use (Status Light) - Left/Right Menu Buttons - OK Button - Low Battery (Status Light) SD Card Slot WARRANTY SEAL On/Off Power Switch Weather-Resistant Case Light Meter 6 Batteries & Memory Cards Accessing Batteries, Memory Card & Camera Controls To install the batteries and memory card, your HyperFire camera is easily opened using the latch on the right side of the camera.
6 Grasp behind the latch and flip it toward the front. The camera will open like a book, allowing access to the batteries, memory card and settings. Step 1 Step 2 Step 3 TIP: Each time you open your camera it s a good practice to: Make sure the main gasket is seated properly and is clear of debris. Be sure that the windows on the front of your camera are clean. Also be sure the latch is fully seated when closing your camera to ensure a weather-tight seal. 7 RECONYX, Inc. Battery Specifications and Installation Your RECONYXTM HyperFire camera runs on twelve AA-cell batteries. We highly recommend using either Energizer Ultimate Lithium batteries or high-quality NiMH Rechargeable batteries in your camera. Alkaline batteries do not provide as much power as Lithium or NiMH batteries and they are adversely affected by both hot and cold weather, so we do not recommend alkaline batteries.
7 NiMH will operate at temperatures down to -20 F or colder. Lithium batteries will operate to -40 F. Alkaline batteries may be used in the HC500 and PC800 camera models. However, they will not provide the performance that the Lithium or NiMH batteries do, in terms of nighttime consistency or number of pictures taken. NOTE: We strongly advise that you not attempt to run alkaline batteries in the HC600 or PC900, as the performance will be very poor. NOTE: Be sure to load batteries in the proper orientation (alternating positive/negative, six in each battery bay). Warning! Do not mix battery types! Damage to the camera can result and your warranty will be voided if you mix battery 8 Battery Performance Because camera settings, animal activity, individual battery performance and temperature all vary, there is no way to precisely predict a camera s run time, the total number of images that can be taken, or the temperature at which the camera will operate on any given set of batteries.
8 Therefore the following table shows approximate values to be used as a guide in determining what type of batteries will best suit your needs. NOTE: The values in the chart below were based on tests using 12 batteries; taking 50% daytime photos and 50% nighttime photos at 70 F. Battery Type Operating Temperature Number of Images PC900 & HC600 PC800 HC500 AA Energizer Ultimate Lithium ( ) -40 F (-40 C) and above 30,000 to 40,000 40,000 to 50,000 40,000 to 50,000 AA Rechargeable Nickel-Metal Hydride ( , 2600 MaH) 0 F (-18 C) and above * 20,000 to 30,000 * 20,000 to 30,000 * 20,000 to 30,000 AA Alkaline ( ) (HC500, PC800 Only) 20 F (-7 C) and above n/a * 20,000 to 30,000 * 20,000 to 30,000 * High temperatures can reduce run time with Alkaline and NiMH batteries by 50% or more. TIP: You can purchase Lithium batteries as well as RECONYXTM certified NiMH rechargeable batteries and chargers at Your camera will display the status of multiple battery types; be sure that the display is showing the same type of battery that you are using.
9 You can change the battery type in the main menu, including Lithium (LITH), Nickel-Metal Hydride (NIMH), or Alkaline (ALK). NOTE: The option to use alkaline batteries is only available on PC800 and HC500 camera models. Alkaline batteries are NOT to be used with the covert (PC900, HC600) cameras. 9 RECONYX, Inc. Secure Digital (SD or SDHC) Card Specifications A Secure Digital (SD/SDHC) card is used to store the pictures your camera captures. These images may be transferred to your computer using standard image viewing software or RECONYX MapView or BuckView mapping and image management software. TIP: Many digital cameras, GPS units, and cell phones can be used to view images taken by your HyperFire camera. No need to purchase a special purpose viewer! Inserting and Removing the memory card Make sure the orientation is correct and that the card is aligned properly.
10 Push gently on the memory card as shown below until it clicks into place. Warning: Inserting the memory card upside down or backwards could damage the camera or the memory card. Damage resulting from inserting the card incorrectly is not covered under warranty. To remove memory cards: 1. Press <OK> to disarm the camera (the battery status and number of pictures taken since last armed will be displayed on the LCD). 2. Switch the power OFF. 3. Press and release the card to partially eject the memory card. 4. The card can then be removed by grasping it with your fingers. NOTE: Always disarm the camera (by pressing OK) and switch the power off before removing or inserting the memory card. 10 Memory Card - File System Requirements Secure Digital cards have various speeds and capacities. Larger capacity cards are capable of storing more images. Your HyperFire camera can accept cards up to 32GB, but most users will find 2GB and 4GB cards to be more than adequate for normal use.