Transcription of ILLUSTRATIONS A. LED SENSOR FLOODLIGHT
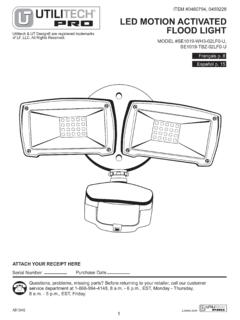
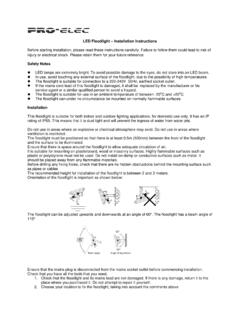
1 DYMOND LED SENSOR FLOODLIGHTSee Illustration I 1) Floodlight2) PIR motion Sensor3) Built-in connector4) Mounting bracket5) Adjustment knobINTRODUCTIONYour Dymond LED SENSOR FLOODLIGHT is a unique indoor or outdoor lighting system for your home or business. At night, the built-in infrared (PIR) motion SENSOR turns on the FLOODLIGHT when it detects motion in its detection field. The built-in light SENSOR can be activated during the day in order to save electricity. An adjustable timer makes you able to select how long the FLOODLIGHT needs to stay on after 10W LED light is installed which can be adjusted thanks to the 3 different knobs located at the bottom of the motion SENSOR :1) SENS (SENSITIVITY): SENS knob controls the sensitivity, the detection area : lowest sensitivity = detects all motion within 5m, highest sensitivity = detects all motion within ) TIME: TIME knob controls how long the FLOODLIGHT will stay on after the last motion has been detected.
2 The minimum TIME is 10sec., the maximum TIME is ) LUX: LUX knob determines at what light level the FLOODLIGHT will start working, so it actually controls the built-in light PRECAUTIONS Do not install when it is raining Make sure you switch off the power before installation Make sure that the power wiring comes from a circuit with a suitable fuse or circuit breaker Make sure that there are no objects within a range of 80 cm from the FLOODLIGHT Do not remove the adjustment knob (5) Do not remove the FLOODLIGHT head assembly and motion SENSOR from the base, so as to avoid any rotation The unit can only be installed horizontally, not vertically as shown on illustration countries may require installation of this product by a qualified electrician.
3 Please check the laws and requirements in your country. If the house wiring is of aluminum, consult with an electrician about proper wiring methods. Before proceeding the installation, TURN OFF THE POWER TO THE LIGHTING CIRCUIT AT THE CIRCUIT BREAKER OR FUSE BOX TO AVOID ELECTRICAL A MOUNTING LOCATION For the best results, fix the FLOODLIGHT on a solid surface at a height between ~ m. For outdoor installation: a location under eaves is preferable Avoid aiming the motion SENSOR at pools, heating vents, air conditioners or objects which may change temperature rapidly Try to avoid pointing the FLOODLIGHT at trees or shrubs or where the motion of pets may be detected Before mounting, please keep in mind that the motion SENSOR is most sensitive to all motion appearing across the SENSOR and less sensitive to all motion appearing directly towards the SENSOR (See Illustration III.)
4 INSTALLATIONMake sure you have a screwdriver and drill ready. Select a location for the unit, based on the coverage angles shown in Illustration INSTRUCTION1) Switch off the power source 2) Remove the mounting bracket from the FLOODLIGHT . Drill the wall and screw the bracket onto the wall using suitable wall plugs and screws (not included). Check that the bracket is securely fitted onto the wall. See illustration V. Note: at this stage, do NOT re-attach the FLOODLIGHT to the ) Strip approximately 6-8 mm insulating part of the power cable and original wire (if needed). Before connection make sure that the wiring box gasket is firmly seated in its original ) Open the backside of the FLOODLIGHT by removing the 4 screws (see Illustration VII a).
5 5) Remove the metal nut cap and put the power cable through the opening (see Illustration VII b + c).6) Connect the BROWN wire (live wire +) to the terminal block L mark. Connect the BLUE wire (Neutral wire) to the terminal block N mark. Connect the YELLOW/GREEN wire (earthing wire) to the terminal block mark. (in case there is an earthing wire). (see Illustration VII d).7) Close the backside of the FLOODLIGHT by placing back the screws. Make sure that the rubber seal is well placed after closing, to keep the unit ) Re-attach the FLOODLIGHT to the bracket and secure the cable to the wall using suitable clips (not included). Ensure that the cable is not touching the body of the FLOODLIGHT and that there is sufficient slack in the cable to allow the FLOODLIGHT to be titled and adjusted as required which should be done by grasping the metal body of the FLOODLIGHT and determining its ) Use the adjustment knob (5) to rotate/turn the motion SENSOR in the perfect position.
6 (see illustration VI). SETTINGS1) TEST MODE - Turn the SENS knob clockwise to the maximum setting. - Turn the TIME knob anti-clockwise to the minimum setting. - Turn the LUX knob clockwise to the maximum sun ( ) setting. When you switch on the power, the controlled power load will not yet work. Preheating will take 30 sec. As soon as the SENSOR detects motion , the FLOODLIGHT will turn on. When the FLOODLIGHT turns off, it will turn on again when the SENSOR detects motion within 5~15 sec. Afterwards make the FLOODLIGHT turn itself on after 5-10 sec. This should work now. When there is no motion signal in the SENSOR , the FLOODLIGHT will turn off. Turn the LUX knob anti-clockwise to the minimum.
7 If it is set to less than 3 LUX (dark), the light and SENSOR will not work when testing in daylight. If you cover the detection window by an opaque object (a towel for example), the light will turn on. When there is no motion signal, the light will turn off within 5-15 sec. Adjust the motion SENSOR to choose and set the desired detection field. For a smaller detection field, point the SENSOR down; for a larger detection field, point the SENSOR up. Attention: when testing in daylight, please turn LUX knob to the SUN position, otherwise the FLOODLIGHT will not turn on!Note: Should be installed by an electrician or experienced person Avoid installation on objects that can move/shrink/expand .. POSSIBLE PROBLEMSWhen sensitivity is poor: Make sure that the detection window is free from dust and dirt which can affect the sensitivity Make sure that the ambient temperature is not too high Make sure that the motion signal is located within the detection field Make sure that the installation height corresponds to the recommended height (between ~ m) Make sure that the motion SENSOR is correctly oriented to detect motion signalsWhen the FLOODLIGHT does not turn off automatically.
8 Make sure there isn t a continuous motion signal within the detection field Make sure that the TIME setting is not set to the maximum Make sure that the power corresponds to the instructions Make sure that the temperature near the SENSOR cannot change rapidly caused by air condition, central heating, ..2) TIME ADJUSTMENTThe TIME adjustment determines how long the FLOODLIGHT will stay on after the last motion has been detected. Turn the motion SENSOR TIME knob counter-clockwise to increase (up to about 7 minutes) the amount of TIME the FLOODLIGHT will stay on. Turn the motion SENSOR TIME knob clockwise to decrease (down to about 10 seconds) the amount of TIME the FLOODLIGHT will stay on. 3) LUX ADJUSTMENTLUX knob determines at what light level the FLOODLIGHT will start working, so it actually controls the built-in light SENSOR .
9 Temporarily turn the LUX knob counter-clockwise to the moon (dusk) ( )setting In this provisional setting mode the motion SENSOR remains inactive during daylight. At dusk when you find it is the desired night level to start working, simply set it to the position it needs to become operative as daylight ) SENS ADJUSTMENTSENS knob controls the sensitivity, the detection area : lowest sensitivity = detects all motion within 5m, highest sensitivity = detects all motion within 12m. Turn the motion SENSOR SENS knob counter-clockwise to decrease the sensitivity (lowest level = within 5 meters) Turn the motion SENSOR SENS knob clockwise to decrease the sensitivity (highest level = within 12 m)OPERATIONTurn on the wall switch (if applicable).
10 When the SENSOR detects motion , the FLOODLIGHT will automatically turn on. The built-in light SENSOR turns the SENSOR off and on according to the light and time level set by the LUX and TIME does not turn on: Make sure that you have made a correct wiring connection , if the load is correctly and there is 100~230V is poor: Make sure that the LUX knob is correctly set Make sure that the SENS knob is correctly set(also check Settings / 1. test mode / possible problems ) Light remains ON: Make sure that you have made a correct wiring connection Make sure that the TIME knob is correctly set Make sure that the LUX knob is correctly setOthersConsult your local service agent concerning safety, protections, regulations, ..SPECIFICATIONSD etection methodPassive infraredPower requirement85 ~240 V / 50~60 HzLighting LoadMax.