Transcription of Install Shower Base SBI-0518 - Onyx Collection
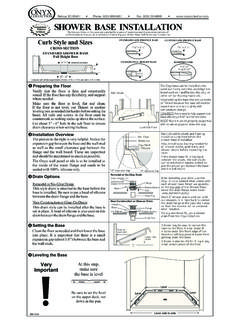
1 Verify that the floor is firm and structurally sound. If the floor has any flexibility, add support where needed. Make sure the floor is level, flat and clean. If the floor is not level, use Thinset or another leveling mix as needed (let harden before setting the base ). All nails and screws in the floor must be countersunk so nothing sticks up above the surface. Cut about 5 - 6 hole in the sub floor to ensure drainclearance when setting the the FloorDrain OptionsInstallation OverviewSTANDARD Shower BASEFull Height BaseCurb Style and SizesCUSTOM LOW-PROFILE BASESTANDARD LOW-PROFILE BASERAMPED CURBL evel Sub FloorWall StudsCROSS-SECTIONCUSTOM FULL HEIGHT BASE4 , 6 or up to 20 111 / to 2 / 44 New Construction or Glue-on DrainRubber WasherDrain PipeFlangeBaseSiliconeSlip WasherSilicone may be used to secure the base to the floor. A small bead of silicone under the front edge of the threshold will help prevent water form getting under the is also helpful for filling in any small uneven areas of the floor.
2 When installing your drain, use the onyx silicone sealant that comes with each Shower base . Never use gaskets where the drain flange seals. Never using plumber s 2 Shower drains work well with our showers. It is important to center the drain flange in the base drain area so that the strainer will be centered when a guaranteed fit, use a Shower drain from the onyx the top side of the Shower base The onyx base can be installed onto wood sub floors, concrete, underlayment board such as HardiBacker, tile, vinyl or other similar flooring setting the base into wet concrete or Thinset because the base will need to expand and contract slightly with temperature change. CONCRETE floors need to fully support the base with only a 5-6 hole for the floors must be properly supported with studs so plywood does not picture to the right is very helpful. Notice the expansion gap between the base and the wall stud as well as the small gap between the flange and the wall board.
3 These are important and should be maintained as much as possible. The onyx wall panel or tile is to be installed to the inside of the water flange and needs to be sealed with 100% silicone or No-Glue DrainRubber WasherDrain PipeNutFlangeBaseCompressionGasketCompre ssion NutWalls should be plumb and framing should be completed before the Shower base is installed. Also, Install wood backing needed for all Shower seats, grab bars, and Shower doors before installing the the Shower base fit is too tight between the studs, the wall studs can be notched or sanded a little to give the proper gap between the base and the wall base INSTALLATIONR emodel or No-Glue Drain: This style drain is attached to the base before the base is installed. Be sure to put a bead of silicone between the drain flange and the Construction or Glue-On Drain: This drain style can be installed after the base is set in place.
4 A bead of silicone is also used on this drain between the drain flange and the tips and hints on this page are compiled from years of experience and the recommendations ofprofessionals, to help you do a perfect job of installing your Shower base , Wall Panels and Accessories111 / to 2 / 44 Installation Videosavailable on our website4 14 /4"DRAIN FLANGE RECESS5 - 6 Setting the BasePush toback wallLower intodrainClean the floor as needed and then lower the base into place. It is important that there is a small expansion gap (about 1/8 ) between the base and the wall , KS 66407(800) 669-9867 Fax: (800) Phone: Leveling the BaseAt this step,make sure the base is levelVeryImportant1/8 Expansion Gap1/4 Clearance GapWall StudSheetrockOnyx PanelBe sure to set the level on the upper deck, not down in the with all the requirements of ANSI and ANSI Helpful Suggestions & SolutionsFor Framing Walk-In Showers, it may be necessary to Install the base before framing the return walls.
5 When framing walls, allow 1/8 spacing for expansion. Also remember to double studs as needed for Shower door in mind stud location and wood backing for accessories such as caddies, seats and grab bars. What to do if a base is not flat:If a base is not flat, it can be corrected by simply laying it on a hard, flat surface overnight with weight on any high points (10-50 lbs. is enough). To flatten the base faster, gradually apply more weight on the high points and heat (normally heat is necessary, an electric blanket, hair dryer or setting outside in a warm temperature will work well). Try to get the temperature to 90 base should flatten within 30 minutes to an dropping tools or tiles on baseSub FloorWall StudsWood Blocks for wall are bonded into the baseDouble Stud for Shower door supportFrame exterior return wallafter base is installedTile - SuggestionsFlooringVinyl Flooring - SuggestionsFlexible Grout or SiliconeUnderlaymentTile FloorSub FloorFloor JoistsSub FloorFloor JoistsFlexible Grout or SiliconeLaminate or vinyl Flooring Runs Under BaseLay base flatApply weight as neededWarped BaseFinish flooring materials can run up to or under the Shower tile flooring, suggested installation is to run the tile up to the onyx base and put grout (flexible type grout is preferred)
6 Or onyx color-matched sealant where the tile meets the vinyl flooring, suggested installation is to Install the vinyl before the base and put a bead of silicone where the base meets the damage to base :Most damage occurs when a tool or other object, such as a wall tile, is dropped on the base . This damage can be repaired, but it is best to prevent this by covering the Shower base with a drop cloth, cardboard, or a piece of OSB board or plywood (when a lot of tile work is being done this may be a good idea). Also, watch for screws, dirt, or other debris that can fall onto the base and will possibly cause scratches if stepped on. Cleaning and CareYour onyx products can be cleaned using almost any liquid household cleaner (except those that have abrasive particles in them which can scratch the onyx surface). We offer a cleaner and surface protector (Eliminate and Repel), but most quality cleaning products you can buy locally will work well.
7 After cleaning, use Repel or Gel Gloss to make future cleaning easier. For heavy cleaning, a soft brush can be , ventilation is important to help reduce water spots and mineral deposits, so keep doors open when possible. Belvue, KS 66407(800) 669-9867 Fax: (800) Phone: Shower base INSTALLATIONF inishing and FlooringFraming for Walk-In Custom BasesCLEANERV ideosInstallation videos for Shower bases and most of the onyx products are available on our website. Trapped / Longstanding WaterIf left for long periods of time, wet soap bars, bottles, or Shower mats etc. can trap water under them, can cause water penetration. If this whichhappens, simply move the item to allow that area to dry out . Move and clean under these type of items routinely.