Transcription of 18 WALL 14MOUNT SHOWER SEAT 17 5/8” 16”
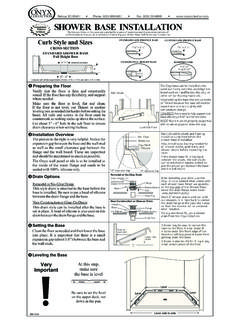
1 Belvue, KS 66407(800) 669-9867 Fax: (800) Phone: Wall PreparationDrilling the HolesSeat LocationAttaching the SeatWALL MOUNT SHOWER SEATS ecuring & SealingWood backing is needed to support the SHOWER Seat. Install the backing as seen in the picture to the right. Use a 2 x 10 for the wood backing. Mount the backing so that its center is about 16 high off the floor. This will allow for the finished seat height to be 16 to 20 tall. If installing the Extended Corner Seat, be sure to extend the wood backing at least 24 from the the SHOWER wall is installed, position the corner seat at the desired height (normally between 17 and 19 above the base). Mark the wall through the pre-drilled holes under the seat for the hole step may require a second person to help. An easy test for how tight the bolts should be is to sit on the seat and listen for it to move (a squeaking sound). Tighten the bolts until the seat does not , having a bottle of rubbing alcohol and roll of paper towels ready will help clean up any silicone that may squeeze drill bits can be used when drilling through Onyx wall enlarging the clearance hole, be careful not to drill into the wood backing.
2 Apply Onyx Silicone Adhesive to the back of the seat before attaching to wall. (The silicone does help support and keep the seat from shifting).Hold the seat in position and insert the lag bolts through the holes. Tighten the bolts in sequence using a 9/16 socket wrench. The bolts should be tightened so that the seat will not move when sitting on it (It squeaks when it moves).After holes are marked, pre-drill 1/4 pilot holes through SHOWER walls and into wood blocking. Then enlarge just the hole through the SHOWER wall (panel or tile) by drilling a clearance lag bolts used in the following step require the clearance hole through the SHOWER the seat is secured in place, use the Onyx color matched seamfill to fill the seams between the seat and the tape on the SHOWER wall and marking the location if the top of the seat may be helpful to maintain the correct height when marking for the 2 x 10 wood backer should be secured soundly to the wall studs. If using the Extended Corner Seat, be sure the wood backer extends to accommodate all the mounting holes in the seat.
3 To smooth out a seamfill bead with your finger, dampen a paper towel with rubbing alcohol and then dampen your finger. Next, run your finger along the bead of seamfill, wiping any excess silicone onto the paper rubbing alcohol will keep the silicone from Seat HeightCornerSeat17 - 19 2 x10 Wood BackerPre-Drill holes in Onyx Wall PanelsApply Onyx adhesiveto back of seatApply Onyx ColorMatch Silicone 1814 18"26"Middle of 2x10 is 16 above floor5 17 /816 126/ 8 WLMTST-0718 Installation Videosavailable on our website3/8" x 3 " Lag Bolts Steel & RubberSealingWashersBelvue, KS 66407(800) 669-9867 Fax: (800) Phone: 43/8 63/8 63/8 141/4 141/4 22 121/8 121/8 43/8 14 Corner SeatBolt Hole Spacing18 Corner SeatBolt Hole Spacing63/8 63/8 141/4 141/4 18 x 26 Extended Corner SeatBolt Hole Spacing63/8 63/8 141/4 141/4 22 Right Side18 x 26 Extended Corner SeatBolt Hole SpacingLeft SideWLMTST-0916