Transcription of Installation Instructions - GenerLink
1 Model MA23/24 - N/S Designed to fit most 200 Ampere Ring or Ring-Less meter cans. This version has been configured for Installation in a four-jaw meter can. Please read these Instructions carefully before beginning the Installation . Installation Instructions Installation Instructions GLOBAL POWER PRODUCTS 225 Arnold Road Lawrenceville, GA 30044 Phone: Copyright 2004 by Global Power Products, Inc. All rights reserved No part of this manual may be reproduced or transmitted in any form or by any means, electronic or mechanical, including photocopying, recording, or by an information storage or retrieval system without the prior written permission of Global Power Products unless such copying is expressly permitted by federal copyright law.
2 Address inquiries to: Global Power Products 225 Arnold Road Lawrenceville, GA 30044 Step 4 Install the meter and secure with a locking ring. Step 4 GenerLink has been thoroughly tested and has been found to be in compliance with the National Electrical Safety Code as it applies to utility control equipment. For additional information, contact: Technical Support, Global Power Products, Inc 770-736-8232. Step 3 NOTICE By breaking this seal, you agree to the following: You will not attempt to remove, repair, or in any way modify this GenerLink unit.
3 You will allow authorized utility representatives to access this GenerLink unit as determined by them to be necessary. You accept and agree to all Terms and Conditions set forth in the Operating Manual relating to GenerLink . If you do not accept the Terms and Conditions do not break this seal and follow the Instructions in the Operating Manual to arrange for removal of the GenerLink . L001A The license label, shown below, is not to be removed during Installation . This label has been attached to GenerLink and should only be removed by the homeowner.
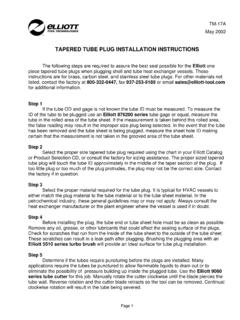
4 NOTICE! ! BEFORE YOU START To perform this Installation you will need the following tools and fasteners: #6 / #8 Hi-lugs or Split Nuts (For attaching Ground) Socket Set Step 3 Connect the neutral/ground leads together. Insert GenerLink by carefully aligning with the jaws of the meter can and pushing the blades firmly into the jaws. Check for normal utility presence with the indicator lights on GenerLink . For normal utility presence, the green light is illuminated with or without the yellow light. Secure GenerLink with a locking ring. Step 2 Install the Neutral/Ground lead connection from GenerLink .
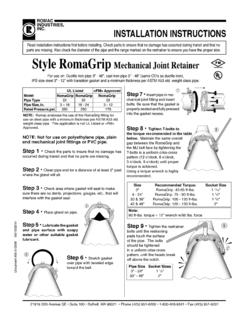
5 Depending on the type of meter can, either a #6/#8 Hi-lug or a split-nut ground connection should be used. The grounding method selected should be consistent with local codes and standards for your area. Step 2b Split-nut Ground Installation Step 2a Hi-Lug Ground Installation HIGH VOLTAGE 240-Volt potential exists across the top jaws when GenerLink is installed in a meter can. DANGER! ! Section 2 - Installation in Ring-Style Meter Cans Installation of GenerLink is fast and easy. For installations in ring style cans, the procedure (shown in Figure 1) is as follows: Step 1 Remove the meter can cover.
6 Figure 1 Step 1 GenerLink allows for the interconnection of a 120/240 volt generator with a continuous output of 30 Amperes or less. Any source connected to GenerLink that does not meet this criteria or exceeds this rating could cause serious operator injury or damage GenerLink . WARNING! ! The warranty on GenerLink is null and void should the device be opened, dismantled, modified, altered, or changed in any way during Installation , normal operation or removal. The warranty is also null and void should GenerLink be installed in a non-compatible meter base or used improperly.
7 GenerLink must be installed and operated in accordance with the following Installation Instructions and the GenerLink Operating Manual. NOTICE! ! HIGH VOLTAGE Installation of GenerLink must only be performed by properly trained technicians. Do not proceed with this Installation unless you have been authorized by your local electric utility to do so. DANGER! ! HIGH VOLTAGE 240-Volt potential exists across the top jaws when GenerLink is installed in a meter can. DANGER! ! Step 4 Step 5 NOTE: GenerLink has been designed for Installation with a wide variety of meter cans.
8 In some cases, the cover will fit tightly to GenerLink as it rotates. Do not attempt to cut, file or otherwise modify GenerLink in order to facilitate this step. Modifications will jeopardize the security of the Installation and will void the warranty. Step 5 Install and secure the meter with a locking ring. Step 1 Section 1 - Installation in Ring-less Style Meter Cans Installation of GenerLink is fast and easy. For installations in ring-less style cans, the procedure (shown in Figure 1) is as follows: Step 1 Remove the meter can cover. Step 2 Install the Neutral/Ground lead connection from GenerLink .
9 Depending on the type of meter can, either a #6/#8 Hi-lug or a split-nut ground connection should be used. The grounding method selected should be consistent with local codes and standards for your area. Step 2b Split-nut Ground Installation Step 2a Hi-Lug Ground Installation Step 3 Connect the neutral/ground leads together. Insert GenerLink by carefully aligning with the jaws of the meter can and pushing the blades firmly into the jaws. Check for normal utility presence with the indicator lights on GenerLink . For normal utility presence, the green light is illuminated with or without the yellow light.
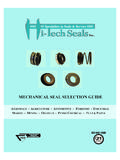
10 HIGH VOLTAGE 240-Volt potential exists across the top jaws when GenerLink is installed in a meter can. DANGER! ! Step 4 Step 4 Position the Meter Can Cover over GenerLink as shown in the diagram below. Rotate the cover over GenerLink and position into place for closure. Step 3