Transcription of Style RomaGrip Mechanical Joint Retainer - romac.net
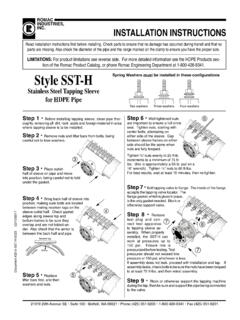
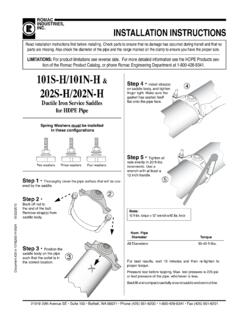
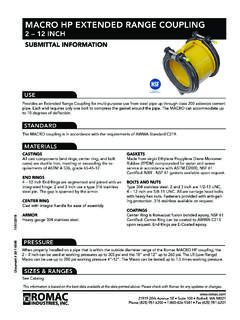
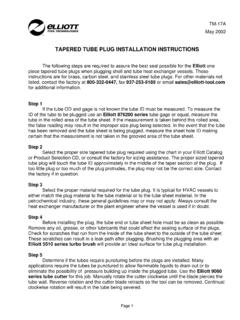
1 installation INSTRUCTIONSROMACINDUSTRIES, installation instructions first before installing. Check parts to ensure that no damage has occurred during transit and that no parts are missing. Also check the diameter of the pipe and the range marked on the restrainer to ensure you have the proper #05-9-0008 06/19/201421919 20th Avenue SE Suite 100 Bothell, WA 98021 Phone (425) 951-6200 1-800-426-9341 Fax (425) 951-620198 Style RomaGrip Mechanical Joint RetainerFor use on: Ductile iron pipe 3" - 48", cast iron pipe 3" - 48" (same OD's as ductile iron), IPS size steel 3" - 12" with transition gasket and a minimum thickness per ASTM A53 std. weight class pipe. Step 1 Check the parts to insure that no damage has occurred during transit and that no parts are 2 Clean pipe end for a distance of at least 2" past where the gland will 3 Check area where gasket will seat to make sure there are no dents, projections, gouges, etc.
2 , that will interfere with the gasket seal. 46 Step 4 Place gland on 7 Insert pipe in me-chanical Joint fitting and insert bolts. Be sure that the gasket is properly seated and fully pressed into the gasket 5 Lubricate the gasket and pipe surface with soapy water or other suitable gasket 6 Stretch gasket over pipe with beveled edge toward the bell. Step 8 Tighten T-bolts to the torque recommended in the table below. Maintain the same overall gap between the RomaGrip and the MJ bell face by tightening the T-bolts in a uniform criss-cross pattern (12 o clock, 6 o clock, 3 o clock, 9 o clock) until proper torque is achieved. Using a torque wrench is highly recommended. Step 9 Tighten the restrainer bolts until the restraining pads touch the surface of the pipe.
3 The bolts should be tightened in a uniform criss-cross pattern, until the heads break off above the notch. Pipe Size Socket Sizes 3" - 24" 1 1/4" 30" - 48" 2"Note:90 ft-lbs. torque = 12" wrench w/90 lbs. force Size Recommended Torque: Socket Size 3" RomaGrip : 45-65 ft-lbs. 1 1/16" 4 - 24" RomaGrip : 75 - 90 ft-lbs. 1 1/4" 30 & 36" RomaGrip : 100 - 120 ft-lbs. 1 5/8" 42 & 48" RomaGrip : 120 - 150 ft-lbs. 2"NOTE: Not for use on polyethylene pipe, plain end Mechanical Joint fittings or PVC pipe. RNOTE: Romac endorses the use of the RomaGrip fitting for use on steel pipe with a minimum thickness per ASTM A53 std. weight class pipe. This application is not UL Listed or <FM> , INSTRUCTIONS21919 20th Avenue SE Suite 100 Bothell, WA 98021 Phone (425) 951-6200 1-800-426-9341 Fax (425) 951-6201 COMMON installation PROBLEMS1.
4 T-Bolts are not tightened to the proper Rocks or debris between pipe and Dirt or debris between pipe and restraining Dirt on threads of bolts or Restraining bolt heads not snapped Not enough pipe inserted into Not using a transition gasket when using the RomaGrip on IPS size steel pipe. 8. Using the RomaGrip on IPS size steel pipe with wall thickness thinner than ASTM A53 std. weight class Check diameter of pipe to make sure you are using the correct size RomaGrip ; also check gasket to make sure it is the size you think it Be sure to clean pipe of as much dirt and corrosion as possible in the area that the gasket will Lubricate both the gasket and the pipe end with soapy water or approved pipe lubricant per ANSI/AWWA C111 Make sure no foreign materials lodge between gasket and Avoid loose fitting wrenches, or wrenches too short to achieve proper Keep threads free of foreign material to allow proper Take extra care to follow proper bolt tightening procedures and torque recommendations.
5 Bolts are often not tightened enough when a torque wrench is not For best results, once T-bolts are properly torqued, wait 10 minutes and retighten proper torque. 9. Be sure that the gland is centered around the Pressure test for leaks before Backfill and compact carefully around pipe and Some initial axial movement may occur in lug Style restraints as the lugs seat. Movement is directly related to the size of the piping system and the system pressure. In general terms movement of approximately " can be expected in restraints under 16 . For larger sizes, movement of approximately may be seen. If this is critical to your application please contact Romac Engineering for additional RESTRAINER MUST BE REMOVED1. Make sure pipe is not pressurized.
6 Removing the restrainer could cause the pipe Joint to separate. 2. To remove the RomaGrip restrainer, use a 5/8" hex wrench or To reassemble, follow installation procedures. For 3-24" tighten the restraining bolts using a 5/8" hex wrench to 75 ft-lbs. minimum. For 30 - 48" tighten the restraining bolts using 15/16" hex wrench to 110 - 135 ft-lbs. Style RomaGrip Mechanical Joint Retainer