Transcription of Instruction Manual / Manuel d’instructions/ …
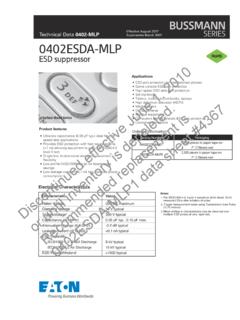
1 Instruction Manual / Manuel d' instructions / instrucciones Questions?/ Des questions?/ Preguntas? 1-800-334-6871 PACKAGING CONTENTS/CONTENIDO DEL PAQUETE. A. Motion detector B. (3) Wire nuts Detector de (3) Tuercas movimiento para alambre MS180 (Bronze). MS180W (White). determined by turning the equipment off and on, the user is encouraged to try to ENGLISH correct the interference by one or more of the following measures: - Reorient or relocate the receiving antenna. ITEMS REQUIRED Fig. 1 - Increase the separation between the equipment and receiver. - Connect the equipment into an outlet on a circuit different from that to which the (Purchase separately) receiver is connected. Phillips screwdriver - Consult the dealer or an experienced radio/ TV technician for help. Outdoor weatherproof silicone caulking WARNING: FCC Regulations state that any unauthorized changes or 1-, 2- or 3-hole junction box coverplate (Fig.)
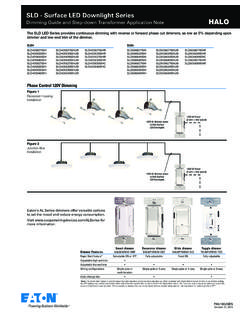
2 1) modifications to this equipment not expressly approved by the manufacturer Compatible coverplates could void the user's authorization to operate this equipment. HOW IT WORKS Up to SAVE THESE instructions . Your motion activated floodlight senses heat images from 70 feet objects such as people, large animals and automobile engines. FOR BEST RESULTS. When motion is detected, the lights will automatically turn Fig. 1. Install your fixture 8-12 feet above the ground. on. Once motion has stopped, the lights will turn off after a (Motion sensor is less sensitive above 12 feet.). preselected time delay. Your motion activated floodlight may also be used as a standard floodlight. Locate fixture so motion moves across detection zone (Fig. 1). IMPORTANT SAFETY instructions 180 degrees Locate sensor away from heat producing sources to When using product, basic precautions should always be followed, including the following: prevent false triggering.
3 Also be very careful not to include objects such as windows, white walls and Heed all warnings, including below warnings AND those included on product. water in the detection zone. For outdoor use only. Locate sensor away from moving objects such as cULus LISTED for wet location. trees, large shrubs and street traffic. Disassembling your fixture will void the warranty. Do not install more than one motion detector on one wall switch. WARNING COMMON WALL AND EAVE. MOUNTING APPLICATIONS Fig. 2. Read and follow these instructions . Total wattage of light bulbs connected to the motion detector cannot exceed 300 watts incandescent/tungsten / halogen. CAUTION. Connect fixture to a 120 volt, 60 Hz power source. Any other connection voids the warranty. Fixture should be installed by persons with experience in household wiring or by a qualified electrician. The electrical system, and the method of electrically connecting the fixture to it, must be in accordance with the National Electrical Code and local building codes.
4 For proper operation and protection against damage, the motion sensor head adjustment knobs must be facing the ground. MINIMUM 90 C SUPPLY CONDUCTORS. WARNING: Total wattage of light bulbs connected to motion detector cannot exceed This device complies with Part 15 of the FCC Rules. Operation is subject to the 300 watts incandescent/tungsten/halogen. following two conditions: (1) This device may not cause harmful interference, and (2) this device must accept any interference received, including interference that may cause undesired operation. Under Part 15 of the FCC Rules, any changes or ASSEMBLING AND WIRING YOUR. modifications to the motion detector described in this Instruction sheet that are MOTION DETECTOR. not expressly approved by Cooper Lighting, LLC could void the user's authority to WARNING: Risk of electric shock. Disconnect operate the equipment.
5 Your fixture mounts power at fuse or circuit breaker before installing to the following NOTE: This equipment has been tested and found to comply with the limits for or servicing. a Class B digital device, pursuant to Part 15 of the FCC Rules. These limits are standard junction boxes: 1. Turn off the power at the main fuse/breaker box. designed to provide reasonable protection against harmful interference in a residential installation. This equipment generates, uses and can radiate radio 2. Screw motion detector arm into the desired hole on frequency energy and if not installed and used in accordance with the instructions , junction box coverplate. may cause harmful interference to radio communications. However, there is no 3. Attach all lampholders or light fixtures to the guarantee that interference will not occur in a particular installation. If this equipment coverplate as required by light fixture instructions .
6 Round Octagonal does cause harmful interference to radio or television reception, which can be 1. 4. Connect the wires together. Connect all white Fig. 3. wires together (house wire, detector wire, and Problem Cause / Solution Junction lamp fixture white wires) using wire nuts provided. B. box Light Light stays ON at There is motion in the detection zone. Connect black lamp wires to red wire from the fixture night and does Make sure the sensor is not picking up moving objects such as detector. Connect black house wire to black wire trees, traffic, etc. not turn OFF. from the detector (Fig. 3). Reposition the sensor. 5. Attach fixture to the junction box according to light Unit is in override mode (if there is no motion). fixture instructions . Turn the light switch to the OFF position for 40 seconds, and 6. Apply silicone caulk around the edges of coverplate then turn back to the ON position.
7 This will send the unit back and any open screw holes for a watertight seal. into the Auto mode. 7. Insert bulb(s) according to light fixture instructions . 8. Turn on power at main fuse/breaker box. B B Light The light given from the unit's own lamp is affecting the continuously motion sensor. OPERATING YOUR FIXTURE blinks ON and Re-aim the lamp. 1. Set dial to TEST (Fig. 4). Fig. 4 OFF at night. Reposition motion sensor. 2. Turn on the power to fixture. Allow fixture to warm up approximately 40 seconds before testing. A Light is ON The controls on the bottom of the motion sensor are in TEST mode. 3. Aim sensor head toward desired detection area, during the day. Change dial setting (not TEST mode). maintaining a 5 down angle to allow moisture The motion detector is shadowed. to drain. Reposition motion sensor. NOTE: Maintain air spacing between lamps and sensor Cannot activate Surrounding external ambient light is too bright.
8 (If so, the unit may head, at least 2 in. Make sure sensor head is positioned think it is daytime.). with control switches facing towards the ground. dusk to dawn mode at night Re-aim the head. 4. Walk across the detection zone at the farthest (override) Relocate or reposition the unit away from the light. distance you wish your detector to detect motion. Not enough time is allowed to enter the dusk to dawn mode. 5. Adjust sensor head angle until you get desired results. Turn power OFF and ON twice within 3 seconds. 6. Set dial to desired time setting. The higher the time setting, the longer the lamps will be There is more than one fixture on an indoor wall switch. ON. (Maximum time is 12 minutes.) If so, put them on separate switches. SELECTING YOUR DESIRED FEATURE 2-YEAR LIMITED WARRANTY. Mode of MODE Knob How to Set THE FOLLOWING WARRANTY IS EXCLUSIVE AND IN LIEU OF ALL OTHER WARRANTIES, Operation Adjustment Power Switch WHETHER EXPRESS, IMPLIED OR STATUTORY INCLUDING, BUT NOT LIMITED TO, ANY.
9 Auto Setting (motion activated) Any setting other Turn the power WARRANTY OF MERCHANTABILITY OR FITNESS FOR ANY PARTICULAR PURPOSE. Lights should turn ON with than TEST to the fixture ON. Cooper Lighting, LLC ( Cooper Lighting ) warrants to customers that, for a period of two years motion only at night and should from the date of purchase, Cooper Lighting's products will be free from defects in materials turn OFF according to the and workmanship. The obligation of Cooper Lighting under this warranty is expressly limited TIME dial setting. to the provision of replacement products. This warranty is extended only to the original Dusk to Dawn Setting Any setting other Turn the power purchaser of the product. A purchaser's receipt or other proof of date of original purchase (activated only at night) than TEST OFF and ON twice acceptable to Cooper Lighting.
10 This is required before warranty performance shall be rendered. Lights should turn ON for 6 hours within 3 seconds. This warranty does not apply to Cooper Lighting products that have been altered or repaired at dusk and then reset to the or that have been subjected to neglect, abuse, misuse or accident (including shipping damages). auto setting mode. This warranty does not apply to products not manufactured by Cooper Lighting which have been Test Setting TEST Turn the power supplied, installed, and/or used in conjunction with Cooper Lighting products. Damage to the Lights should turn ON with to the fixture ON. product caused by replacement bulbs or corrosion or discoloration of brass components are motion both day and night. not covered by this warranty. Lights should turn OFF. after 4 seconds. LIMITATION OF LIABILITY: IN NO EVENT SHALL COOPER LIGHTING BE LIABLE FOR SPECIAL, INDIRECT, INCIDENTAL, OR.