Transcription of Instruction Manual - SINGER Sewing Co.
1 5, 6, 8, 10 Stitch Sewing machine Instruction Manual 5, 6, 8, 10 Stitch Sewing machine Table of Contents 1. Getting To Know Your MachinePrincipal PartsAccessoriesImportant Safety instructions 2. Getting Ready To SewOperating the MachineChoosing and Changing NeedlesChanging Presser FeetChanging the Needle PlateAttaching the Feed CoverRemoving and Replacing theExtension TableFabric Thread and Needle TableWinding a BobbinInserting a BobbinThreading the MachineRaising the Bobbin Thread 3. Straight StitchingStitch Width SelectorNeedle Position SelectorStitch Length SelectorReverse Stitch ButtonAdjusting Thread TensionSewing a SeamStarting a seamDarning QuiltingInserting a Zipper 4.
2 Zig-Zag StitchingStitch Pattern SelectorNeedle Position SelectorStitch Width SelectorAdjusting Stitch LengthNeedle Thread Tension Zig-Zag Zag StitchBlindstitchLadder SeamsMulti Stitch Zig-Zag"M" Stitch 5. Four Step Buttonhole 6. Free-Arm Sewing 7. Twin Needle Sewing 8. Caring For Your MachineRemoving and Replacing the Bobbin CaseChanging the Light BulbCleaning the MachineLubricating the MachineAdditional Accessories Attaching a Button Performance Checklist 5, 6, 8, 10 Stitch Sewing machine Congratulations As the owner of a new SINGER Sewing machine , you are about to begin an exciting adventure in creativity.
3 From the moment you first use your machine , you will know you are Sewing on one of the easiest to use Sewing machines ever made. In addition to the many familiar SINGER exclusives, like a removable extension table and a horizontal spool pin, this machine offers you these features: * Zig-zag stitching for buttonholes, mending and decorative stitches. * Flexi stitch patterns for Sewing knitted and other stretch fabrics. (only for machines with 6, 8 and 10 stitches) * Built-in 4-step buttonholer that takes the difficulty out of making a buttonhole. (only for machines with 5, 6, 8 and 10 stitches) * Blindsitching for invisible hems.
4 (only for machines with 5, 6, 8 and 10 stitches) * Easy to find "Letter-Coded" Accessories. * Drop in front bobbin for easy, quick bobbin replacement. * Simple stitch length dial and push button reverse stitching. * Snap on presser feet that are quickly removed and easily replaced. * One-way needle insertion that makes it impossible to insert the needle incorrectly. May we recommend that, before you start to use your Sewing machine , you discover the many advantages and the ease of operation by going through this Instruction book, step by step, seated at your machine .
5 To ensure that you are always provided with the most modern Sewing capabilities, the manufacturer reserves the right to change the appearance, design or accessories of this Sewing machine when considered necessary. *A Trademark of The SINGER Company Copyright (c) 1992 SINGER Sewing machine Company All rights reserved throughout the world. 3 5, 6, 8, 10 Stitch Sewing MachineDear Customer, We recommend that for future reference you record the Serial Number of your Sewing machine in the space provided. Refer to illustration at right for location of Serial Number on your machine .
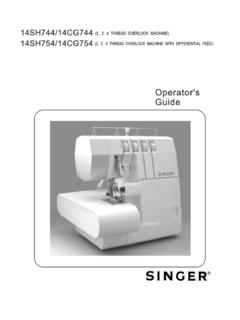
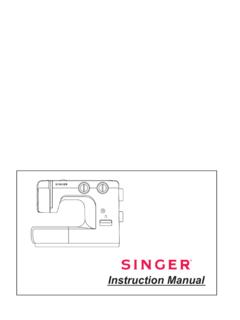
6 Serial European Territories:This SINGER Sewing machine was tested according to European norms and meets the requirements regarding electrical safety radio, interference and electromagnetic immunity. The conformity is documented with the , 6, 8, 10 Stitch Sewing machine 1 Getting to know your machine Principal parts 1. Hand wheel 2. Bobbin winder 3. Pattern selector lever (only for machines with 5, 6, 8 and 10 stitches) 4. Horizontal spool pin and holder 5. Needle position selector 6. Stitch width lever 7. Snap-in thread guide 8. Bobbin winder tension disc 9. Thread guide 10.
7 Take up lever 11. Face plate 12. Needle thread tension dial 13. Thread guides 14. Snap on presser foot 15. Feed system 16. Needle plate 17. One-way needle clamp 18. Removable extension table 19. Stitch length dial/ four-step buttonhole (only for machines with 5, 6, 8 and 10 stitches) 20. Push button reverse 21. Stitch balance control (only for machines with 6, 8 and 10 stitches) 22. Presser foot lifter 23. Thread cutter 24. Slide plate 25. Foot control 26. Electrical lead 27. machine plug 28. Power and light switch 29. Bobbin winding indent 5 5, 6, 8, 10 Stitch Sewing machine Accessories The following accessories furnished with your Sewing machine are designed to simplify your Sewing projects and increase the versatility of your machine .
8 The letter in a circle adjacent to the illustrated part is reproduced on the part itself to help you select the correct attachment for the type of work you are doing. 1. Special purpose presser foot (J) is used for decorative and zig-zag Sewing . (only for machines with 5, 6, 8 and 10 stitches) 2. General purpose needle plate (A) and presser foot (B) are on your machine when delivered. Use together for alternating between straight and zig-zag stitching. 3. Buttonhole presser foot (L) is used with the General Purpose Needle Plate to make four-step buttonholes. (only for machines with 5, 6, 8 and 10 stitches) 4.
9 Zipper foot (E) is used for inserting zippers and stitching corded seams. (only for machines with 5, 6, 8 and 10 stitches) 5. Friction free spool holder is used to hold various size spools and allows thread to unwind smoothly. The spool does not turn. 6. Small thread spool holder (Q) for use with small diameter spools of thread. 7. Needlepack includes an assortment for Sewing various types of fabrics. 6 5, 6, 8, 10 Stitch Sewing Machines Accessories 8. Feed cover (F) is used to prevent the feed from moving the fabric when darning or free motion embroidery. 9. Transparent bobbins for easy viewing of thread supply 10.
10 Blindstitch hem presser foot is used to position the hem for blindstitch hemming. (only for machines with 5, 6, 8 and 10 stitches) 11. Twin needle and spool pin are used to stitch two parallel rows of decorative stitching simultaneously. When using twin-needle for decorative stitching, set stitch width lever to zig-zag mid range. (Optional for some markets). 12. Felt for twin needle spool pin. (Optional for some markets). Optional accessories are available for your machine from your local SINGER retailer. 7 5, 6, 8, 10 Stitch Sewing machine IMPORTANT SAFETY instructions When using this machine , basic safety precautions should always be followed including the following: Read all instructions before using this machine .