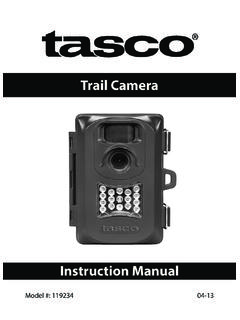
Transcription of Instruction Manual - Tasco
1 03-13 Trail CameraModel #: 119256 CWInstruction Manual3 Page IndexIntroduction 5 Parts & Controls Guide 6-7 Battery and SD Card Installation 8 About the Setup Menu 9 Using the Setup Menu 9 SETUP MENU REFERENCE TABLE 10-11 Camera Operation 12 Mount the Camera 12 Power on the Camera 12 Test the Coverage Area 13 Secure the Camera 13 Viewing the Photos and Videos 14 Glossary
2 15 Technical Specifications 16 Troubleshooting/FAQ 17-204 IMPORTANT NOTEC ongratulations on your purchase of one of the best trail cameras on the market! Tasco is very proud of these cameras and we are sure you will be pleased with yours as well. We appreciate your business and want to earn your trust. Please refer to the notes below and the instructions in this Manual to ensure that you are completely satisfied with this your Tasco Trail Cam does not seem to be functioning properly or if you are having photo/video quality issues, please check the Troubleshooting/FAQ section on pages 17-20. Problems are often due to something simple that was overlooked, or require only changing one setting to your problem continues after trying the solutions in the Troubleshooting/FAQ section, please call Tasco Customer Service at (800) 423-3537.
3 In Canada, call (800) recommends using 4 Energizer Lithium AA batteries in this Trail Cam to obtain maximum battery Not Mix Old and New BatteriesDo not mix battery types-use ALL lithium or ALL batteries are not recommends using SanDisk SD and SDHC Cards (up to 32GB capacity) in this Trail on your purchase of a Tasco Digital Trail Camera. This camera is designed to record animal activity in the outdoors with its still image and movie modes and weatherproof, rugged construction. Your trail cam features a compact, portable size and an extra long battery life. Main Features: MP digital sensor Compact Size (120mm*94mm*46mm) Long Battery Life (Up to 6 months) Trigger Time= seconds or less Automatic IR Filter LCD Display 15 Night Vision LEDs Adjustable Photo Delay: 5~ 59 second ,1~ 10mins (default 10S) Multiple Shot Mode (3 images per trigger) 640*480 at 30 FPS Videos Supports up to 32 GB SD Card Date, Time & Moon Phase Imprint Auto Exposure Auto White Balance Power Supply.
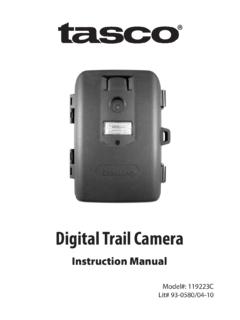
4 4 AA batteries (lithium or alkaline) Mounting Socket for Standard Tripods Weatherproof6 Parts and Controls GuideFront of CameraCamera LensInfrared LED ArrayPIR Motion SensorTripod SocketPadlockHoleIR LED Array DetailPIR Indicator (Setup Mode OnlyLight Sensor7 Control Panel DetailParts and Controls GuideControl Panel (Front Unlatched & Opened)Power SwitchUSB Port LCD DisplaySD Card SlotBattery Compartment8 BATTERY and SD CARD INSTALLATIONYour Tasco Digital Trail Camera is designed to operate using 4 AA batteries. We recommend using Lithium (for longest life) or Alkaline batteries. NOTE: Always set the power switch to the OFF position when installing or removing make sure the batteries are inserted correctly, as indicated inside the battery compartment. Incorrect voltage or polarity (+/-) will damage the camera. Do not mix old and new not mix battery types-use ALL lithium or ALL batteries are not Digital Trail Camera has a memory card slot, to accept SD cards up to 32GB max.)
5 Capacity (sold separately). Inserting an SD card Make sure the power switch is in the OFF position whenever adding or removing memory. Insert an SD card into the card slot completely and oriented correctly as shown by the icon above the slot (label up, contacts facing down and notched corner on the right). To remove the SD memory card, depress the SD card and pull out the card a new, blank SD card is recommended. If the SD card has been used in another device, please make sure to format using the Format option in the Trail Cam s Setup menu before you set the camera to capture photos/videos. New cards are ready to use straight from the THE SETUP MENUS lide the power switch to the On position. You ll see WAIT on the display, then the setup menu screen. Before you start using the camera, you ll no doubt want to set the date/time so they are imprinted correctly on your photos, and maybe change the trigger delay time and image resolution to your preferences.
6 This is done by editing the settings of an item listed in the Setup Menu. To enter the Setup Menu at any time, press the SETUP button (to left of the power switch). USING THE SETUP MENUThe Setup Menu has 5 different items, which appear on a list in the left frame of the display. Here s how to edit (change) the setting of a menu item:1. Select the menu item you want to edit by pressing the UP or DOWN button until the item is blinking. Note: you can see the current/default setting for each item (without changing it) in the main center frame as you move up and down the list of Press the OK You can now select the setting you prefer for the selected item by pressing the UP or DOWN button (do not hold the button down). The setting displayed in the center frame will blink until you press OK to confirm it is the setting you want to To exit the Setup menu at any time, simply press the Setup MENU DISPLAYSELECTED MENU ITEMCURRENT SETTING OF SELECTED ITEMI ndicates Photo (1P or 3P) or Movie ModeBattery Level10 Menu ItemSettings (Bold=default)Description/OperationDates et year, month, and dayPress OK and use the UP/DOWN keys (to change the setting), then press OK again to go to the next date parameter and repeat, to set the current year, month, and day.
7 Press OK after setting the day to move on and set the Time (next item)Timeset hour and minutePress OK and use the UP/DOWN keys (to change the setting) then OK again ( to move to the next field) to set the current hour (24-hr format only, 00 =midnight, 12 =noon) and minutes (0-10) or seconds (5-59)Default delay time= 10 the length of time that the camera will wait until it responds to any additional triggers from the PIR after an animal is first detected and remains within the sensor s range. During this user set ignore triggers interval, the camera will not capture photos/videos. This prevents the card from filling up with too many redundant images. Settings begin with 10 second default time. Press OK, set the delay time in minutes (if desired), press OK and set the delay in following table lists all of the menu items, their available settings, and a description of their functions:11 Menu ItemSettings (Bold=default) (with Mode set to 1P or 3P for photos),5-60 Sec (in Movie (video) modeSelect Mode and press OK.)
8 Use UP/DOWN to select 1P (single photo), 3P (burst of 3 photos), or Movie (video mode). Press OK. Use UP/DOWN to set LO ( MP) or HI (3 MP) still photo resolution (High resolution provides better quality photos, low resolution allows you to store more photos on the SD card), or video length from 5-60 sec. (if video mode was selected).FormatFO/NO,Y/NDeletes (erases) all files stored on a card to prepare it for reuse. Always format a card that has been previously used in other devices. Caution! Make sure you have downloaded and backed up any files on the card that you want to preserve first! Press UP to select FO , press OK, then select Y (Yes) and press OK again to confirm you want to format the card. The extra step and No defaults help prevent accidental erasure of all your you ve finished using the Setup Menu, and are ready to return the camera to normal operating mode, so it will begin to capture photos or videos for you, simply press the Setup button.
9 After you exit the Setup Menu, the display will go blank and the camera is in sleep mode. About 30 seconds later, the camera will begin taking photos or videos when triggered, at intervals determined by the trigger delay time your camera has been setup, you are ready to begin using it to capture photos of activity in the area you choose to locate it. Just follow these steps:CAMERA OPERATION1. Mount the CameraIt is recommended that you mount the camera about 4 or 5 feet ( ~ meters) off the ground, with the camera pointed at a slight downward angle. It s best to avoid mounting the camera facing east or west as the rising and setting of the sun could produce false triggers and overexposed images. Clear branches and other debris away from the front of the camera so as not to block the camera lens or PIR mount the camera in place, insert the strap through the strap slots on the rear housing.
10 Wrap the strap around the mounting surface. Secure the strap and tighten the buckle in order to secure the sure that both door latches are securely locked in place, to ensure proper weather Power On the CameraThe camera will be in sleep status after it has been powered on. When the PIR sensor is triggered, it will start to take photos immediately after the delay time (as set) has OPERATION (continued)3. Test the Coverage AreaOne of the Trail Camera s most useful features is the ability to test the coverage area. After mounting the camera, open the front housing and slide the Power switch to the ON position. Press the SETUP button if necessary to enter the Setup Menu. The PIR indicator light below the lens will blink when you have entered the coverage area. Adjust the camera position as needed and repeat the test until the desired coverage area is achieved.