Transcription of INTRODUCTION TO THE EXCEL SPREADSHEET …
1 Lesson 3: INTRODUCTION to the SPREADSHEET 67 INTRODUCTION TO THE EXCEL SPREADSHEET preparing a gradesheet learning OUTCOMES This tutorial will help you understand what a SPREADSHEET is and where a SPREADSHEET might come in useful for classroom management. Specifically you will learn about the following topics. Understanding the basic concepts of a SPREADSHEET , including: the idea of templates cells, rows and columns cell coordinates entering data into a SPREADSHEET cell Setting up labels, including: setting column widths aligning data in cells entering column and row labels Creating and copying formulas Making changes in a SPREADSHEET inserting rows and columns deleting rows and columns Producing a printed copy of the contents of a SPREADSHEET file Saving a backup copy of your work Appreciating the power of SPREADSHEET templates ESSENTIAL MICROSOFT OFFICE 2000: Tutorial for Teachers Copyright Bernard Poole, Rebecca Randall, 2000.
2 All rights reserved 68 A caveat before you begin: You'll find it easiest to use the tutorial if you follow the directions carefully. On computers there are always other ways of doing things, but if you wander off on your own be sure you know your way back! GETTING STARTED Showing the Full menus Microsoft Office has a silly habit of showing only a few items in the menus when you want to use them. If you want to see the full menus, you have to double click on the menu name, or slide down to the arrows at the bottom of the menu, or, worse still, wait for the full menu to reveal itself, which it will after a few seconds.
3 But for this tutorial, we're going to be using quite a few menu items that do not normally appear when you first click to select a menu. So let's set the Option in Word to Show Full Menus all the time. In the Tools menu, select , then in the dialog box that pops up, select the Options tab Remove the check mark next to the item Menus Show Recently Used Commands First There, now you'll get the full menus all the time. If you find this tip useful, and you're working a lab where you can't permanently set defaults like this, remember to show full menus when you start work using any of the programs in the Office suite (Word, EXCEL , PowerPoint, Access, and so forth).
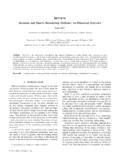
4 If you have your own computer at home, you might like to permanently set this Show Full menus option. It'll save you no end of time and annoyance. Some background Fig. on the next page illustrates a typical school worksheet. As illustrated in Fig. , the leftmost column and the topmost row often are reserved for descriptive labels that identify the value stored in each of the cells in the grid. The rightmost column and lower rows of a set of figures are often set aside for row and column totals respectively. In 1978, Dan Bricklin, a young graduate student at the Harvard School of Business, developed a piece of software called Visicalc which simulated a worksheet.
5 It was the first electronic SPREADSHEET , a prototype of the many varieties of spreadsheets available today. The EXCEL SPREADSHEET is considerably more powerful than Visicalc, able to handle much larger sets of numerical data at greater speeds. Like Visicalc, however, it goes beyond the traditional manual worksheet in so far as it is programmable. You can build instructions into an electronic SPREADSHEET to do relatively complex mathematical calculation and analysis. Lesson 3: INTRODUCTION to the SPREADSHEET 69 Fig. Annotated SPREADSHEET You also can build instructions into the SPREADSHEET to carry out humdrum, repetitive calculations--the kind of calculations which could take hours, even days, to complete manually but which, when done electronically, take a matter of seconds.
6 The EXCEL screen acts as a window onto a large grid of rows and columns into which data is entered, usually from the keyboard. You can build Formulas into selected cells which automatically carry out calculations on designated sets of data. You'll learn how to do that in this lesson. Practice makes perfect As with the word processor, the best way to learn about the SPREADSHEET is to build a SPREADSHEET file and work with it. So here goes. ESSENTIAL MICROSOFT OFFICE 2000: Tutorial for Teachers Copyright Bernard Poole, Rebecca Randall, 2000.
7 All rights reserved 70If you have worked your way through the first two tutorials in this series you will be very familiar with the steps to take to load a component of the Microsoft Office software. Go ahead and open EXCEL . Once EXCEL is loaded you are ready to complete the exercises that follow. You should see a new EXCEL SPREADSHEET file titled Book1 (or some such default name). It is always a good idea to immediately name the file that you are about to create. The outline version of the file you are about to create will be a template for a Put your Data disk in the disk drive, select Save As from the File menu and switch to the 3 1/2 floppy A.
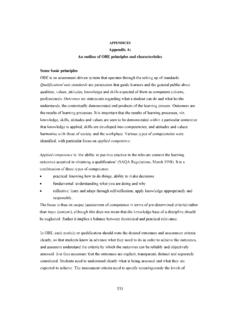
8 Drive In the Save As dialog box, click on the New folder icon and name the new folder spreadsheets Type GradeTmp as the file name for the new SPREADSHEET and click on the Save button You should now be looking at a screen with the name of your file (GradeTmp) at the top of a blank worksheet ready for you to insert your data. HELPFUL HINTS WHILE USING THE SPREADSHEET A SPREADSHEET is a grid divided into columns and rows The intersection of the column and row is referred to as a cell (Fig. ). Fig. Think of the SPREADSHEET as a grid divided into rows and columns 1 A template is an outline or form which can be used over and over as a layout when carrying out other projects that require the same basic file format.
9 Here you are going to build a SPREADSHEET template to simulate an empty gradebook. Once you have created the template, you will keep it as a template on your disk for future use. You will be able to use this template from semester to semester to build the electronic gradesheets for all your classes. Lesson 3: INTRODUCTION to the SPREADSHEET 71 Right now, cell A1 is selected in the top left-hand corner of the SPREADSHEET . This is where information, in the form of a label, number or formula for calculation, will be entered. Labels are made up of text that describes the numbers in the columns and rows.
10 Formulas are mathematical expressions built into certain cells that instruct the computer to carry out calculations on specified sets of numbers in the rows and columns. As you go on with the tutorial, these concepts will become clearer to you. Moving around in the SPREADSHEET Table lists the effect of pressing the keys listed in the first column. Keys Pressed Effect Tab Moves selection to the right to next cell in same row Shift-Tab Moves selection to the left to previous cell in same row Arrow keys Move selection one cell in any direction Shift-Enter Moves selection up to previous cell in same column Enter Moves selection down to next cell in same column Scroll bars Scroll vertically and horizontally through the SPREADSHEET Accept button () Accepts data in cell but does not move to another cell Cancel button (X)