Transcription of IRIScan Express 4 - Capture Tool - IRISLINK.COM
1 IRIScan Express 4 Capture tool User Guide 1. INTRODUCTION .. 1-1 2. USING THE SCANNER PROPERTIES DIALOG BOX (SETUP) .. 2-1 A Glance of the Scanner Properties Dialog Box .. 2-1 Buttons on the Scanner Properties Dialog Box .. 2-2 The Image Tab .. 2-3 The Image Selection Box .. 2-4 Other Image Options .. 2-5 Scanning color images .. 2-9 Scanning grayscale images .. 2-9 Scanning B&W images .. 2-9 Editing Profiles .. 2-10 The Compression Tab (Windows PC only) .. 2-11 The Color Dropout Tab .. 2-12 Color Dropout Selection .. 2-12 Other Color Dropout Options .. 2-13 The Paper Tab .. 2-14 Cropping .. 2-14 Other Paper Selection .. 2-17 The Preview 2-18 The Options Tab .. 2-18 The Setting Tab .. 2-22 The Imprinter Tab .. 2-1 The Information Tab .. 2-1 3. LEGAL INFORMATION .. 3-B 1. Introduction With the Capture tool , you can perform simple scans and view the captured images.
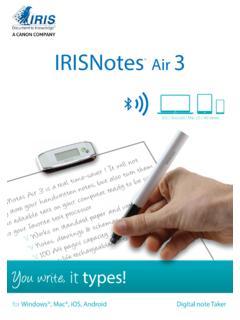
2 On a Windows PC: 1. Start the Capture tool from Start>All Programs> IRIScan Express 4 Scanner. 2. Select your driver type and scanner model and click OK. The Capture tool dialog box will be displayed. On a Mac computer: 1. Click the Capture tool icon on the Desktop. Interface 1. Choose your desired file format from the File Format drop down list box. The choices include JPEG, TIFF, MTIFF, PDF, MPDF, GIF, and BMP. The supported file formats vary depending on your scanner model. 2. Type your desired folder name and file name in the File Path box. 3. Click the Setup button () or choose Setup from the File menu to prompt the Scanner Properties dialog box. 4. From the Image Selection Box, choose your desired image type for your scanned image. (Default is Front B&W) If you have a duplex scanner, choose Front and Rear to scan both sides of your document.
3 5. Click OK to quit the Scanner Properties dialog box. 6. Place your document face up in the feeding slot. Image Selection Box Setup Actual Size Fit Page Scan File Format Save File Path 7. In the Scan Validation dialog box, click the Scan button () or choose Scan from the File menu. 8. The document will be scanned and displayed in the Scan Validation screen. 9. You can view the scanned image Fit to Page () or in Actual Size (100%) (). 10. Click the Close box or Quit from the File menu to exit the Scan Validation tool . 2. Using the Scanner Properties Dialog Box (Setup) In this chapter we provide an overview of the Scanner Properties dialog box (Setup). The Scanner Properties dialog box allows you to configure the scanner s settings. It consists of several tabbed windows each of which will be described in this chapter. Note: In this chapter, all options are described based on a duplex (double-side) scanner.
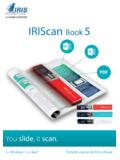
4 If you have purchased a simplex (single-side) scanner, not all options will be available. A Glance at the Scanner Properties Dialog Box 1. Tab Options Choice: Image, Compression (PC), Color Dropout, Paper, Preview (PC), Rotation, Separation, Enhancement, Settings, Imprinter, Information. Note: by default only 4 tabs are shown. To add extra tabs, click the Settings tab and then select the tabs you want to add. 2. Image Selection Box Choose your image type and the side of document you wish to scan. Options vary based on type of scanner. 3. Brightness Adjust the brightness level from 100 to +100. 4. Contrast Adjust the contrast level from 100 to +100. 5. Resolution Determine the quality of the scanned image. The industry standard is 300 dpi. 6. Invert Reverse the color of your scanned image. 7. Scan Source Choice: Auto Document Feeder 8. Defaults Reset all values on the tabs to the factory default settings.
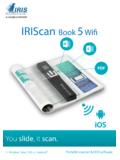
5 3 4 5 6 7 1 2 8 Buttons on the Scanner Properties Dialog Box The buttons on the Scanner Properties dialog box Buttons Description Defaults Click the Defaults button, the factory default settings will be shown on each tab. Scan (PC) After all the scan settings are satisfactory, click the Scan button to start scanning your document. Close Click the Close button to leave the Scanner Properties dialog box. The following table shows the default settings Tab name Default settings Image Image Front B&W Binarization Dynamic Threshold Resolution 300 dpi Invert Blank on White Scan Source Auto Document Feeder Threshold None Brightness None Contrast None Compression None Color Dropout None Paper Cropping Automatic Deskew Yes Orientation Portrait OverScan Unit Inch Preview None Options Rotation Degrees None Blank Page Removal None Image Control Option None Setting Show Scanning Progress No Show Warning Message No Imprinter None The Image Tab The Image tab allows you to choose the front side and (or) the rear side of your document, the type of image, andconfigure several basic scan settings.
6 Note that except for the resolution, you can set individual scan settings for the front side and the rear side. For example, all settings in the Image tab, Compression tab and Color Dropout tab can be set individually for the front and the rear side. However, the settings in the Paper tab, the Options tab (Rotation, Separation, Enhancement), and the Settings tab have to be the same for the front and rear side. The Image tab dialog box The Image Selection Box The Image Selection box includes the image type and document side option. If you wish to scan both the front side and the rear side of your color document, you can check both Front Color and Rear Color at the same time. Note that the options vary based on type of scanner. Example 1 Scanning a two-sided color document, both sides in color Side/Image Selection Front Rear Example 2 Scanning a two-sided color document, one in B&W (Drop Blue Color Threshold 10, Background 79), the other in color Side/Image Selection Front Rear Image Type Description Color Choose Color if you wish to scan a color image for your original in color.
7 Gray Choose Gray image if your original contains actual shades of gray. B&W Choose B&W if your original contains only text, pencil or ink sketch. B&W Gray Color Front/Rear Auto Color Detection: Click to automatically detect and scan the front or the rear page of your color document in color image mode. If your document is in colors, the scanner will automatically scan the document into a color image. If your document is non-color, you can choose the output to be either B&W or Gray from the Non-Color Selection option. This option is useful when you have a mixture of color and non-color document. Note: If you choose Front Rear Auto Color Detection, you can not specify the image mode of your rear page and vice versa. Sensitivity of Auto Color Detection If your documents contain primarily B&W text and a small amount of light or pale colors and you do not wish them to be recognized as color image to save the file size, you can reduce the sensitivity value by moving the bar to the left to let these images to be detected as B&W.
8 The value ranges from 1 to 100. The default is 37. Other Image Options Binarization This is the process of converting a grayscale or color image to a bi-tonal image. There are several different methods of performing this conversion. Options: Dynamic Threshold, Fixed Processing, Halftone 1~5, Error Diffusion. Dynamic Threshold: Selecting Dynamic Threshold allows the scanner to dynamically evaluate each document to determine the optimal threshold value to produce the highest quality image. This is used to scan mixed document containing faint text, shaded background, or color background with a single setting. If Dynamic Threshold is selected, Threshold, Brightness, and Contrast are not available. Sensitivity of Dynamic Threshold Occasionally your scanned image may contain small dots or speckles. To remove these spots, increase the sensitivity value by moving the bar to the right.
9 The value ranges from 1 to 30. The default is 20. Fixed Processing: Used for black-and-white and other high contrast documents. A single level is set to determine the black-and-white transition. The threshold is programmable over the entire density range. Fixed Processing sets Contrast to 0. If Fixed Processing is selected, Contrast is not available. Halftone: In addition to the black and white display, Halftone can present a somehow gray shade of image by using different size of dots. Halftone image looks like the picture we have seen in the newspaper. Options include Halftone 1, Halftone 2, Halftone 3, Halftone 4, Halftone 5. Error Diffusion: Error Diffusion is a type of Halftone. Error Diffusion gives good image texture and makes text in images more readable than Halftone. Halftone Image Error Diffusion Image Threshold Used to convert a grayscale image to a bi-tonal image.
10 The value ranges from 0 to 255. A low threshold value produces a lighter image, and can be used to subdue backgrounds and subtle, unneeded information. A high threshold value produces a darker image, and can be used to help pick up faint images. Adjust the threshold setting by dragging the Threshold sliding bar to the left or right to achieve the desired threshold setting. 200 dpi, Threshold:50, Brightness: 0 200 dpi, Threshold:100, Brightness: 0 Gray Document Type: Choice: Normal, Photo, Document Three options of document type are provided when you choose Gray as the image type for your scanned document. Choice: Normal, Photo, Document. Document: Choose Document if your original contains pure text or a mixture of text and graphic since it is an optimal setting for regular business document. When using Document, only Threshold can be adjusted.