Transcription of Jamesbury® Tank Car Ball Valve Inspection Procedure
1 Jamesbury Tank Car ball Valve Inspection Procedure Installation, Maintenance and Operating Instructions IMO-R26EN 2/2016. 2 IMO-R26EN. Table of Contents 1 SCOPE .. 3. 2 WARNINGS .. 3. 3 GENERAL .. 3. 4 Valve CLEANING .. 3. 5 GENERAL Valve Inspection .. 3. Sealing Area Criteria.. 3. 6 DETAILED Inspection OF. Valve COMPONENTS .. 4. ball .. 4. Stem.. 4. Cap/Insert .. 5. Body .. 6. 7 TESTING .. 8. READ THESE INSTRUCTIONS FIRST! These instructions provide information about safe handling and operation of the Valve . If you require additional assistance, please contact the manufacturer or manufacturer's representative. Addresses and phone numbers are printed on the back cover. See also for the latest documentation. SAVE THESE INSTRUCTIONS! Subject to change without notice. All trademarks are property of their respective owners.
2 IMO-R26EN 3. 1 SCOPE 5 GENERAL Valve Inspection . This manual contains guidance for inspecting Jamesbury Valve components shall be replaced using ONLY OEM. tank car ball Valve components and determining their parts. acceptability for continued service. These instructions shall be used in conjunction with the specific Installation, Maintenance and Operation (IMO) manual for the ball Inspect all ball Valve components for damage before Valve under repair. reassembling Valve . 2 WARNINGS Proper lighting shall be used when inspecting parts. Inspection mirrors may be used to achieve necessary angle of view. PRIOR TO READING THESE INSTRUCTIONS, READ AND UNDERSTAND. THE SPECIFIC IMO FOR THE TANK CAR Valve BEING REPAIRED. Sealing Surfaces are areas on the Valve components which are critical to the Valve sealing performance.
3 Sealing FOLLOW ALL DISASSEMBLY INSTRUCTIONS IN THE SPECIFIC IMO FOR surfaces are shown in Figures 2 through 6. No damage as THE TANK CAR Valve BEING REPAIRED. defined in sealing area criteria ( ) shall be allowed on these surfaces. IF YOU HAVE ANY QUESTIONS CONCERNING THE USE, APPLICATION OR COMPATIBILITY OF THE Valve WITH THE Functional Surfaces are areas on the Valve components INTENDED SERVICE, CONTACT METSO FOR MORE INFORMATION. which are critical to the Valve performance, fit and/or assembly of the product. Functional surfaces are shown in DO NOT EXCEED THE Valve PERFORMANCE LIMITATIONS! Figures 2 through 6 as dotted line. EXCEEDING THE PRESSURE OR TEMPERATURE LIMITATIONS. MARKED ON THE Valve IDENTIFICATION PLATE MAY CAUSE. DAMAGE AND LEAD TO UNCONTROLLED PRESSURE RELEASE.
4 Sealing Area Criteria: DAMAGE OR PERSONAL INJURY MAY RESULT. Corrosion- Pitting and/or raised corrosion products on WHEN HANDLING THE Valve ASSEMBLY, TAKE ITS WEIGHT INTO sealing surfaces are not acceptable. ACCOUNT! PLACE LIFTING DEVICES SECURELY AROUND THE. Valve BODY. FAILURE TO FOLLOW THESE INSTRUCTIONS MAY Staining- Staining is light corrosion that can be visually RESULT IN DAMAGE OR PERSONAL INJURY FROM FALLING PARTS. detected but not felt with a fingernail. Staining is acceptable on seat sealing areas. 3 GENERAL Scratches- Scratches are visually noticeable, mechanical damage, deep enough to catch a finger nail in. Damage All used soft goods (seats, packing, seals, bearings, and o- that will catch a fingernail or that produces raised rings) shall be replaced with using OEM parts.
5 For a list of material (such as dents) are not acceptable in sealing repair/service kits, see the specific IMO manual for the ball areas. Valve under repair. Light scratches- Light scratches are scratches that can be WARNING visually detected and can be felt with a fingernail but in which the fingernail does not catch . Light scratches can THE USE OF NON-OEM PARTS IN THE REPAIR OF A JAMESBURY TANK be acceptable in static sealing areas only when oriented CAR ball Valve CAN RESULT IN POOR PERFORMANCE, INCREASED concentric to the seal and not across the seal (which could MAINTENANCE FREQUENCY AND/OR FIELD FAILURES RESULTING IN provide a path for leakage past the seal). EQUIPMENT DAMAGE OR PERSONAL INJURY. Rub Marks- Rub marks are marks that typically appear in the ball wiping zone.
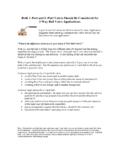
6 The marks can be visually detected 4 Valve CLEANING but not felt with a fingernail and are acceptable on ball sealing and wiping zones. All Valve components shall be clean and free of debris. Valve shall be cleaned using a media compatible solution. Damage- Damage consists of scratches, galling, pitting, cracks, corrosion and /or voids. Cleaning methods shall not damage the components or their sealing surfaces. 4 IMO-R26EN. 6 DETAILED Inspection OF Valve Visually inspect the stem drive slot in the ball for damage. COMPONENTS Marking of surfaces is acceptable. Material which has been raised up or deformed is not acceptable and considered damage. Any other damage in the non-working zone is ball acceptable. Visually inspect the spherical surface for surface damage in the sealing and wiping zones.
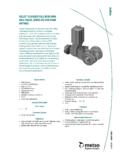
7 These zones are shown in Stem Figure 1. Sealing and functional surfaces are shown in Figure 2. Zones on ball : Visually inspect stem for galling. No galling is allowed 1. Sealing Zone- where the seat sits on the ball in the closed position. Visually inspect packing or stem seal area and thrust bearing area sealing surfaces. No damage is allowed in 2. Wiping Zone- path of the seat contact as the ball is these areas. rotated between open and shut. If stem has threads, visually inspect the threads and gage 3. Non-Working Zone- area that is never in contact with threads for damage. No thread damage is allowed. the seats. Damage on threads may not be repaired. WIPING ZONE. SEALING ZONE. NON-WORKING ZONE. WIPING ZONE. SEALING ZONE. Figure 1: Typical ball Sealing Area LEGEND: Seal Surface (Solid Line) Functional Surface Figure 2: Typical Stem Sealing and Functional Areas IMO-R26EN 5.
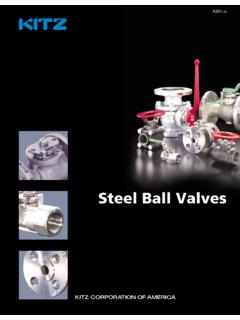
8 Cap/Insert If equipped with phono-grooves, visually inspect them for damage. Sealing and functional surfaces are shown in Figures 3, 4. If equipped with NPT threads, visually inspect and gage and 6. threads for damage. Visually inspect body seal sealing areas as shown below If insert threads into body, visually inspect the threads for for damage. damage. Visually inspect seat sealing areas per Section and Dry fit insert into the body thread to check fit. Figure 6. Visually inspect the sealing surface between the Valve and Tank car for damage. LEGEND: Seal Surface (Solid Line) Functional Surface See Figure 6. Figure 3: Typical Insert Sealing and Functional Areas LEGEND: Seal Surface (Solid Line) Functional Surface See Figure 6. Figure 4: Typical Cap Sealing and Functional Areas 6 IMO-R26EN.
9 Body damage. Dry fit the insert into the body threads to check fit. Sealing and functional surfaces are shown in Figure 5 and 6. Where a seal is used between the Valve body and the tank car, visually inspect the sealing surface between the Valve and tank car for damage. Visually inspect body seal, packing, and thrust bearing seal areas for damage. Visually inspect thrust bearing area for wear or galling. Visually inspect seat sealing area per Section and Figure 6. If equipped with threaded holes, visually inspect them for damage. If equipped with phono-grooves, visually inspect them for damage. If the body has threaded fasteners, gage the threads for damage. Replace any fastener where the threads are damaged, or have been heated, stretched or corroded. If insert threads into body, visually inspect the threads for LEGEND: Seal Surface (Solid Line) Functional Surface See Figure 6.
10 Figure 5: Typical Body Sealing and Functional Areas Seat to Body Sealing Area areas. Metso recommends that all repairs be confirmed by gas testing each rebuilt Valve for shell and seat leakage. The seat seal against the body occurs at the transition of the angle on the back of the seat (see Figure 6). This band of continuous sealing area and must meet the sealing area criteria. The location of the sealing band varies for each ball Valve model, size and seat material. Dimensions for each Jamesbury Tank Car ball Valve are provided in Table 1. The repair facility must use their own judgement and experience when evaluating damage severity in sealing IMO-R26EN 7. Sulphur Valve Barrier Seat Xtreme (-9J), PTFE (-50), Material Code -47. MTFE (-49) (9 RETS, 9 RELS, SUZRC, SUZRL, SUZRS).