Transcription of Kodak DryView 8900 Laser Imager Release 3 User …
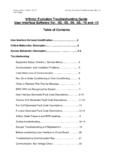
1 Kodak DryView 8900 Laser Imager Release 3 User GuideEastman Kodak Company343 State StreetRochester, NY 14650 Eastman Kodak Company, 2006 Kodak and DryView are trademarks of Eastman Kodak number 1275593 Rev. FTable of ContentsJanuary 10, 20065E6155iii1 Safety and Related InformationSafety, Warnings, and Cautions .. 1-1 Safety Labels .. 1-6 Safety and Health 1-11 Safety .. 1-12EU Directives .. 1-17CE 1-18 User Guide Conventions .. 1-18 Please Note .. 1-192 Overview Product Description .. 2-1 System Components .. 2-2 How the Laser Imager 2-33 Operation and MaintenanceSystem Power Up, Shut Down, and Energy Save .. 3-1 Power 3-1 Restart / Shut Down.
2 3-2 Energy 3-2 Levels of User Access .. 3-3 Power 3-3 Using the Touch Screen Local Panel .. 3-4 Status Screen .. 3-4 Main Menu .. 3-6 Door Control 3-7 System Functions 3-8 System Information Screen .. 3-9 Version Information .. 3-10 Job Management Screen .. 3-11 View 3-12 Image Sources Screen .. 3-14 Opening the Left Front Door .. 3-14 Opening the Right Front 3-14 Opening the Film Drawers .. 3-14iv5E6155 January 10, 2006 Table of ContentsFilm Drawers and Front Door Manual Override Latches .. 3-14 Opening the Hood .. 3-16 Loading Film Cartridges .. 3-18 Recycling Empty Film Cartridges .. 3-19 Requesting a Calibration Test 3-19 Requesting a Density Test Print.
3 3-19 Requesting a QC Step Wedge .. 3-20 Printing a DVM ( DryView Mammography) Test Pattern .. 3-20 Evaluating DVM Test Patterns .. 3-21 Automatic Image Quality Control (AIQC).. 3-21 Operating in Manual Mode .. 3-21 Operator Maintenance .. 3-23 Cleaning the Laser Imager .. 3-23 Installing a New Charcoal Filter .. 3-23 Preventive 3-25 Key Operator Information .. 3-26 Key Operator 3-26 Setting Time and Date .. 3-27 Audible Alarm (On/Off) .. 3-29 Selecting 3-30 Changing Dmax .. 3-32 Deleting Print Jobs .. 3-34 Scheduling the Automatic Energy Save Mode .. 3-36 Image Resizing Icons .. 3-394 TroubleshootingStatus and Error Messages .. 4-1 Local Panel Status Messages.
4 4-1 Local Panel Error Messages .. 4-3 Operator Actions .. 4-4 Clearing Film 4-25 Manually Closing the Film Cartridge Lid .. 4-26 Film Pickup Problems in Area 1U, 1M, or 1L .. 4-26 Clearing Film Jams from Area 4-27 Clearing Film Jams from Area 4-28 Clearing Film Jams from Area 4-29 Table of ContentsJanuary 10, 20065E6155vClearing Film Jams from Area 5 .. 4-31 Clearing Film Jams from Area 6 .. 4-32 Calling for 4-335 SpecificationsDimensions .. 5-1 Laser 5-2 Operating Environment .. 5-2 Storage Environment .. 5-2 Environmental 5-2 Film Sizes .. 5-3 Film 5-3 Film Throughput .. 5-3 Agency Compliance .. 5-36 Film Technical InformationGeneral Description.
5 6-1 Spectral Sensitivity .. 6-1 Image 6-2 Automatic Image Quality Control .. 6-2 Environmental 6-3 Storing and Handling Undeveloped Film .. 6-3 Handling Developed 6-3 Archiving Developed Film .. 6-4 Exposing to Moisture .. 6-4 Dissipating 6-4 Dissipating 6-5 Recycling Film .. 6-5 Appendix A: Quality Control ProceduresCompliance Guide - Quality Control for Laser Imagers Used in Digital Mammography A-1 Automatic Image Quality Control and the QC Process .. A-1 Running a QC Baseline Test .. A-2 Procedure for the Installing Field A-2 Procedure for the QC Technologist .. A-2 Baseline A-2vi5E6155 January 10, 2006 Table of ContentsRunning a Daily QC Test.
6 A-5 Appendix B: Warranty and Limitation of LiabilityImportant Notice to User License Agreement (EULA) ..B-2 Eastman Kodak Company Health Group Software End User License Agreement ..B-2 License ..B-2 Limited Warranty ..B-3 Limitation of Remedies .. Government Restricted Rights ..B-4 End-User License Agreement for Microsoft Desktop Operating Product and Special Provisions for Austria, New Zealand or Papua New Guinea - Express and Special Provisions for England Scotland, Wales and Ireland - Limited and Special Provisions for Canada - Limited Warranty ..B-15 GARANTIE ET DISPOSITIONS PARTICULI RES POUR LE CANADA GARANTIE LIMIT E ..B-16 Warranty and Special Provisions for the United States of America and any Other Country - 10, 20065E61551-11 Safety and Related InformationSafety, Warnings, and CautionsPlease read and understand all instructions before using this product.
7 RISK OF ELECTRIC SHOCK:This equipment is operated with hazardous voltage which can shock, burn, or cause death. Remove wall plug before servicing equipment. Never pull on cord to remove from outlet. Grasp plug and pull to disconnect. Only perform maintenance that is described in this User Guide. To avoid exposure to dangerous voltage, Laser beam, or other danger, do not attempt to service or repair the Laser Imager yourself. Always call an Authorized Service Provider of Kodak products for any service or repair. Do not operate equipment with a damaged power cord. Do not use an extension cord to power this equipment. Do not operate equipment with any of the safety interlocks overridden.
8 Position the power cord so it will not be tripped over or pulled. Connect this equipment to a grounded wall :This equipment contains moving parts that may be accessible to the user. Loose clothing, jewelry or long hair may cause personal injury or damage to the equipment. Do not operate equipment with the covers open. Do not operate equipment with any of the safety interlocks overridden. 1-25E6155 January 10, 2006 Safety and Related InformationWARNING:This equipment is not contained in a sealed cabinet. Do not use this equipment in locations where it can come in contact with liquids, including body :Do not use a cell phone within 2 meters of a Laser Imager .
9 This proximity includes any Imager behind a wall adjacent to your :Do not use a microwave oven within 4 meters of a Laser Imager . Electromagnetic radiation from a microwave oven is only an issue if after the oven door is closed and latched, the seal does not maintain an electromagnetic tight fit between the oven door and oven main housing. Determining if the seal has an electromagnetic tight fit requires special detection :Do not use in the presence of flammable anesthetics, oxygen, or nitrous oxide. This equipment does not have a gas-sealed electronics enclosure and could ignite any flammable or explosive gases present in its and Related InformationJanuary 10, 20065E61551-3 CAUTION:This equipment is intended to connect to other medical devices.
10 Only an Authorized Service Provider of Kodak products may perform installation and service maintenance. This device is NOT to be located within the patient environment. Therefore, the equipment must not be located closer than meters from a patient bed or :This device should not be used in close contact with MRI devices, due to possible very high magnetic fields near an MRI unit. For magnetic field specifications, see "Operating Environment" on page :Do not substitute or modify any part of this equipment without prior written approval of Eastman Kodak Company. CAUTION:Federal law prohibits dispensing without a :This equipment has been tested and found to comply with the limits for a Class A digital device, pursuant to part 15 of the FCC Rules.