Transcription of Lab: Basic OSPF Configuration Lab - ut
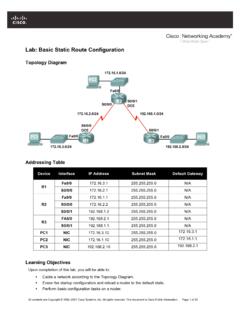
1 All contents are Copyright 1992 2007 Cisco Systems, Inc. All rights reserved. This document is Cisco Public Information. Page 1 of 14 Lab: Basic OSPF Configuration Lab Topology Diagram Addressing Table Device Interface IP Address Subnet Mask Default Gateway Fa0/0 N/A S0/0/0 N/A R1 S0/0/1 N/A Fa0/0 N/A S0/0/0 N/A R2 S0/0/1 N/A Fa0/0 N/A S0/0/0 N/A R3 S0/0/1 N/A PC1 NIC PC2 NIC PC3 NIC CCNA Exploration Routing Protocols and Concepts: OSPF Lab: Basic OSPF Configuration Lab All contents are Copyright 1992 2007 Cisco Systems, Inc.
2 All rights reserved. This document is Cisco Public Information. Page 2 of 14 Step 1: Configure the routers On the routers, enter global Configuration mode and configure the hostname as shown on the chart. Then configure the console, virtual terminal lines password (both cisco ) and privileged EXEC password ( class ): Step 2: Disable DNS lookup Router(config)#no ip domain-lookup Step 3: Configure the interfaces on R1, R2, and R3 Configure the interfaces on the R1, R2, and R3 routers with the IP addresses from the table under the Topology Diagram. Step 4: Verify IP addressing and interfaces Use the show ip interface brief command to verify that the IP addressing is correct and that the interfaces are active.
3 Step 5: Configure Ethernet interfaces of PC1, PC2, and PC3 Configure the Ethernet interfaces of PC1, PC2, and PC3 with the IP addresses and default gateways from the table under the Topology Diagram. Task: Configure OSPF on the R1 Router Step 1: Use the router ospf command in global Configuration mode to enable OSPF on the R1 router. Enter a process ID of 1 for the process-ID parameter. R1(config)#router ospf 1 R1(config-router)# Step 2: Configure the network statement for the LAN network. Once you are in the Router OSPF Configuration sub-mode, configure the LAN network to be included in the OSPF updates that are sent out of R1.
4 The OSPF network command uses a combination of network-address and wildcard-mask similar to that which can be used by EIGRP. Unlike EIGRP, the wildcard mask in OSPF is required. Use an area ID of 0 for the OSPF area-id parameter. 0 will be used for the OSPF area ID in all of the network statements in this topology. R1(config-router)#network area 0 R1(config-router)# Step 3: Configure the router to advertise the network attached to the Serial0/0/0 interface. R1(config-router)# network area 0 R1(config-router)# Step 4: Configure the router to advertise the network attached to the Serial0/0/1 interface.
5 CCNA Exploration Routing Protocols and Concepts: OSPF Lab: Basic OSPF Configuration Lab All contents are Copyright 1992 2007 Cisco Systems, Inc. All rights reserved. This document is Cisco Public Information. Page 3 of 14 R1(config-router)# network area 0 R1(config-router)# Step 5: When you are finished with the OSPF Configuration for R1, return to privileged EXEC mode. R1(config-router)#end %SYS-5-CONFIG_I: Configured from console by console R1# Task: Configure OSPF on the R2 and R3 Routers Step 1: Enable OSPF routing on the R2 router using the router ospf command.
6 Use a process ID of 1. R2(config)#router ospf 1 R2(config-router)# Step 2: Configure the router to advertise the LAN network in the OSPF updates. R2(config-router)#network area 0 R2(config-router)# Step 3: Configure the router to advertise the network attached to the Serial0/0/0 interface. R2(config-router)#network area 0 R2(config-router)# 00:07:27: %OSPF-5-ADJCHG: Process 1, Nbr on Serial0/0/0 from EXCHANGE to FULL, Exchange Done Notice that when the network for the serial link from R1 to R2 is added to the OSPF Configuration , the router sends a notification message to the console stating that a neighbor relationship with another OSPF router has been established.
7 Step 4: Configure the router to advertise the network attached to the Serial0/0/1 interface. When you are finished, return to privileged EXEC mode. R2(config-router)#network area 0 R2(config-router)#end %SYS-5-CONFIG_I: Configured from console by console R2# Step 5: Configure OSPF on the R3 router using the router ospf and network commands. Use a process ID of 1. Configure the router to advertise the three directly connected networks. When you are finished, return to privileged EXEC mode. R3(config)#router ospf 1 CCNA Exploration Routing Protocols and Concepts: OSPF Lab: Basic OSPF Configuration Lab All contents are Copyright 1992 2007 Cisco Systems, Inc.
8 All rights reserved. This document is Cisco Public Information. Page 4 of 14 R3(config-router)#network area 0 R3(config-router)#network area 0 R3(config-router)# 00:17:46: %OSPF-5-ADJCHG: Process 1, Nbr on Serial0/0/0 from LOADING to FULL, Loading Done R3(config-router)#network area 0 R3(config-router)# 00:18:01: %OSPF-5-ADJCHG: Process 1, Nbr on Serial0/0/1 from EXCHANGE to FULL, Exchange Done R3(config-router)#end %SYS-5-CONFIG_I: Configured from console by console R3# Notice that when the networks for the serial links from R3 to R1 and R3 to R2 are added to the OSPF Configuration , the router sends a notification message to the console stating that a neighbor relationship with another OSPF router has been established.
9 Task: Configure OSPF Router IDs The OSPF router ID is used to uniquely identify the router in the OSPF routing domain. A router ID is an IP address. Cisco routers derive the Router ID in one of three ways and with the following precedence : 1. IP address configured with the OSPF router-id command. 2. Highest IP address of any of the router s loopback addresses. 3. Highest active IP address on any of the router s physical interfaces. Step 1: Examine the current router IDs in the topology. Since no router IDs or loopback interfaces have been configured on the three routers, the router ID for each router is determined by the highest IP address of any active interface.
10 What is the router ID for R1? _____ What is the router ID for R2? _____ What is the router ID for R3? _____ CCNA Exploration Routing Protocols and Concepts: OSPF Lab: Basic OSPF Configuration Lab All contents are Copyright 1992 2007 Cisco Systems, Inc. All rights reserved. This document is Cisco Public Information. Page 5 of 14 The router ID can also be seen in the output of the show ip protocols, show ip ospf, and show ip ospf interfaces commands. R3#show ip protocols Routing Protocol is "ospf 1" Outgoing update filter list for all interfaces is not set Incoming update filter list for all interfaces is not set Router ID Number of areas in this router is 1.