Transcription of Lecture 1 Class Introduction, Microsoft Word …
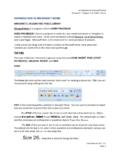
1 Lecture 1 Class introduction , Microsoft Word Essentials Class introduction 1. Verify students can login with their ONID user accounts 2. Complete a name card for the instructor 3. Misc.: Lab chair and flat panel monitor adjustment for height 4. Look at the Class website a. Grades will be updated every other Saturday from the beginning of Class i. Your six-digit number will be issued with your first graded assignment 5. Submit homework each week by email to a. Homework is due at 9PM on Thursday b. Specific instructions to submit the homework is located at the bottom of each homework assignment i. Submit MS Office files only 1. Google Docs, Sheets, Slides, Drawings, or PDF files will not be accepted ii. Pay special attention to the file and subject naming convention 6.
2 Provides free supplemental learning material 7. Notes are allowed on all exams a. Recommend taking notes on a printed copy of the homework assignment Microsoft Word: Navigation, Basic Formatting 8. Open T:\teach\Classes\FOR112\ 9. Understand the different components of the window ( ribbon, groups, toggles, switches) 10. There are certain keyboard shortcuts that you will be required to learn and utilize in this course. You ll have the opportunity to adopt many more! a. REQUIRED .. Ctrl + Z .. Undo in many applications. b. Ctrl + Scroll the Mouse Wheel .. zooms in/out in many applications 11. Navigating a Word document a. Arrow keys move the Insertion Point b. Ctrl key + Left/Right Arrow moves to the next word c.
3 Ctrl key + Home/End moves to the start or end of a document d. Ctrl key + PageUp/PageDown moves to beginning of previous or next page 12. Status Bar at bottom of the screen a. Look at the right side of the status bar: the icons are shortcuts to different views and there is also a slider control for zooming in/out on a document. Check out the View tab on the ribbon for related Viewing options ( - displaying a ruler). b. Right-click the status bar to customize what you see in the status bar. Select the Section option so we can always see what the current section number is as we navigate a document. 13. Selecting Text (incorrectly referred to as highlighting at times) a. Double-click on a word to select the entire word.
4 Triple-click to select its paragraph b. Click in the left margin to select an entire line. Double-click in the same margin area to select an entire paragraph. 14. Show/Hide formatting. Click on this icon in the ribbon . What the heck is that thing? It s called a pilcrow! The icon toggles between showing the end-of-paragraph markers and other hidden formatting ( spaces, tabs, page breaks, etc.). a. When you can see a page break, you can select it and click Delete to remove it. b. Ctrl + Enter is a quick way to insert a page break. 15. When it comes to formatting documents, note that formatting is typically applied at one of three levels: font, paragraph, and section. Section formatting is also referred to as Page Layout formatting.
5 A. Font-level formatting can apply to just a single character in your document. Examples include bold, italic, font, font size, and font color. b. Paragraph-level formatting applies to an entire paragraph. Examples include indentation, alignment, and line spacing. c. Section-level formatting applies to an entire section. Examples include margins, orientation (portrait or landscape), and columns. 16. Line Spacing Home tab, Paragraph group, this Keyboard shortcut for line spacing: Ctrl + 1 for single spacing; Ctrl + 2 for double spacing. TRY IT: Change the line spacing of a paragraph in the document to spacing 17. Font Formatting a. Select text and use the Quick Menu that semi-transparently appears to the upper right.
6 You can also use the icons on the Home tab. b. More options on the Font group dialog launcher. c. Use the Format Painter (icon is on the Home tab, Clipboard group and looks like ). Place the insertion point in the middle of a format you want to copy, click the Format Painter icon once, and then select text that you want to change. NOTE: If you want to repeatedly apply the same formatting to a non-contiguous range, you can double-click the Format Painter icon. Your mouse pointer will continue to act as a Format Painter tool until you press the <Esc> key to get out of this repeat paint mode. 18. Section Formatting aka Page Setup a. Found on the Page Layout tab of the ribbon (or double-click the vertical ruler) b. Orientation Portrait or Landscape.
7 Margins and Columns are there, too. 19. Homework: Get an early start on Homework #1 which is accessible through the website calendar. Make sure to submit it on time. Late assignments are penalized 20%, no late work will be accepted after 5 days past the due date. 20. Reminder: Always logout from your computer in the classroom!