Transcription of Little House on the Prairie - Andover Fabrics
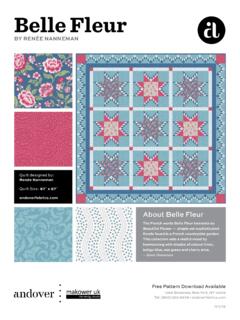
1 Little House on the Prairie Prairie Flowers BY KATHY HALL. Double Wedding Ring quilt designed by: Lucy A. Fazely quilt Size: 54" x 70". Little House ON THE Prairie and associated character names and trademarks are owned and licensed by Friendly Family Productions, LLC. All rights reserved. 2015 Friendly Family Productions, LLC. Free Pattern Download Available 1384 Broadway New York, NY 10018. Tel. (800) 223-5678 5/15/15. Double Wedding Ring quilt Introducing Andover Fabrics new collection: Little House on the Prairie Prairie FLOWERS by Kathy Hall quilt designed by Lucy A. Fazely quilt finishes 54" x 70". 12 Blocks: 16" x 16". As charming as a country lane in the springtime, these floral prints bring a fresh look to the traditional Double Wedding Ring pattern.
2 Color placement is consistent in all the blocks, although you may want to mix up the placement a bit. Just be sure to use the same red and yellow prints at the corners for a lively design. Making the quilt Fabric Requirements 1. From each Fabric A 7" x 8" rectangle, cut 2 curved Yardage Fabric corner patches as shown in Diagram 1 (96 total Fabric A blocks 22 yards 7926-L. patches). Fabric B blocks f yard 7926-Y. Fabric C blocks 4 yard 7949-Y. Fabric D blocks, border 12 yards 7951-R. 20 Prints blocks fat 4 yard ea. 7947-B *7947-K 7947-N 7948-B. 7948-R 7948-Y 7949-B 7949-E Fabric 7". 7949-G 7949-K 7949-N 7949-P A. 7949-T 7950-C 7950-Y 7951-B 6". 7951-G 7952-B 7952-K 7952-T. *Backing 32 yards 7947-K 8". Diagram 1.
3 Cutting Directions 2. Referring to Diagram 2, position 5 print wedges to Note: Read assembly directions before cutting make an arc. Sew wedges together. Hint: Begin the patches. All measurements are cut sizes and include line of stitching at the inside curved edge and sew to 4" seam allowances. A fat 4 is an 18" x 21"-22" cut. the outside curve for more control. Make 24 arcs Borders are cut the exact lengths required plus 4" alike ( set 1). Press seam allowances in one direc- seam allowances. WOF designates the width of fabric tion (Diagram 3). Repeat with 5 different wedges to from selvedge to selvedge (approximately 42" wide). make a second arc. Make 24 arcs alike (set 2). Fabric A Cut (48) rectangles 7" x 8" (see Step 1).
4 Fabric B Cut (48) melon patches Fabric C Cut (48) squares 22" x 22" for block corners Fabric D Cut (6) strips 32" x WOF, pieced to make the following: (2) borders 32" x 642". (2) borders 32" x 542" Diagram 2. Cut (7) strips 22" x WOF for binding Cut (48) squares 22" x 22" for block corners 20 Prints From each: Cut (24) wedge patches Backing Cut (2) panels 39" x 62", pieced to fit quilt top Diagram 3. with overlap on all sides Page 2 of 6 Free Pattern Download Available at 5/15/15. Double Wedding Ring quilt 3. Referring to Diagram 4, with right sides together, pin the center of a Fabric A Curved curved corner patch to the center of a pieced arc from set 1. Pin each end, and corner gently stretch the inside curve to match the outside curve.
5 Clip the inside curve 8" into the seam allowance as needed. Stitch with a 4" seam (Diagram 5). Diagram 4. Press the seam allowance toward the Fabric A patch. Repeat on the rest of set 1 and set 2 arcs. 4. Sew a Fabric C 22" square to each end of each of the 24 arcs of set 1, noting that the end squares match the edges of the wedges, not the curved corner piece (Diagram 6). The curved corner piece has an extra 4" seam allowance that will be Diagram 5. trimmed later. Press seam allowances toward the newly added end squares. 5. Using a pieced arc from set 2, with right sides together, center and pin a melon patch to an arc. Stretch the arc edge to fit over the curved edge of the melon patch. Stitch with a 4" seam (Diagram 7).
6 Press the seam allowance toward the melon patch. Repeat on all set 2 arcs. 6. Position the 2 parts of the block to see how they go together (Diagram 8). With right sides together, pin the parts at the center of the curves. C C. Diagram 6. Stretch the pieced arc over the melon patch, and match the seams of the Fabric C corner squares with the seam where the melon meets the other pieced arc. Stitch and press the seam allowance toward the melon patch. 7. Trim the unit to a square by cutting off the excess seam Melon allowance of the curved corner patches (Diagram 9). Ideally, the unit should measure 82" from raw edge to raw edge, but if it's smaller, that's okay. As long as all the units measure the same size square, it doesn't Diagram 7.
7 Matter what size they are. Make 24 Unit Y and trim to the same size square. 8. Repeat steps 2-7 with the remaining 10 prints, using Fabric D 22" squares in Step 4 (Diagrams 10 and 11). Make 24 Unit Z and trim the same size as Unit Y. 9. Join 2 Unit Y and 2 Unit Z as shown in the Big Block diagram. Press seam allowances open. Make 12 Big Blocks 10. Referring to the quilt Diagram, make 4 rows of 3. blocks each, positioning the blocks as shown. Join the rows. Diagram 8. Trim 11. Sew longer Fabric D borders to the sides, and sew shorter borders to the top and bottom. Finishing the quilt Trim 12. Layer the quilt with batting and backing and baste. quilt in the ditch around borders and block Trim patches. quilt as you wish inside the Fabric A.
8 Trim Diagram 9 Unit Y Make 24. Page 3 of 6 Free Pattern Download Available at 5/15/15. Double Wedding Ring quilt Unit Y Unit Z. Diagram 10. Unit Z Unit Y. Big Block Make 12. D D. Diagram 11. Unit Z Make 24. quilt Diagram Page 4 of 6 Free Pattern Download Available at 5/15/15. Double Wedding Ring quilt Prepare Templates: Check the length of the Curved Corner Template to be certain you are printing at 100%. Trace Wedge Template templates onto template plastic and cut out along solid lines. Label each template and store templates in a zip lock bag. Melon Template 6". Curved Corner Template These long edges of the template have 2" seam allowances. The blocks will be trimmed. This wider seam allowance ensures your blocks will be square.
9 Page 5 of 6 Free Pattern Download Available at 5/15/15. Little House on the Prairie Prairie Flowers BY KATHY HALL. 7947-B* 7948-B* 7951-B* 7952-B*. 7950-C*. 7947-K* 7948-R* 7951-G* 7952-K*. 7950-E. 7947-N* 7948-Y* 7951-R* 7952-T*. 7950-Y* 7949-B* 7949-E* 7949-G* 7949-K*. 7926-L* 7926-Y* 7949-N* 7949-P 7949-T* 7949-Y*. *Indicates Fabrics used in quilt pattern. Fabrics shown are 50% of actual size. Free Pattern Download Available 1384 Broadway New York, NY 10018. Tel. (800) 223-5678 5/15/15.