Transcription of Maintenance Globe Control Valve Series 1a
1 Pfeiffer Chemie-Armaturenbau GmbH Phone: +49 2152 2005-0 Fax: +49 2152 1580 E-Mail: Internet: of 12EB 01a_ENMaintenanceGlobe Control Valve Series 1aFig. 1 Series 1a Globe Valve with Samson Actuator0. Contents1. Introduction 12. Design, operation and dimensions 23. Installation, start-up and Maintenance 24. Assembly of the Control Valve Assembly of the Valve in DIN version Assembly of the Valve in ANSI version Stroke adjustment 105. Troubleshooting 11 6. Repair of the Control Valve Replacing the bellows Replacing the bellows and packing Readjustment of the stuffi ng box (option) Further repair work 127. Customer inquiries 121. IntroductionThese instructions are intended to assist the user on assembly and repair of Series 1a Con-trol details, as a result of further develop-ment of valves mentioned in these instructions are subject to alteration without notice.
2 The text and illustrations do not necessarily display the scope of supply or any ordering of spare parts. Drawings and graphics are not to related special designs, which are not in accordance with our standard range, are not documents are protected by German copyright laws. The transmission and/or duplication of documents, even excerpts, as well as the use and communication of their content are not permitted unless expressly granted. Offenders will be liable for payment of damages. All rights to exercise in-dustrial property rights are Chemie-Armaturenbau GmbHPfeiffer Chemie-Armaturenbau GmbH Phone: +49 2152 2005-0 Fax: +49 2152 1580 E-Mail: Internet: of 12EB 01a_ENThe equipment may only be dismounted and disassembled by skilled staff who are familiar with the assembly, start-up, and operation of this these Maintenance and assembly instructions, the term skilled staff refers to individuals who are able to judge the responsibilities assigned to them as well as recognize potential hazards due to their specialized training, knowl-edge, and experience as well as their special knowledge of the relevant Design, operation and dimensionsDesign, operation, and dimensions as well as all further de-tails and technical data can be found in Data Sheet <TB 01a> for Control valves in DIN version<TB 01a-an> for Control valves in ANSI Installation, start-up and maintenanceInstructions for the installation, start-up and Maintenance are to be found in Operating Instructions< BA 01a-01 > for pneumatic valves.
3 < BA 01a-02 > for manually operated Assembly of the Control valveThe current DIN versions of the Series 1a Control Valves have a different stem sealing design compared to the current ANSI version, meaning that they cannot be covered by the same DIN Valve version is fi rst described from page 2 on-wards. Refer to the page 6 for the description of the ANSI Valve version. Assembly of the Valve in DIN Preparation for assemblyBefore assembling the Valve , carefully clean all parts and place them on a soft surface (rubber mat or similar). Please note that plastic parts are nearly always soft and very sensitive. Take particular care when handling the sealing sur-faces to ensure that they do not get ! A high-performance grease paste is used dur-ing manufacturing to prevent the screws from cold welding in the bodies ( Gleitmo 805 by Fuchs).Do not use this lubricant with valves intended for oxygen service. Use a lubricant suitable for valves that are free of grease, especially for oxygen !
4 The position and arrangement of the individu-al parts shown in the detail drawing (Fig. 6) are to be observed during Preassembling the Valve bodyPlace the Valve body ( 1 ) with the bonnet fl ange facing down-wards on a fl at, clean working surface to allow easy working access to the bearings in the seat. Clean the PTFE lining of the body with a cleaning PTFE O-ring ( 5 ) into the groove of the Valve ! Depending on the temperature, it may be necessary to shrink it slightly by either using a cool-ing spray or by placing it in the the seat ( 6 ) into the spacer ( 7 ) into the body and onto the seat ( 6 ).Note! Make sure that the through hole in the spacer is aligned properly with inlet port of the Valve . Simi-larly, the top of the spacer must lie fl at with the fac-ing of the body fl a 5 mm hole approx. 10 mm deep into the spacer at an angle from the facing. Thread a piece of PTFE cord ( 12 ) into this drilled hole to secure the spacer against the PTFE washer ( 8 ) on the spacer in the body.
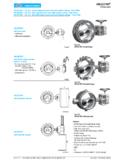
5 Then place the elastomer inlay ( 9 ) onto the PTFE place the bottom fl ange ( 3 ) on the body, making sure the washer ( 8 ) and inlay ( 9 ) fi t bolts ( 22 ) through the bonnet and use the nuts ( 24 ) to position them correctly. Tighten the bolts evenly in an alter-nating !Observe the tightening torques in Table Chemie-Armaturenbau GmbH Phone: +49 2152 2005-0 Fax: +49 2152 1580 E-Mail: Internet: of 12EB 01a_ENNominal sizeDN 25 DN 40 DN 50 DN 80 DN 100 DN 150 Torques10 Nm 15 Nm 25 Nm 30 Nm 30 Nm 40 NmTable 1 Tightening Preassembling the stemApply lubricant to the bottom of the thread of the one-pieced stem ( 14 ).Note! Some versions have a stem consisting of three parts with the guide ready-mounted to the stem with a snap tight the bellows ( 11 ) ready-mounted with washer and Ensat bushing onto the greased thread of the stem( 14 ).Note! Due to the sliding property of PTFE, we rec-ommend using emery cloth to prevent the bellows from slipping when screwing it onto the body1049 / PTFE2 Bonnet fl ange10493 Bottom fl ange10494 Bordered fl angeSt 37 / PTFE5O-ringPTFE6 SeatPTFE7 SpacerPTFE8 WasherPTFE9 InlayUniseal 340010 PlugPTFE11 BellowsPTFE12 CordPTFE13 WasherUniseal F16 Grooved plugSt, yellow ng ringBuna22 Hex boltA2-7024 Hex nutA2-7025 Hex boltA2-7027 Hex nutA2-7028 Hex screwA2-70 Table 2 - List of partsFig.
6 6 - Detailed drawing of Series 1a ValvePfeiffer Chemie-Armaturenbau GmbHPfeiffer Chemie-Armaturenbau GmbH Phone: +49 2152 2005-0 Fax: +49 2152 1580 E-Mail: Internet: of 12EB Assembling the stem for DN 25 to DN 50To neatly push the plug onto the stem, make a small notch in the bellows to let air escape. Push the plug ( 10 ) onto the bellows ( 11 ). Secure the con-nection between plug and bellows with PTFE cord ( 12 ) in-serted as far as it will complete the stem assembly, thoroughly grease the groove of the Assembling the stem for DN 80 to DN 150 / ( 6 )To reduce corrosion, apply grease to the metal side of the bordered fl ange ( 4 ). Push the bordered fl ange over the bel-lows as far as it will neatly push the plug onto the stem, make a small notch in the bellows to let air escape. Push the plug ( 10 ) onto the bellows ( 11 ).Secure the connection between plug and bellows with PTFE cord ( 12 ) inserted as far as it will complete the stem assembly, thoroughly grease the groove of the Preassembling the bonnet fl angePrior to mounting, grease the inside of the bonnet fl ange( 2 ).
7 Thread in the screws ( 28 ) slightly so that they do not jut out inside of the ! Control valves in nominal sizes DN 25 to DN 50 are mounted without the screws ( 28 ).To continue mounting, clamp the bonnet fl ange with the stem guide facing downwards in a the Glycodur bushings. If these have different lengths, insert the shorter bushing ( 15a ) into the stem guide as far as it will go with Loctite using a suitable the longer bushing ( 15b ) until it is fl ush with the inside surface of the bonnet, also with Loctite using a suitable man-drel. Hammer in the grooved pin ( 16 ). Screw in the blanking plug ( 17 ).Insert the washer ( 13 ) into the groove of the bonnet fl ange intended for it. Place the ready-assembled stem into the Final assembly of the Valve ( stuffi ng box in standard version )Carefully place the ready-mounted Valve body on the bonnet fl ! The pneumatic connection ( 17 ) in the bonnet fl ange and the nameplate on the Valve body( 1 ) must face in the same the screws ( 25 ), align and position them using the nuts ( 27).
8 Tighten the screws evenly in an alternating ! Tightening the screws causes the position of the plug to change. Therefore, make sure that the plug remains tightening the screws, move the stem( 14 ) to check that it can still move easily. If the stem gets jammed, the plug, seat and guide could be damaged as a the stuffi ng box by fi rst positioning the washer ( 18 ) and then insert the packing rings ( 19 ) into the bonnet using a special ! Make sure that the packing rings are inserted offset to ensure the divisions of packing rings do not become the wiper ring ( 21 ) into the gland nut ( 20 ). Screw the ready-assembled stuffi ng box ( 20 ) into the bon-net. After tightening it manually, unscrew it by half a turn and retighten it ! Make sure that the packing is pressed neatly and does not bulge through the stuffi ng Final assembly of the Valve ( version with optional adjustable backup stuffi ng box )For the fi nal assembly of the Valve , proceed as described in section , do not unscrew the stuffi ng box ( 20 ) and retighten it.
9 Instead, unscrew it completely and remove it from the !Clean the removed stuffi ng box to ensure it is free of grease. Pfeiffer Chemie-Armaturenbau GmbH Phone: +49 2152 2005-0 Fax: +49 2152 1580 E-Mail: Internet: of 12EB 01a_ENApply Loctite 668 to the thread of the stuffi ng box ( 20 ).Screw the stuffi ng box back into the bonnet fl ! Do screw tight the stuffi ng box. The distance be-tween the collar of the stuffi ng box and the bonnet must be 3 mm! Fig. 7 - Adjustable packingSeal the stuffi ng box with a dot of red point. Assembly of the Valve is now completeWhen the Valve and Samson actuator are delivered sepa-rately, the stroke needs to be adjusted. Refer to section for Chemie-Armaturenbau GmbHPfeiffer Chemie-Armaturenbau GmbH Phone: +49 2152 2005-0 Fax: +49 2152 1580 E-Mail: Internet: of 12EB Assembly of the Valve in ANSI Preparation for assemblyBefore assembling the Valve , carefully clean all parts and place them on a soft surface (rubber mat or similar).
10 Take into consideration, that parts made of plastic are gener-ally soft and sensitive. In particular, the sealing surfaces must be handled with care to ensure that they are not ! To avoid cold corrosion of the screws in the bodies, the manufacturer has used a high-perfor-mance lubricating grease ( Gleitmo 805 from Fuchs).Do not use this lubricant with valves intended for oxygen service. Use a lubricant suitable for valves that are free of grease, especially for oxygen ! The position and arrangement of the individu-al parts shown in the detail drawing (Fig. 8) are to be observed during Preassembling the Valve bodyPlace the Valve body ( 1 ) with the bonnet fl ange facing down-wards on a fl at, clean working surface to allow you to easily access the bearings in the seat. Clean the PTFE lining of the body with a cleaning the PTFE O-ring ( 5 ) into the groove of the Valve ! Depending on the temperature, it may be necessary to shrink it slightly by either using a cool-ing spray or by placing it in the the seat ( 6 ) into the spacer ( 7 ) into the body and onto the seat ( 6 ).