Transcription of MAX Toolbar for Microsoft Dynamics GP
1 Balance Point Technologies, Inc. User Guide MAX Toolbar for Microsoft Dynamics GP V2013 MAX Toolbar for Microsoft Dynamics GP V2013 2 | P a g e Copyright Manual copyright 2013 Balance Point Technologies, Inc. All Rights reserved. Your right to copy this documentation is limited by copyright law and the terms of the software license agreement. As the software licensee, you may make a reasonable number of copies or printouts for your own use. Making unauthorized copies, adaptations, compilations, or derivative works for commercial distribution is prohibited and constitutes a punishable violation of the law. Trademarks Microsoft , Microsoft Dynamics GP, and SQL Server are registered trademarks of Microsoft Corporation or their affiliates. MAX is a registered trademark of Exact Software or their affiliates. Unless otherwise noted, all names of companies, products, street addresses, and persons contained herein are fictitious and are used solely to document the use of this product.
2 Warranty Balance Point Technologies, Inc. disclaims any warranty regarding the sample code contained in this documentation, including the warranties of merchantability and fitness for a particular purpose. Limitation The content of this manual is furnished for informational use only, is subject to change of Liability without notice, and should not be construed as a commitment by Balance Point Technologies, Inc. Balance Point Technologies, Inc. assumes no responsibility or liability for any errors or inaccuracies that may appear in this manual. Neither Balance Point Technologies, Inc. nor anyone else who has been involved in the creation, production or delivery of this documentation shall be liable for any indirect, incidental, special, exemplary or consequential damages, including but not limited to any loss of anticipated profit or benefits, resulting from the use of this documentation or sample code. License Use of this product is covered by a license agreement provided by Balance Point Agreement Technologies, Inc.
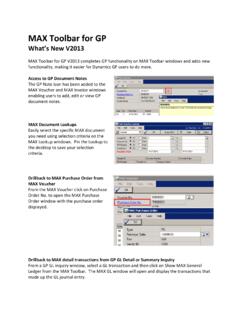
3 With the software product. If you have any questions, please call Balance Point Technologies, Inc. at (847)265-3797. Publication December 2013 Date MAX Toolbar for Microsoft Dynamics GP V2013 Contents 3 | P a g e Contents Purpose 4 System Requirements 4 Database Setup Steps ( Microsoft SQL 2005 or 2008) 4 Removing MAX Drillbacks 10 Installing MAX Toolbar for GP V2013 11 Configuring GP and MAX Toolbar V2013 12 MAX Toolbar for GP 19 Select MAX Company 20 Show MAX General Ledger 21 Show MAX Invoice 22 Show MAX Voucher 23 Show MAX Purchase Order 24 Show MAX Sales History 25 Register MAX Toolbar 26 About MAX Toolbar for GP 27 Customer Maintenance 28 Vendor Maintenance 29 Shipping Method Maintenance 30 Payment Terms Setup 31 MAX Account Type 32 MAX GL Reference 33 MAX Posting Accounts 34 Contact Information 37 Appendix 38 MAX Toolbar for Microsoft Dynamics GP V2013 Database Setup Steps 4 | P a g e Purpose The MAX Toolbar for Microsoft Dynamics GP provides two primary functions.
4 Provide convenient access to MAX transaction details from within GP. Enable users to update master records in multiple MAX companies from GP. System Requirements for MAX Toolbar for GP V2013 Microsoft Dynamics GP 2010 or GP 2013 EXACT Software MAX v5 SQL Server 2005, 2008, or 2012 subject to the GP SQL Server requirements Database Setup Steps Microsoft SQL Server 2005 or 2008 follow the steps below Create a DSN for MAX for each MAX company you want to access from within GP. This can be done by accessing Control Panel > Administrative Tools > Data Sources (ODBC). MAX Toolbar for Microsoft Dynamics GP V2013 Database Setup Steps 5 | P a g e Note: Microsoft Dynamics GP requires a 32 bit DSN. If you are installing on a 64 bit operating system, you must create a 32 bit DSN. To create a 32 bit DSN on a 64 bit machine, follow these instructions. 1. Open the Windows folder and find the C:\Windows\SySWOW64\ file.
5 2. Create a shortcut on your desktop to the file. 3. Rename the shortcut Data Sources (ODBC) 32 bit 4. Move the shortcut to Control Panel Administrative Tools Double click Data Sources (ODBC) 32 bit to launch the ODBC Data Sources Administrator. MAX Toolbar for Microsoft Dynamics GP V2013 Database Setup Steps 6 | P a g e Choose System DSN and then Add. Select SQL Server Native Client and then Finish. MAX Toolbar for Microsoft Dynamics GP V2013 Database Setup Steps 7 | P a g e Enter a DSN Name and Server. Description is optional. The DSN Name you enter here will be used to identify the MAX database within GP. It is helpful to use a name users will associate with the MAX company. Select With SQL Server and then enter the sa or equivalent user id and password. Click Next. MAX Toolbar for Microsoft Dynamics GP V2013 Database Setup Steps 8 | P a g e Select Change the default database to: and select the appropriate MAX company database for your installation.
6 Click Next. Choose Finish. MAX Toolbar for Microsoft Dynamics GP V2013 Database Setup Steps 9 | P a g e Choose the Test Data Source Option. Click OK. Repeat the DSN setup process for each MAX database you will need to access in GP. MAX Toolbar for Microsoft Dynamics GP Removing MAX Drillbacks 10 | P a g e Removing MAX Drillbacks If you have a previous version of MAX Toolbar installed, MAX Toolbar for GP V2013 can be installed over the top of it. If you currently have MAX Drillbacks installed, follow these instructions to remove them prior to installing MAX Toolbar for GP. 1. Remove GP security to the alternate windows. Launch GP. From the Administration list page select Alternate/Modified Forms and Reports. Select the appropriate user id and Exact MAX Lookups as the product. Select Windows as the Type. Remove access to all Exact MAX Lookups alternate windows by selecting the Microsoft Dynamics GP window.
7 2. Remove Drillback options from the shortcut bar by right clicking on each option and choosing Delete. 3. Remove MAX Drillbacks from the Dynamics launch file. Navigate to your file. The default location is c:\Program Files\ Microsoft Dynamics \GP\ Make a copy of the file as a backup by right clicking on the file, clicking Copy and then right clicking in the folder and clicking paste. After making your backup copy, right click on the file and choose Open With. Open with either Notepad or WordPad. The first lines of the file will look like this: 22 0 Microsoft Dynamics GP Reduce the first number by 1. In this example, 22 would be replaced by 21. Scroll down in the file to the lines 1299 EXACT MAX LOOKUP Delete those lines and any blank lines created. Scroll down in the file to the lines that contain Exact and 1299. :C:Program Files/ Microsoft Dynamics /GP9 :C:Program Files/ Microsoft Dynamics /GP9 :C:Program Files/ Microsoft Dynamics /GP9 Delete the three lines that end with , AND Save and close the file.
8 Perform steps 2 and 3 on each Dynamics GP workstation. MAX Drill Back for Microsoft Dynamics GP Installing MAX Toolbar for GP V2013 11 | P a g e Installing MAX Toolbar for GP V2013 NOTE: Initial installation will require all Dynamics GP users to exit the system for a short time. Please verify no users are using Great Plains before continuing. Download the Toolbar chunk file. There are different downloads for GP2010 and GP2013. Be sure to download the correct file. Paste the file into the local GP folder. This is the folder where your file is located. MAX Drill Back for Microsoft Dynamics GP Configuring MAX Toolbar for GP V2013 12 | P a g e Configuring GP and MAX Toolbar V2013 1. Log into GP as sa (or DYNSA ) to Create Tables. You will be prompted to include new code. Select yes and continue. This application creates custom tables in your Dynamics and Company databases.
9 The administrator must log in as the user sa (or DYNSA ) one time for the application to create those tables. 2. Add the folders MAX Toolbar Setup and MAX Inquiries to the shortcut bar. Right click in the shortcut pane and choose Add > Folder. Name the folder MAX Toolbar Setup. Repeat and name the second folder MAX Inquiries. 3. Add Windows to the shortcut bar folders. Right click on the MAX Toolbar Setup folder and choose Add > Add Window. From the scrolling list of available windows, expand MAX Toolbar for GP. Expand System. Select a window to be added and then click Add. Add the following windows: System/About MAX Toolbar for GP MAX Toolbar for Microsoft Dynamics V2013 Configuring GP and MAX Toolbar Module 13 | P a g e System/Register MAX Toolbar System/MAX Company Maintenance System/MAX Account Type System/MAX GL Reference System/MAX Posting Accounts Right click on the MAX Inquiries folder and choose Add > Add Window.
10 From the scrolling list of available windows, expand MAX Toolbar for GP. Select a window to be added and then click Add. Add the following windows: System/MAX Toolbar for GP Purchasing/MAX Purchase Order Purchasing/MAX Voucher Sales/MAX Invoice Financial /MAX GL System/MAX Account Type Inquiry System/MAX GL Reference Inquiry When all windows have been added, click Done. Adding the MAX Toolbar windows to the shortcut bar must be performed for each user or they can be added for a user class and then assigned to the users. 4. Obtain a Registration Key. If you have not been provided with a registration key, go to to request a free 30-day evaluation key or to purchase a registration key. Open the Register MAX Toolbar window from the shortcut menu. Enter the MAX Toolbar Registration Key and click Register MAX Toolbar , then click OK. MAX Toolbar for Microsoft Dynamics V2013 Configuring GP and MAX Toolbar Module 14 | P a g e 5.