Transcription of Nighthawk X6S AC3000 Tri-Band WiFi Range Extender
1 Nighthawk X6S AC3000 Tri-Band WiFi Range ExtenderUser ManualModel EX8000 May 2018202-11758-02350 E. Plumeria DriveSan Jose, CA 95134 USAS upportThank you for purchasing this NETGEAR can visit to register yourproduct, get help, access the latest downloads and user manuals, and join our community. We recommend thatyou use only official NETGEAR support the current EU Declaration of Conformity, visit regulatory compliance information, visit the regulatory compliance document before connecting the power NETGEAR, Inc., NETGEAR and the NETGEAR Logo are trademarks of NETGEAR, Inc. Any non_NETGEAR trademarks are used for reference purposes X6S AC3000 Tri-Band WiFi Range ExtenderContentsChapter 1 OverviewUnpack Your to Use Your the Extender 2 Get StartedInstall the WiFi the Extender and Apply to an Existing WiFi With With the NETGEAR Installation the Extender in Access Point a Device to the Extender a Device to the Extender Network Using a Device to the Extender Network Using an Ethernet-Enabled Device to the In to the Extender After Smart Setup 3 Extender Network SettingsEnable or Disable One WiFi or Disable Smart Connected WiFi the WiFi Network Off the SSID Broadcast to Create a Hidden or Enable the WiFi the WiFi WPS to Add a Computer to the Extender s WiFi WPS With the Push button
2 WPS With the PIN Access to a Computer or WiFi Up an Access the Extender s Device Up the Extender to Use a Static IP the Extender With MAC Filtering or Access 4 Maintain and Monitor the ExtenderChange the Extender admin User Name and Password Protection Off and a Forgotten User Name or Adjust for Daylight Saving Set the Extender Up and Manage the Extender Up the Configuration the Configuration the Extender to Its Factory Default the Reset In and Reset the Extender to Factory the Extender for New Firmware and Update the Upload Firmware to the the Extender the NETGEAR Logo LED On or 5 Share USB Storage Devices Attached to the ExtenderUSB Device a USB Storage Device to the a Storage Device Connected to the Extender From a a USB Device to a Windows Network a Storage Device That Is Connected to the Extender From a the USB Port Off and a Network Folder on a USB Storage a Folder on a USB Storage the Extender USB Port to Share a the Network or Device 6 Use the Extender as a Media ServerSpecify ReadyDLNA Media Server Up the Extender to Work With 7 FAQs and Connect to the Join a WiFi Network and Receive an Error Access the Extender s IP 8 Supplemental InformationFactory Default and Environmental X6S AC3000 Tri-Band WiFi Range Extender1 OverviewThe WiFi Range Extender boosts your existing network Range and speed, delivering Tri-Band chapter covers the following topics.
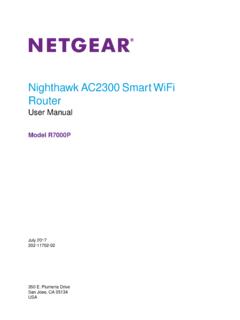
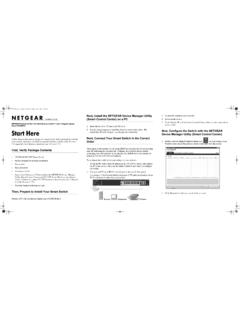
3 Unpack Your Extender LEDs Back Panel When to Use Your Extender How the Extender WorksFor more information about the topics covered in this manual, visit the support website Your ExtenderYour package contains the following 1. Extender package X6S X6S AC3000 Tri-Band WiFi Range Extender (Model EX8000) adapter (varies by region)Overview6 Nighthawk X6S AC3000 Tri-Band WiFi Range ExtenderLEDsThe following table describes the 2. Front panelOverview7 Nighthawk X6S AC3000 Tri-Band WiFi Range ExtenderTable 1. LED descriptionsDescriptionLEDThis LED indicates the WiFi connection between the Extender and the router. Solid white. Best connection. Solid amber. Good connection. Solid red. Poor connection. Off. No connection. Blinking white. The Extender is reseting to its factory default Status LED Solid white.
4 The Extender uses the 5 GHz WiFi band for backhaul. Off. The Extender uses the GHz WiFi band for backhaul. Blinking white. The Extender is resetting to its factory default ThroughputLED Solid white. The GHz radio is operating. Off. The GHz radio is GHz LED Solid white. The 5 GHz radio is operating. Off. The 5 GHz radio is off. Blinking white. The Extender is resetting to its factory default GHz LED Solid white. The Extender is connected to a WiFi-enabled computer or mobiledevice. Off. The Extender is not connected to a WiFi-enabled computer or Link LED Solid white. A USB device is connected to the Extender . Off. A USB is not connected to the LEDO verview8 Nighthawk X6S AC3000 Tri-Band WiFi Range ExtenderTable 1. LED descriptions (Continued)DescriptionLED Blinking white.
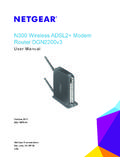
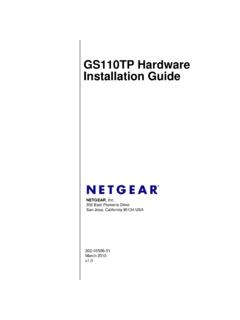
5 A WPS connection is being established. Solid white. The extended network is enabled with WiFi security (either WPAor WPA2). Off. The extended network is enabled without WiFi LED Solid white. An Ethernet device is connected to an Ethernet port. Off. An Ethernet device is not connected to the LEDBack PanelThe back panel of the Extender provides ports, buttons, and a DC power 3. Back panelOverview9 Nighthawk X6S AC3000 Tri-Band WiFi Range ExtenderThe back panel contains the following components: WPS button . Use this button to connect WPS-enabled devices to the Extender . Ethernet ports. Use the four Gigabit Ethernet RJ-45 LAN ports to connect the Extender to LAN devices. USB port. Use the USB port to connect the Extender to a USB device such as a printer. Power On/Off button and Power LED.
6 Press the Power On/Off button to provide power to the Power LED light green when the Extender is ready. DC power connector. Connect the power adapter that came in the product package to the DC powerconnector. Reset button . Pressing this button resets the router. If the Reset button is pressed for at least sevenseconds and the Power LED blinks green, the router returns to its factory to Use Your ExtenderWe recommend that you connect through the Extender network only when the WiFi device is in a deadzone where connection from the existing network is poor or nonexistent. Data traffic routed through theextender is inherently slower than traffic routed directly from the the Extender WorksThe Extender works like a bridge between a WiFi router (or a WiFi access point) and a WiFi device outsidethe Range of the WiFi router.
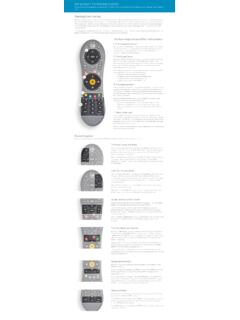
7 The Extender performs two main jobs: The Extender connects to a working WiFi the Extender connects over WiFi to an existing network, it functions as a network client, similarto how a WiFi device connects to a network. The Extender acts as an access point for WiFi Extender broadcasts its own WiFi network that WiFi devices can join. In its role as an access point,the Extender performs tasks that WiFi routers do, such as broadcasting its network name (SSID).The Extender must do each of these jobs so that both ends of the bridge are in X6S AC3000 Tri-Band WiFi Range ExtenderFigure 4. Extender in a homeOverview11 Nighthawk X6S AC3000 Tri-Band WiFi Range Extender2 Get StartedThis chapter covers the following topics: Install the WiFi Extender Use the Extender in Access Point Mode Connect a Device to the Extender Network Log In to the Extender After Installation Run Smart Setup Installation12 Install the WiFi ExtenderPlace the Extender , apply power, and connect the Extender to your existing WiFi the Extender and Apply PowerTo place the Extender and apply your Extender in the same room as your WiFi to the WiFi router is required only during the initial setup the Extender into an electrical for the Power LED to light amber and then turn the Power LED does not light, press the Power On/Off button on the to an Existing WiFi NetworkTo extend the Range of your WiFi network.
8 You must connect the Extender to your existing WiFi your router s WiFi security is set to WPA enterprise or WPA2 enterprise, yourextender can t connect to your router. You must change your router s WiFi can connect the Extender in one of two ways: Connect with WPS. For more information, see Connect With WPS on page does not support WEP network security or a hidden SSID network. If your routerWiFi network uses WEP security or its SSID is hidden, follow the instructions inConnect With the NETGEAR Installation Assistant on page Connect with web browser setup. For more information, see Connect With the NETGEAR InstallationAssistant on page With WPSWi-Fi Protected Setup (WPS) lets you join a secure WiFi network without typing the network name andpassword. For help with the WPS button on your WPS-enabled device, check the instructions or online helpthat came with that device.
9 Some older equipment cannot use does not support WEP network security or a hidden SSID network. If yourexisting WiFi network uses WEP security or its SSID is hidden, follow the instructionsin Connect With the NETGEAR Installation Assistant on page Started13 Nighthawk X6S AC3000 Tri-Band WiFi Range ExtenderTo use WPS to connect the Extender to your WiFi the WPS button on the WPS LED two minutes, press the WPS button on your router or access the Extender connects to your existing WiFi network, the WPS LED on the Extender lights solidwhite and the Link Status LED the Link Status LED does not light, try again. If it still does not light, see Connect With the NETGEARI nstallation Assistant on page your router supports the 5 GHz band, your Extender attempts to connect to therouter s 5 GHz band the first time you press the WPS button .
10 If your Extender connectsto the router's 5 GHz band, the Extender 's Link Status LED and Maximum ThroughputLED light solid white. If the LEDs don't light, follow the next your WiFi router supports the 5 GHz band, repeat Steps 1 and 2 to connect the Extender to the 5 Link Status LED and Maximum Throughput LED light solid white to confirm the the Extender and move it to a new location that is about halfway between your router and thearea with a poor router WiFi location that you choose must be within the Range of your existing WiFi router the Link Status LED to help you choose a spot where the Extender -to-router connection is the Link Status LED doesn t light amber or white, plug the Extender into an outlet closer to the routerand try moving the Extender to outlets closer to the router until the Link Status LED lights amber or your WiFi-enabled computer or mobile device to the location with poor WiFi router your WiFi-enabled computer or mobile device to the extended Extender uses the same WiFi network settings as your router for its GHz and 5 GHz example, if your Extender connects to the router s GHz WiFi band, your Extender uses yourrouter s GHz WiFi settings for both its networks: Router GHz WiFi network name.