Transcription of Otago Home Exercise Programme - Huntingdonshire
1 Page 1 Page 2 Page 3 Ensure that the chair you use is sturdy and stable. Wear comfortable clothes and supportive a space and have your Exercise band and a glass of water (for afterwards) ready before you exercising, if you experience chest pain, dizziness or severe shortness of breath, stop immediately and contact your GP (or call an ambulance if you feel very unwell and your symptoms do not go away when you stop exercising).If you experience pain in your joints or muscles, stop, check your position and try again. If the pain persists, seek advice from your Postural Stability , feeling your muscles working or slight muscle soreness the next day after Exercise is normal and shows that the exercises are normally throughout and enjoy to do these exercises three times per you are using this booklet without attending a supervised Exercise session, consult your GP to check it is suitable for 2 Page 3 Always begin with a warm up to prepare your body for the main are 6 warm up exercises.
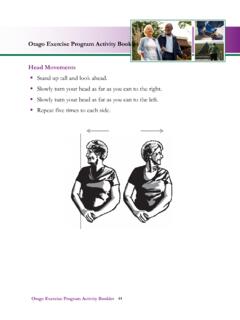
2 Complete them all:Warm Up ExercisesPage 4 Page 5 Stand tall (holding your support if needed) Begin marching your legs If you feel steady, add an arm swing with one or both armsContinue marching for 1 to 2 minutes MarchPage 4 Page 5 Stand tall with your feet hip width apart and arms resting loosely by your sides or hold the chairTurn the head slowly to the left then slowly to the right Ensure that the shoulders stay still so only the head is movingRepeat 5 times Head movementsPage 6 Page 7 Stand tall with your feet hip width apart and arms resting loosely by your sides or hold the chairPlace 2 fingers onto your chin then gently guide the chin back until you feel a stretch in the back of the neckRepeat 5 times Neck movementsPage 6 Page 7 Stand tall with your feet hip width apart Place your hands onto your bottom Gently arch your back Avoid looking at the ceiling or locking out your knees Repeat 5 times Back extensionPage 8 Page 9 Stand tall with your feet hip width apart Fold the arms in
3 Front of the chest or place one hand on the chairLengthen and lift the trunk upwards then slowly turn the head and shoulders to the rightEnsure you are only turning the upper body (not the hips)Return to the start position and repeat to the other sideRepeat 5 times Trunk movementsPage 8 Page 9 Sit with your back supported by the chair back Straighten one leg so the foot is held off the floor Keep the leg in this position whilst pointing the toes forwards then pulling them back Do this 5 times then repeat on the other leg If the pull behind the knee is too intense, perform this Exercise with the foot closer to the floorAnkle movementsPage 10 Page 11 These are to help improve your bone and muscle them your ankle cuff weights on exercisesPage 10 Page 11 Front knee strengtheningSit back in the chair with your back supported and your feet under your kneesBrush one foot along the floor then lift the weight slowly and straighten (but do not lock out)
4 Your knee Lower the foot with control Repeat _____ times on one leg then change legs Aim to lift for a slow count of 3 and lower for a slow count of 5 each timePage 12 Page 13 Stand tall close to and holding your support Feet hip width apart and knees soft Brush the foot backwards along the floor then lift the heel slowly towards the bottomKeep the knees close together Lower the foot slowly Place the weight back over both feet to rest briefly Repeat _____ times on one leg then change legs Aim to lift for a slow count of 3 and lower for a slow count of 5 each timeBack knee strengthening Page 12 Page 13 Stand tall with your feet hip width apart holding your supportLift the leg slowly out to the side keeping the toes pointing forwards Avoid leaning the body to the side Lower the leg slowly Place the weight back over both feet to rest briefly Repeat _____ times on one leg then change legs Aim to lift for a slow count of 3 and lower for a slow count of 5 each timeSide hip strengtheningPage 14 Page 15 Take your ankle cuff weights off now!
5 Important!Page 14 Page 15 Stand tall with your feet hip width apart holding your supportSlowly lift the heels keeping the weight over the big toesAvoid locking the knees Lower the heels slowly Repeat 10 to 20 times Aim to lift for a slow count of 3 and lower for a slow count of 5 each timeCalf raisesPage 16 Page 17 Stand tall with the feet hip width apart, holding your supportSlowly lift the toes keeping your knees soft Avoid sticking your bottom out Lower the toes slowly Repeat 10 to 20 times Aim to lift for a slow count of 3 and lower for a slow count of 5 each timeToe raisesPage 16 Page 17 These are to help improve your balance and stability and prevent them exercisesPage 18 Page 19 Feet should be hip width apart, toes facing forwards Hold your support Bend the knees and push your bottom backwards as though you were going to sit downEnsure the heels do not lift Ensure the knees do not roll inwards Come back up to the start position Repeat _____ times Knee bends supportedPage 18 Page 19 Feet should be hip width apart, toes facing forwards Bend the knees and push your bottom backwards as though you were going to sit downEnsure the heels do not lift Ensure the knees do not roll inwards Come back up to the start position Repeat _____ times Knee bends no supportPage 20 Page 21 Stand side on to a support with feet hip width apart Lift the heels keeping the weight over the big toes Walk 10 steps forwards on your toes.
6 Bring the feet level before lowering the heels to the floorTurn around towards the support then repeat the toe walking in the other directionMove steadily and with control Toe walking supportedPage 20 Page 21 Stand with feet hip width apart Lift the heels keeping the weight over the big toes Walk 10 steps forwards on your toes Bring the feet level before lowering the heels to the floorTurn around then repeat the toe walking in the other directionMove steadily and with control Toe walking no supportPage 22 Page 23 Stand tall, side on to the support Place one foot directly in front of the other so that the feet form a straight lineLook ahead and balance for 10 seconds Take the feet back to hip width apart before placing the other foot in front and balancing for another 10 secondsHeel toe stand supportedPage 22 Page 23 Stand tall Place one foot directly in front of the other so that the feet form a straight lineLook ahead and balance for 10 seconds Take the feet back to hip width apart before placing the other foot in front and balancing for another 10 secondsHeel toe stand no supportPage 24 Page 25 Stand tall.
7 Side on to the support Walk 10 steps forwards placing one foot directly in front of the other so that the feet form a straight lineLook ahead and aim for a steady walking action Take the feet back to hip width apart before turning towards your support then repeat the steps in the other directionHeel toe walking supportedPage 24 Page 25 Stand tall Walk 10 steps forwards placing one foot directly in front of the other so that the feet form a straight lineLook ahead and aim for a steady walking action Take the feet back to hip width apart before turning around then repeat the steps in the other directionHeel toe walking no supportPage 26 Page 27 Stand close to and holding on to your support Balance on one leg keeping the support knee soft and upright postureHold the position for 10 seconds Repeat on the other leg One leg stand supportedPage 26 Page 27 Stand tall Balance on one leg keeping the support knee soft and upright postureHold the position for 10 seconds Repeat on the other leg One leg stand no supportPage 28 Page 29 Stand tall facing a support Take 10 sideways steps keeping the hips forward and the knees soft Repeat the other way Sideways walking supportedPage 28 Page 29 Stand tall Take 10 sideways steps keeping the hips forward and the knees soft Repeat the other way Sideways walking no supportPage 30 Page 31 Stand side on to the support Lift the toes keeping the knees soft and the bottom tucked inWalk 10 steps on your heels Move steadily and with control Keep looking ahead Bring the feet together before lowering the toes to the floorRepeat the other way Heel walking supportedPage 30 Page 31 Stand tall Lift the toes keeping the knees soft and the bottom tucked inWalk 10 steps on your heels
8 Move steadily and with control Keep looking ahead Bring the feet together before lowering the toes to the floorRepeat the other way Heel walking no supportPage 32 Page 33 Sit tall near the front of the chair Place your feet slightly back Lean forwards slightly Stand up (using your hands on the chair if needed) Step back until your legs touch the chair Slowly lower your bottom back into the chair, reaching for the chair as you lower if neededRepeat ____ times Sit to stand using handsPage 32 Page 33 Sit tall near the front of the chair with your hands on your thighs or folded across your chestPlace your feet slightly back Lean forwards slightly Stand up Step back until your legs touch the chair then slowly lower your bottom back into the chairRepeat ____ times Sit to stand no handsPage 34 Page 35 Stand side on to the support Walk backwards 10 steps Keep the back tall and look straight ahead throughout the exerciseUse a toe through to heel action Keep the pace steady and controlled Repeat the other way Backwards walking supportedPage 34 Page 35 Stand tall Walk backwards 10 steps Keep the back tall and look straight ahead throughout the exerciseUse a toe through to heel action Keep the pace steady and controlled Repeat the other way
9 Backwards walking no supportPage 36 Page 37 Stand tall Look straight ahead Place one foot directly behind the other touching the toe against the heel so the feet are in a straight lineContinue walking backwards in this way for 10 steps Aim for a smooth walking action, rolling through the foot from toe to heelPlace your feet hip width apart before turning then repeat in the other directionHeel toe walking backwardsPage 36 Page 37 Walk at your usual pace in a figure of 8 shape (around 2 chairs if this is easier for you) Try to maintain upright posture as you walk Repeat this Exercise twice only Walk and turnPage 38 Page 39 Hold the rail if you usually do, but try not to pull too much with your arms Use the strongest leg to lead on each step Place the foot fully on the stair Look down with the eyes (rather than bending forwards from the waist) to check your foot position At the top, take a rest then come back down leading with your weaker leg on each step Repeat _____ times Stair walkingPage 38 Page 39 Perform the following stretches.
10 Ending the sessionPage 40 Page 41 Calf stretchSit forwards in the chair and hold on Keep one knee bent and directly above the ankle Straighten the other leg with the heel resting on the floor Pull the toes back towards the shin until you feel a stretch in the calf Hold for 10 to 15 seconds, making sure the knee is not locked outRelease and repeat on the other side Page 40 Page 41 Make sure you are right at the front of the chair Straighten one leg placing the heel on the floor Place both hands on the other leg then sit really tall Lean forwards with a straight back until you feel the stretch in the back of your thighHold for 10-15 seconds Repeat on the other leg Back of thigh stretchPage 42 Page 43 Aim for two 30 minute walks per or 10 minute walks are an ideal way to get started. Progress the time until 30 minutes of continuous walking is achieved. If possible, try to walk at a pace that makes you feel warmer and increases your breathing.