Transcription of OWNER’S MANUAL - FX Airguns
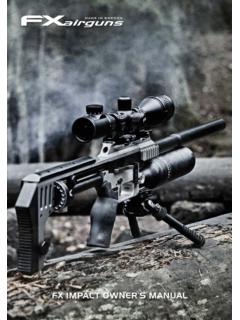
1 11made in swedenOWNER S MANUALSINGLE SHOT REPEATER SEMI-AUTOMATIC23 CONTENTS Page1 WARRANTY 42 WARNINGS 43 GENERAL INSTRUCTIONS 44 OPERATING INSTRUCTIONS 5 Charging the Rifle 5 Safety Operation 7 Loading Magazine 8 Cocking and Loading 11 Air tubes 14 Power adjuster 15 5 ARROW VERSIONS, HANDLING 17 Quick change barrelsystem 17 Quick change optics 176 SETTINGS 18 Trigger adjustment 18 Recoil pad adjustment 20 Cheek piece adjustment 217 MAINTENANCE 21 Replacement of O-rings 21 Lubricant 22 Cleaning 22 Storage 22 Trouble Shooting CHARGING THE RIFLEA quick connector is supplied with the rifle and is threaded with a 1/8 sure that
2 The thread is the same at the charging source then attach the quick connector at your charging sure that the fill probe and filler hole are clear from any dirt. Feel free to use lubricant on the o-rings to increase their life. Note: Use any lubricants in Type MkI: Insert the fill probe into the rifle filler hole located at the end of the air tube. Rev-olution have the filling holes hidden under the front piece of the stock and have to have the cocking mechanism in the rear position to have the filler hole Connector MkII: Push the connector over the male connector. Close ventilation screw on the charging source. Charge the rifle to its Maximum level which is, this may vary from 200-250 bar, check maximum fill pressure engraved on the check the pressure on the charging source, they have in most cases a more reliable gauge the gauge on the rifle is more of an indicator to see if you need to charge or not.
3 If a hand pump is used the moisture trap must be opened at regular Intervals during the pumping you want to uncock the rifle after filling your Revolution: Simply squeeze the trigger at the same time as you keep one hand on the cocking and gently move it to the front position while still keeping the finger squeezing the : Only dry air should be used! Under no circumstances should oxygen or any other gas be used to fill the airtubes! This could result in a serious explosion!1 WARRANTYAll FX Airguns carry a One Year Warranty against faulty workmanship and defective materials. Contact the dealer from which you purchased the gun if it becomes the rifle develops a defect within the warranty period, contact the dealer from whom it was purchased.
4 The guarantee does not cover any damage caused by tampering with the rifle should only be disassembled by factory-authorized repairmen. Never fire the rifle when it empty of air or when air cylinder is removed! Never point the rifle at anyone, or allow anyone to point a rifle at you! Treat every rifle as if it is loaded even if you know it is not loaded! Always carry the rifle so that the direction of the muzzle is under control, even if you stumble. Always be sure of your target and what lies behind it before firing your rifle. Never leave a loaded rifle unattended. Beware of targets that tend to cause ricochets. It is recommended that eye protection is worn when charging the cylinder.
5 Always use caution when operating this rifle. Learn and obey the laws in your location. Be responsible in your use of this weapon! Never fill the rifle with anything else other than regular air!3 GENERAL INSTRUCTIONS The FX Rifles should be fitted with a scope or alternate optic sights before use. Before using your rifle, read and abide by the basic safety rules. We recommend the use of our own FX Pellets4 OPERATING INSTRUCTIONSN ever attempt to disassemble this rifle while it is charged !Failure to obey this instruction could result in personal injury or damage to the gun !2 WARNING!67 Built in pump:The use of the built in pump on Independence and Indy. Put the rifle in the palm of your hand on the opposite side of the pump handle.
6 Then extract the pump sidele-ver fully with the other hand and then pull/push it back to its original this until you have achieved wanted pressure in the system. The system is equipped with a safety valve system that release the air at approximately 240-250 bar. SAFETY Push the safety lever to the rear position to engage the safety. To obtain firing position, push the safety lever to its forward of safety lever:Right side: All except Monsoon. (Typhoon and T12 uses the cocking bolt as safety in its rear and down position). Left Side: Monsoon Uncocking the rifle/inactivate trigger system:Pull the cocking lever to its rear position squeeze the trigger at the same time as you keep one hand on the cocking bolt/pump action and gently move it to the front position while still keeping the finger squeezing the : Like all other mechanical devices, safety mechanisms can be negati-vely affected by wear, abuse, dirt or corrosion.
7 Never assume that it is a foolproof way of preventing a accidental discharge and always follow the safety code when handling an air LOADING THE MAGAZINEG eneral:The magazine is designed to fit only one way into the rifle. When viewed from the rear the magazine rotates clockwise except for Wildcat in lefthand version. 8 Revolver magazines:Removal: Push the safety to its safe mode and/or pull the cocking lever to its rear position. On the Cyclone and Ranchero you need to pull the brass ring backwards to be able to release the magazine. On the Wildcat you can just pop it out as it is locked in position with spring tensioned steel uncocking the rifle see: Point : For first time use, position the magazine in the rifle without pellets to understand its function.
8 Push the safety to its safe position and pull the cocking lever until it locks. Insert the magazine into the slot. On the Cyclone and Ranchero you need to puch the brass ring forward to lock the magazine in place, rotate magazine untill it index with a click. On the wildcat you grab the sidelever and give it a twitch backwards and the magazine will pellets:Load pellets from the rear of the magazine, pushing them through the retainer O ring until the skirts are in line with the bottom of the magazine careful not to squeeze or damage the pellet as this could affect loaded, insert the magazine back into the slot. Push the cocking lever to its forward position. This will chamber a pellet into the barrel and you are ready to fire when safety is Not Close the Cocking Lever Until You Are Ready to Fire the Rifle!
9 1011 Spring tensioned magazines:Removal: Push the safety to its safe mode and/or pull the cocking lever to its rear magazine can now be removed from the : On FX Biathlon you need to pull the thumb-return button rearwards until you feel a click. When magazine is removed just give the sidelever a pull and it will uncocking the rifle see: Point : For first time use, position the magazine in the rifle without pellets to understand its cannot push the cocking lever to front position when magazine is empty. Push the safety to its safe mode and/or pull the cocking lever to its rear position. Insert the magazine into the : On FX Biathlon you need to pull the thumb-return button rearwards until you feel a click.
10 When magazine is inserted just give the sidelever a pull and it will pellets:Load pellets by pushing the transparent lid counter clockwise until it a firm grip on the lid in the end shot actions: Pull the cocking lever/handle backward as far as possible without hesitation. Insert a pellet of appropriate caliber into the barrel breech or simply lay the pellet in the pellet tray (Typhoon) as shown in the picture. be careful not to squeeze or damage the pellet as this could affect accuracy. Push the cocking lever/handle forward as far as possible. This chambers a pellet into the barrel and you are ready to fire. The rifle is now cocked and ready to fire. Put one pellet in the open slot from the rear side of the magazine, the tip of the pellet shall be pointing out of the hole.