Transcription of MANEC10 - Eaton Compressor
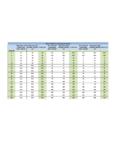
1 SPLASH LUBRICATEDAIR Compressor PUMPSO perating InstructionsAirbase Industries designs and manufactures products for safe operation. However, operators and maintenance persons are responsibile for maintaining safety. All safety precautions are included to provide a guideline for minimizing the possibility of accidents and property damage while equipment is in operation. Keep these instructions for 0810 Unit configuration and appearance varies by model. ContentsPage Specification Charts .. 2 Safety Information .. 3 Tag Definitions .. 3 Basic Guidelines .. 3 Breathable Air .. 3 Personal Protective Equipment .. 3 Inspection .. 3 Installation .. 3 Area .. 3 Piping Safety Steps .. 4 Tank Installation .. 4 Pump Installation .. 5 Page .. 6 Safety Rules .. 6 Start Up .. 6 Maintenance .. 7 Safety Steps .. 7 Belt Adjustment .. 7 Changing Oil .. 7 Maintenance Schedule .. 7 Troubleshooting .. 8 Warranty .. 8 MANEC102 Splash Lubricated, Air Compressor Pumps Model APP2V0313S APP3Y0518S APP2V0732S Description 3HP 5HP CFM Displacement 13 18 32 CFM @ Pressure (100 psi) 18 Max PSI 145 145 145 Noise DB(A) 75 75 74 Outlet Connection NPT 1/2 NPT 1/2 NPT 3/4 Pump RPM 850 950 680 Bolt Pattern 8-3/16 x 4-5/8 8-1/4 x 5-1/4 10-1/4 x 5-3/8 Dimensions 15 x 10 x 13 18 x 15 x 12 18 x 15 x 12 Weight (lbs.)
2 60 75 121 Belt Type (A or B) A A B Number of Belts 1 2 2 SINGLE STAGES plash Lubricated, Air Compressor PumpsTWO STAGES plash Lubricated, Air Compressor PumpsL W H(inches) Model APP3Y0521T APP2I0524T APP3Y0732T APP4V1043T APP3Y1544T APP3Y2062T APP4V2598T Description 5HP - 3cyl 5HP- 2cyl 10HP 15HP 20HP 25HP CFM Displacement 21 24 32 43 44 62 98 CFM @ Pressure (100 psi) 18 17 24 34 35 52 91 Max PSI 175 175 175 175 175 175 175 Noise DB(A) 74 75 75 75 75 75 79 Outlet Connection NPT 3/4 NPT 3/4 NPT 3/4 NPT 3/4 NPT 1-1/4 NPT 1-1/4 NPT 1-1/4 Pump RPM 895 795 830 600 640 640 710 Bolt Pattern 9-7/8 x 6-1/2 7-3/4 x 9 9-7/8 x 6-1/2 9-1/4 x 9-1/4 13-1/2 x 6-3/4 13-1/2 x 6-3/4 13-5/8 x 12 5/8 Dimensions 25 x 13 x 18 16 x 14 x 19 25 x 13 x 18 28 x 21 x 21 27 x 14 x 27 27 x 14 x 27 38 x 29 x 26 Weight (lbs.)
3 133 180 149 282 321 369 684 Belt Type (A or B) B B B B B B B No. of Belts 2 2 2 2 3 3 4L W H(inches)3 Operating InstructionsSafetyThis manual contains very important information to know and understand. This is provided for SAFETY and to PREVENT EQUIPMENT PROBLEMS. To help un-derstand this information, observe the following: Danger indicates an imminently hazardous situation which, if not avoided, will result in death or serious injury. Warning indicates a potentially hazardous situation which, if not avoided, could result in death or serious injury.
4 Caution indicates a potentially hazardous situation which, if not avoided, may result in minor or moderate injury. Notice indicates important infor-mation, that if not followed, may cause damage to Guidelines 1. Allow only trained, authorized persons who have read and understood these operating instructions to use this Compressor pump. Fail-ure to follow the instructions, procedures and safety precautions in this manual can result in accidents and injuries. 2. NEVER start or operate the Compressor pump under unsafe conditions. Tag the compres-sor, disconnect and lock out all power to it to prevent accidental start-up until the condition is corrected. 3. Install, use and operate the Compressor pump only in full compliance with all pertinent OSHA regulations and all applicable Federal, State & Local Codes, standards and regulations. 4. NEVER modify the Compressor pump and/or controls in any way. 5. Keep a first aid kit in a convenient place. Seek medical assistance promptly in case of injury.
5 Avoid infection by caring for any small cuts and burns Air 1. NEVER use air from this Compressor pump for breathable air except in full compliance with OSHA Standards 29 CFR 1910 and any other Federal, State or Local codes or Read all manuals included with this product carefully. Be thoroughly familiar with the controls and the proper use of the equipment. Death or serious injury can result from inhaling compressed air without using proper safety equipment. See OSHA standards on safety equipment. 2. DO NOT use air line anti-icer systems in air lines supplying respirators or other equip-ment used to produce breathable air. DO NOT discharge air from these systems in unventi-lated or other confined Protective EquipmentBe sure all operators and others around the Compressor and its controls comply with all appli-cable OSHA, Federal, State and Local regulations, codes and standards relating to personal protec-tive equipment. This includes respiratory protec-tive equipment, protection for the extremities, protective clothing, protective shields and barri-ers, electrical protective equipment, and personal hearing protective Inspect Compressor pump prior to any use.
6 Check for external damage that might have occurred during transit. Be careful of moving parts then test pulley by turning it freely by hand. Report any dam-age to delivery carrier immediately. Do not operate unit if damaged during shipping, handling or use. Damage may result in bursting and cause injury or property Area 1. Install Compressor pump in a clean, dry and well-lit area. Be sure installation area can maintain a temperature range between 35 - 110 F. 2. Insulate cold water or other low temperature pipes that pass overhead to avoid conden-sation dripping on Compressor which could cause rust and/or motor shorting. DO NOT install Compressor in boiler room, paint spray room, or area where sandblasting occurs. Make sure inlet air is away from exhaust fumes or other toxic, noxious or corrosive fumes or Lubricated, Air Compressor Pumps 3. If acid is used in operating environment or air is dust laden, pipe intake to outside, fresh air. Increase pipe size by one size for every 20 feet of run.
7 Be sure to install pro-tective hood around intake filter. 4. In operating environments where excessive water, oil, dirt, acid or alkaline fumes are present, a TEFC (totally enclosed, fan cooled) motor is recommended. Check nameplate for motor type. 5. Allow sufficient space around Compressor pump for maintenance access. Mount unit with pulley towards wall and leave a mini-mum of 15 inches of clearance. 6. Use shims to level Compressor if installation area is not flat. This will avoid excessive vibration and premature pump Steps 1. Install appropriate flow-limiting valves as necessary according to pipe size(s) used and run lengths. This will reduce pressure in case of hose failure, per OSHA Standard 29 CFR (b)(7). 2. Flow-limiting valves are listed by pipe size and rated CFM. Select appropriate valves accordingly, in accordance with the manufac-turer s Installation 1. Place tank feet on 1/4 thick rubber pads. Thicker padding will increase vibration and the possibility of cracking the tank or other unit damage.
8 Do not place unit on dirt floor or uneven surface. 2. Fasten anchor bolts snugly but do not overtight-en so normal vibration will not damage unit. Compressor unit is top heavy and must be bolted to solid, flat surface to avoid falling and premature pump wear. Splash lubrication will not operate properly if unit is not Installation 1. Mount pump to deck of tank then connect main feed port to check valve in tank. See figure 1. 2. For units with centrifugal unloader system, install 1/4 copper tubing from 90 elbow (located in front of crankcase) to the un-loader port of check valve. NOTE: If pump is not equipped with centrifugal unloader, install an unloader line from the check valve unloader port to the unloader port of the pressure switch. This will relieve head pressure when unit stops and provide no-load restarting. 3. Cap fitting on cylinder heads if not using pilot valve for continuous run port. 4. Make sure there is a 1/4 copper tube (un-loader tube) installed from tank check valve to unloader on pressure switch.
9 This relieves head pressure when Compressor stops for easier restart. See figure 2. 5. Use proper pulley for motor. Refer to Pulley Size Chart for correct sizing. 6. Install belts. There should be 1/2 slack for proper belt tension. See figure 3. 7. Use a flexible connector between Compressor tank and piping system to minimize noise, vibration, unit damage, and pump 1: Connect feed port to check valveCheck valveFigure 2: Install unloader line from check valve to pressure switchPressure switch with unloaderFigure 3: Proper belt tension1/2 deflection5 Operating Instructions 8. Install appropriate ASME code safety valves and make sure piping system is equipped with adequate condensate drains. See figure 4. Never install a shut-off valve such as a glove or gate valve, between the pump discharge and the air tank unless a safety valve is installed in the line between valve and pump. 9. Make sure any tube, pipe or hose connected to the unit can withstand operating tem-peratures and retain pressure.
10 Never use plastic (PVC) pipe for compressed air. Serious injury or death could result. 10. Never use reducers in discharge piping. Keep all piping and fittings the same size in the piping system. 11. For permanent installations of compressed air systems, determine total length of sys-tem and select correct pipe size. Make sure underground lines are buried below frost line and avoid areas where condensation could build up and ValveWater Drain ValveAir TankAir DryerCoalescing Filter with Auto DrainTo Shop PipingFigure 4: Basic Piping DiagramMinimum Pipe Size For Compressed Air Lines(Pipe size shown in inches) Length Of Piping System SCFM 25 ft. 50 ft. 100 ft. 250 ft. 20 3/4 3/4 3/4 1 40 3/4 1 1 1 60 3/4 1 1 1 100 1 1 1 1-1/4 125 1-1/4 1-1/4 1-1/2 1-1/2 Pulley Size Chart(Pulley size in inches) Pump Electric 1750 RPM 3450 RPM Gas Engine Gas Engine Model No. Motor - Hp 4 Pole Motor 2 Pole Motor Hp Pulley Size APP2V0313S 3 3 APP3Y0518S 3 3 APP3Y0518S 5 3 APP3Y0521T 5 7 8 APP2V0732S 5 8 3 APP2I0524T 5 11 4 APP3Y0732T 5 6 3 11 3 APP3Y0732T 7 13 4 APP4V1043T