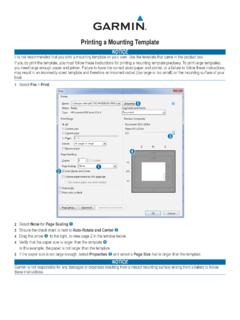
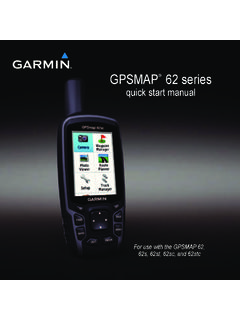
Transcription of Owner’s Manual - Garmin International
1 Edge 820 owner s Manual 2016 Garmin Ltd. or its subsidiariesAll rights reserved. Under the copyright laws, this Manual may not be copied, in whole or in part, without the written consent of Garmin . Garmin reserves the right to change or improve its products and to make changes in the content of this Manual without obligation to notify any person or organization of such changes or improvements. Go to for current updates and supplemental information concerning the use of this , the Garmin logo, ANT+ , Auto Lap , Auto Pause , Edge , Forerunner , and Virtual Partner are trademarks of Garmin Ltd. or its subsidiaries, registered in the USA and other countries. Connect IQ , Garmin Connect , Garmin Express , Garmin Index , Varia , Varia Vision , and Vector are trademarks of Garmin Ltd.
2 Or its subsidiaries. These trademarks may not be used without the express permission of is a trademark of Google Inc. Apple and Mac are trademarks of Apple, Inc., registered in the and other countries. The Bluetooth word mark and logos are owned by the Bluetooth SIG, Inc. and any use of such marks by Garmin is under license. The Cooper Institute , as well as any related trademarks, are the property of The Cooper Institute. Advanced heartbeat analytics by Firstbeat. Di2 is a trademark of Shimano, Inc. Shimano is a registered trademark of Shimano, Inc. iOS is a registered trademark of Cisco Systems, Inc. used under license by Apple Inc. Training Stress Score (TSS), Intensity Factor (IF), and Normalized Power (NP) are trademarks of Peaksware, LLC.
3 STRAVA and Strava are trademarks of Strava, Inc. Wi Fi is a registered trademark of Wi-Fi Alliance Corporation. Windows is a registered trademark of Microsoft Corporation in the United States and other countries. Other trademarks and trade names are those of their respective product is ANT+ certified. Visit for a list of compatible products and : A03001 Table of the the the Standard the Out-Front the On the the Connections Screen the the the Satellite for a Virtual Partner .. a Segment From the a Segment a a Workout a Workout From the a a a a the Training Garmin Connect Training an Interval an Interval Your ANT+ Indoor an ANT+ Indoor Target a Training Your Personal a Personal a Personal Your Locations from the to a to Known Back to a a and Riding a a Course From Garmin and Riding a Round-Trip for Training with Course a Course on the a a an Activity for Route the Map Connected Your Audio Prompts on Your a GroupTrack for GroupTrack Files to Another Edge Detection and Assistance Up the Incident Detection and Assistance Your
4 Emergency Incident Detection On and an Automated a Status Update After an + On the Heart Rate Your Recovery VO2 Max. Your VO2 Max. for Cycling VO2 Max. Your Stress Your Heart Rate Heart Rate for Erratic Heart Rate the Speed the Cadence the Speed and Cadence Averaging for Cadence or Your ANT+ with Power Your Power Your Power Cycling the Vector Software Using the Edge Your FTP an FTP Calculating Electronic a Weight Index Smart Scale Your Your Time in Each Training Data a Your Ride to Garmin of ContentsiGarmin Fi Connected Up Wi Fi Fi the Device to Your Files to Your the USB Your IQ Downloadable Connect IQ Features Using Your Up Your User Lifetime Training Your Activity the Data the Satellite Range a Recurring Laps by
5 Laps by Auto Auto Auto the Timer Recording the Units of the Device Tones On and the Device the Configuration Up Extended Display Extended Display Rate Monitor Sensor and Cadence Sensor the for the Heart Rate Replaceable the Heart Rate Monitor the Speed Sensor or Cadence Sensor the User Battery On Battery Save GPS Satellite device is in the wrong Your Device the More Rate Zone Max. Standard Size and Frequency of ContentsIntroduction WARNINGSee the Important Safety and Product Information guide in the product box for product warnings and other important consult your physician before you begin or modify any exercise StartedWhen using your device the first time, you should complete these tasks to set up the device and learn about the basic the device (Charging the Device, page 1).
6 2 Install the device using the standard mount (Installing the Standard Mount, page 1) or the out-front mount (Installing the Out-Front Mount, page 1).3 Turn on the device (Turning On the Device, page 2).4 Locate satellites (Acquiring Satellite Signals, page 2).5Go for a ride (Going for a Ride, page 3).6 Upload your ride to Garmin Connect (Sending Your Ride to Garmin Connect, page 15).Charging the DeviceNOTICETo prevent corrosion, thoroughly dry the USB port, the weather cap, and the surrounding area before charging or connecting to a device is powered by a built-in lithium-ion battery that you can charge using a standard wall outlet or a USB port on your : The device will not charge when outside the approved temperature range (Edge Specifications, page 19).
7 1 Pull up the weather cap from the USB port .2 Plug the small end of the USB cable into the USB port on the the large end of the USB cable into an AC adapter or a computer USB the AC adapter into a standard wall you connect the device to a power source, the device turns the device the Battery WARNINGThis device contains a lithium-ion battery. See the Important Safety and Product Information guide in the product box for product warnings and other important the Standard MountFor the best GPS reception, position the bike mount so the front of the device is oriented toward the sky. You can install the bike mount on the stem or the a secure location to mount the device where it does not interfere with the safe operation of your the rubber disk on the back of the bike rubber tabs align with the back of the bike mount so it stays in the bike mount on the bike the bike mount securely using the two bands.
8 5 Align the tabs on the back of the device with the bike mount notches .6 Press down slightly and turn the device clockwise until it locks into the Out-Front Mount1 Select a secure location to mount the Edge device where it does not interfere with the safe operation of your the hex key to remove the screw from the handlebar connector .3If necessary, remove the two screws on the back side of the mount , rotate the connector , and replace the screws to change the orientation of the the rubber pad around the handlebar: If the handlebar diameter is mm, use the thicker pad. If the handlebar diameter is mm, use the thinner the handlebar connector around the rubber and tighten the : Garmin recommends a torque specification of 7 lbf-in.
9 ( N-m). You should check the tightness of the screw the tabs on the back of the Edge device with the bike mount notches .Introduction18 Press down slightly and turn the Edge device clockwise until it locks into the Edge1 Turn the Edge clockwise to unlock the the Edge off the Select to enter sleep mode and wake the to turn the device on and off and lock the touchscreen. Select to mark a new lap. Select to start and stop the activity On the DeviceThe first time you turn on the device, you are prompted to configure system settings and .2 Follow the on-screen your device includes ANT+ sensors (such as a heart rate monitor, speed sensor, or cadence sensor), you can activate them during more information about ANT+ sensors, see ANT+ Sensors, page the Connections ScreenThe connections screen displays the status of the GPS, ANT+ sensors, and wireless the home screen or a data screen, swipe down from the top of the connections screen appears.
10 A flashing icon means the device is Screen OverviewThe home screen gives you quick access to all the features of the Edge to go for a the arrows to change your activity to mark a location, search for locations, and create or navigate a to access your segments, workouts, and other training to access your history, training options, personal records, contacts, and to access your Connect IQ apps, widgets, and data the BacklightYou can tap the touchscreen to turn on the : You can adjust the backlight timeout (Display Settings, page 18).1 From the home screen or a data screen, swipe down from the top of the an option: To manually adjust the brightness, use the arrows.