Transcription of Packet Tracer Create a Simple Network Using Packet Tracer
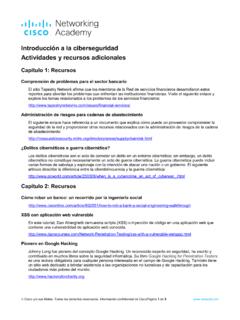
1 2017 Cisco and/or its affiliates. All rights reserved. This document is Cisco Public. Page 1 of 14 Packet Tracer Create a Simple Network Using Packet Tracer Topology Addressing Table Device Interface IP Address Subnet Mask Default Gateway PC Ethernet0 DHCP Wireless Router LAN internet DHCP Server Ethernet0 Laptop Wireless0 DHCP Objectives Part 1: Build a Simple Network in the Logical Topology Workspace Part 2: Configure the Network Devices Part 3: Test connectivity between Network devices Part 4: Save the File and Close Packet Tracer Background / Scenario In this activity you will build a Simple Network in Packet Tracer from scratch and then save the Network as a Packet Tracer Activity File (.)
2 Pkt). Packet Tracer Create a Simple Network 2017 Cisco and/or its affiliates. All rights reserved. This document is Cisco Public. Page 2 of 14 Part 1: Build a Simple Network in the Logical Topology Workspace Ste p 1: Launch Packet Tracer . a. Launch Packet Tracer on your PC or laptop computer Double click on the Packet Tracer icon on your desktop or navigate to the directory that contains the Packet Tracer executable file and launch Packet Tracer . Packet Tracer should open with a blank default Logical topology workspace as shown in the figure. Ste p 2: Build the topology a.
3 Add Network devices to the workspace. Using the device selection box, add the Network devices to the workspace as shown in the topology diagram. To place a device onto the workspace, first choose a device type from the Device-Type Selection box. Then, click on the desired device model from the Device-Specific Selection box. Finally, click on a location in the workspace to put your device in that location. If you want to cancel your selection, click the Cancel icon for that device. Alternatively, you can click and drag a device from the Device-Specific Selection box onto the workspace.
4 Packet Tracer Create a Simple Network 2017 Cisco and/or its affiliates. All rights reserved. This document is Cisco Public. Page 3 of 14 b. Add Network devices to the workspace. Using the device selection box, add the Network devices to the workspace as shown in the topology diagram To place a device onto the workspace, first choose a device type from the Device-Type Selection box. Then, click on the desired device model from the Device-Specific Selection box. Finally, click on a location in the workspace to put your device in that location. If you want to cancel your selection, click the Cancel icon for that device.
5 Alternatively, you can click and drag a device from the Device-Specific Selection box onto the workspace. c. Change display names of the nework devices. To change the display names of the Network devices click on the device icon on the Packet Tracer Logical workspace, then click on the Config tab in the device configuration window. In the Config tab type the new name of the device into the Display Name box as show in the figure. d. Add the physical cabling between devices on the workspace Using the device selection box, add the physical cabling between devices on the workspace as shown in the topology diagram.
6 The PC will need a copper straight-through cable to connect to the Wireless Router. Select the copper straight-through cable in the Device-Selection box and attach it to the FastEthernet0 interface of the PC and the Ethernet 1 interface of the Wireless Router. The Wireless Router will need a copper straight-through cable to connect to the Cable Modem. Select the copper straight-through cable in the Device-Selection box and attach it to the internet interface of the Wireless Router and the Port 1 interface of the Cable Modem. The Cable Modem will need a coaxial cable to connect to the internet cloud.
7 Select the coaxial cable in the Device-Selection box and attach it to the Port 0 interface of the Cable Modem and the coaxial interface of the internet cloud. Packet Tracer Create a Simple Network 2017 Cisco and/or its affiliates. All rights reserved. This document is Cisco Public. Page 4 of 14 The Interne cloud will need copper straight-through cable to connect to the server. Select the copper straight-through cable in the Device-Selection box and attach it to the Ethernet interface of the internet cloud and the FastEthernet0 interface of the server.
8 Part 2: Configure the Network Devices Ste p 1: Configure the Wireless Router a. Create the wireless Network on the Wireless Router Click on the Wireless Router icon on the Packet Tracer Logical workspace to open the device configuration window. In the Wireless Router configuration window click on the GUI tab to view configuration options for the Wireless Router. Next, click on the Wireless tab in the GUI to view the wireless settings. The only setting that needs to be changed from the defaults is the Network Name (SSID). Here, type the name HomeNetwork as shown in the figure.
9 B. Configure the internet connection on the Wireless Router Click on the Setup tab in the Wireless Router GUI. In the DHCP Server settings verify that the Enabled button is selected and configure the static IP address of the DNS server as as shown in the figure. c. Click on the Save Settings tab. Packet Tracer Create a Simple Network 2017 Cisco and/or its affiliates. All rights reserved. This document is Cisco Public. Page 5 of 14 Ste p 2: Configure the Laptop a. Configure the Laptop to access the wireless Network Click on the Laptop icon on the Packet Tracer Logical workspace and in the Laptop configuration windows select the Physical tab.
10 In the Physical tab you will need to remove the Ethernet copper module and replace it with the Wireless WPC300N module. To do this, you first power the Laptop off by clicking the power button on the side of the laptop. Then remove the currently installed Ethernet copper module by clicking on the module on the side of the laptop and dragging it to the MODULES pane on the left of the Laptop window. Then install the Wireless WPC300N module by clicking on it in the MODULES pane and dragging it to the empty module port on the side of the laptop. Power the laptop back on by clicking on the Laptop power button again.