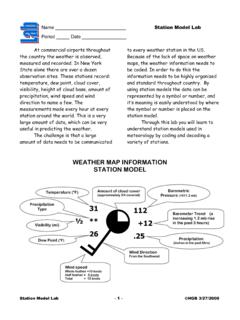
Transcription of Personal Weather Station - Siting
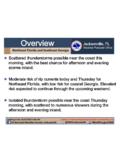
1 Personal Weather Station - Siting Proper Siting of a Personal Weather Station can be very challenging, especially in an urban or suburban setting. Generally speaking, avoid obstructions and anything that may cause a biased reading, such as dark surfaces, or materials that cool slowly, such as concrete. In most cases, you will have to make compromises, but the closer you are to the standards, the better. This How-To will provide some examples of best case scenarios, some best compromise solutions, and some examples on what NOT to do as well. Keep in mind that Personal Weather Station accuracy is not within the range acceptable for Climate-Quality data, and typically they will be placed in surroundings that are constantly changing. Climate-quality data is best collected in areas where sources of potential bias (such as introduction of surrounding structures and changes in land use) are kept to a minimum. Ideal Scenario Standards Temperature / Humidity Sensor Should be placed on a patch of level ground, over a surface representative of the area.
2 [Avoid rock/concrete and dark-colored surfaces, roofs, or irrigated lawns]. Should be mounted in a ventilated radiation shield. Height between 4 1 and 6 7 above ground ( m) Place sensors at a horizontal distance of 2 times the height of the nearest object (tree, structure, etc). [Example: 40 feet away from a 20 foot tall tree]. Keep away from other sources of heat such as chimneys, air vents, air conditioners, etc. Anemometer Ideally mounted at feet (10 metres) above ground level. Ideally placed at a horizontal distance of 10 times the height of the nearest obstruction. When placed on the side of a mast (rather than at the top), the sensor should be placed on a horizontal boom extending outwards from the mast, at a distance of 3 times the mast diameter. [So, if mounted on a 2-inch diameter pole, the boom should extend out 6 inches away from the pole]. Rain Gauge Ideally mounted at a height of 4 to 6 feet above the ground.
3 Ideally located at a horizontal distance of 4 times the height of the nearest obstruction. Ensure the gauge is mounted level to the ground, away from any horizontal surface that can introduce rain-splashing or surrounding snow buildup. 1/8 Personal Weather Station - Siting Reality Check Welcome to the Desert Southwest, where suburban houses are built on top of one another, fences are made of stone or concrete, and back yards are crushed rock or artificially irrigated turf grass. In some cases, lack of space, Home Owners Association rules, and aesthetics may make it impossible to ideally place Weather equipment. You can usually find an acceptable compromise for temperature, humidity, and precipitation, but the biggest challenge will be anemometer placement. The best tip here is if you ve got land, use it! If your home or business is in a rural area, you are likely to have more space to keep your instrumentation as far from structures as possible, and less likely to have landowner covenants or Homeowners Association rules to abide by.
4 Consider using wireless equipment to avoid the hassles of running long lengths of wire. Station Placement in Rural Areas LEFT: This is about as ideal as you can get. Anemometer is at 10m ( ) above ground level (AGL), Temp/Humidity sensor is at 5 AGL. Surrounding terrain is flat, with a natural, regionally-representative surface. The anemometer mast has cable stays to avoid flexing. At , cable stays are essential, unless you are mounting a much larger tower/sturdier structure. RIGHT: All-in-one units can relieve you of messy wires, but force you to compromise between the ideal height for temp/humidity/rain sensors, and ideal height for the anemometer. The best bet is to go somewhere in-between. This Station appears to be about 6-7 feet off the ground, not ideal for the anemometer, but an acceptable compromise, especially if the anemometer height can be noted in metadata. Keep in mind that if you mount an all-in-one Station high up, it will require more work to keep the rain gauge funnel clear of debris.
5 2/8 Personal Weather Station - Siting LEFT: The temp/humidity sensor is at an ideal height over representative ground cover. The rain gauge is at a good height to avoid dog-watering by the Weather Lab. However, the anemometer is only at about 6 AGL. Mounting a free-standing pole much higher than this without using cable stays can be difficult, and might not have been acceptable to the landowner, in which case this is a good compromise. The anemometer height should be noted in Station metadata. From a NWS perspective, peak gust information from this site would still be useful, but we probably would not want to use wind data for surface analysis without applying a correction factor, as it would have a low-biased wind speed against standard mounted equipment. Station Placement in Suburban Areas Smaller yards, nearby structures, variable ground cover, and HOA rules for aesthetics can make placing a Weather Station in residential suburban areas a challenge.
6 The principles remain the same get the anemometer as close to 10 metres AGL as possible, and keep the temp/humidity sensor and rain gauge as far from obstructions as possible. Stay away from pavement, rock walls, irrigated lawns, and swimming pools. RIGHT: Antenna masts are a great place to mount an anemometer, but not the temperature sensor. The anemometers here are both technically too low but the one on the right is at a very good compromise height. The one on the left would best be raised a little higher. Eave cross-mounts can prevent you from having to drill into your roof. When mounting any equipment on a structure, be sure to run a ground wire! 3/8 Personal Weather Station - Siting LEFT: Chimneys can provide a nice, solid structure for mounting an extension pole. Chimney mounts designed for antennas can be purchased in most home improvement and electronics stores. While this is likely below 10 metres AGL, this is a good compromise height that is low-impact (no holes drilled) and aesthetically not distracting (no cable stays).
7 This Station (Davis Vantage Pro 2?) uses an optional wireless transmitter kit for the anemometer, allowing the anemometer to be mounted far from the Rain Gauge and Temp/Humidity sensor suite. RIGHT: A 4x4 post buried a few feet into the ground is an excellent mounting option for your rain gauge and temp/humidity sensor. Periodically check to ensure that it is plumb and level, especially if you are in an area prone to frost-heaving. If you are concerned about aesthetics, consider using lumber that is more attractive when unfinished, such as cedar. It is probably best to not paint the post a dark color! 4/8 Weather Station Siting Bad Examples! LEFT: This anemometer is mounted far too low relative to the roof line. The wind direction will be heavily influenced by the peak of the roof, and the wind speed will be erratic as the roof may enhance or block the wind, depending on the direction. RIGHT: This temperature/humidity sensor is mounted too close to this structure.
8 Heat will radiate from the walls, eaves, and soffit through the day. A pocket of warm air will likely develop under the eave at night. This will result in a major warm bias. The rain gauge may also be blocked from the right depending on the wind direction and roof pitch, and heavy raindrops may splash into the gauge from the nearby roof. LEFT: If you do this, you re just begging for birds nest in your rain gauge funnel! Wind speed and direction is likely to be erratic due to turbulence around the tree branches. Temperature may run a little high during the day due to radiation off the tree limb. 5/8 Weather Station Siting Bad Examples! LEFT: Station notes indicated that this is an inactive chimney, but the temperature and humidity sensor is still too close to the black tar shingle roof. The brick also is likely to radiate heat. RIGHT: This Weather rock is clearly mounted too low to the ground, not far enough from nearby structures, and too close to pavement.
9 6/8 Weather Station Siting Good Examples! LEFT: This sensor suite is far from obstructions, with the anemometer mounted at about 10 m, and temp/humidity/rain gauge sensor suite about 5-6 feet AGL. Hopefully there are cable stays to prevent wobbling. 7/8 Further Detailed Reading CWOP Weather Station Siting , Performance, and Data Quality Guide World Meteorological Organization Guide to Meteorological Instruments and Methods of Observation World Meteorological Organization Initial Guidance to Obtain Representative Meteorological Observations at Urban Sites The following are NOT light 8/8 Document last updated 08/13/2016. Images and data contained herein are for informational purposes only and are not intended to imply endorsement of any particular Weather Station /manufacturer, software package/developer.