Transcription of Ply Gem Viny Replacement Window Installation Instructions
1 WHITEWHITENEW CONSTRUCTIONNAIL FIN INSTALLATIONPRECAUTIONARY NOTES For trim and siding, allow 1/8 -1/4 gap all the way around the Window frame to allow for expansion. If exterior is brick or masonry, leave a 3/8 gap between the bottom sill of the Window and the masonry to avoid brick binding . Exterior wall systems like stucco and EIFS must be designed to manage moisture around the Window opening. Follow the siding manufacturer s requirements for sealing between the siding and Window frames. Any low-expansion foam used should conform to AAMA 812-04 (see manufacturer s requirements), but any binding or damage of any type caused by the insulation will not be covered under warranty. Do not paint any vinyl part of this Window for any reason. Painting vinyl will render null and void all warranties. Do not block or seal weep solutions used to clean masonry can damage Window and door items such as; cladding, hardware, glass, sealants, and fasteners.
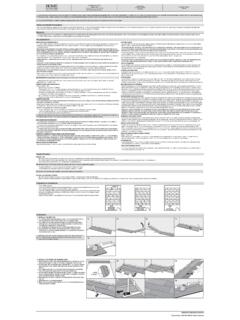
2 The cleaning solution manufacturer s recommendations must be followed carefully; you must protect Ply Gem Window units from contact with solution. If solution does come in contact with unit, immediately rinse all surfaces with clean (Recommended) Following the flashing manufacturers recommendations, apply flashing to the nail fins and surrounding wall surface starting with the bottom, then the sides, and finally the top, creating a shingle effect (reference Figure 4). NOTE: Where pan flashing is present, do not use flashing that will impede proper drainage of the pan on the bottom. 1. (Required) The Rough Opening should be level, plumb, and square, and should be sized according to Figure 1. 2. (Recommended) If a weather resistant barrier is used, follow the barrier manufacturer s recommendations for treatment of Window (Recommended) If pan flashing is used, it should be installed at this time. Follow the pan flashing manufacturer s recommendations (or ASTM 2112 standards), making sure that the product provides an adequate sill dam height to the (Required) Apply a generous (at least 3/8 bead), continuous bead of exterior-grade sealant to ensure an adequate seal between the back of the nailing fin and the exterior surface of the rough opening (reference Figure 3).
3 The bead should run along the approximate location of the nailfin holes (if the nailing fin has two rows of holes, apply sealant in line with the inner row). If using pan flashing, do not seal the lower sill nailing fin so as to provide adequate (Required) With the Window closed and locked, place it in the rough opening and center it from side to side. If the sill of the rough opening is not level and true, place shims as needed to prevent the sill from bowing or sagging (Figure 2), otherwise place the Window unit directly onto the sill. If your Window is a horizontal sliding Window , make sure each meeting rail is (Required) With a single approved fastener (see Chart A), fasten the Window through the nailfin through one hole nearest the top (Required) Square Window side to side (shimming if necessary see Figure 2) to maintain square and plumb jambs. Make sure the Window sill and head are level and not crowned.
4 Follow your local building codes, customs and building practices for additional Installation requirements. The manufacturer will accept no responsibility for air or water leakage above, under, or around the Window unit. These Instructions are general in nature; for detailed Installation Instructions by product, contact Ply Gem windows at properly installed Window will measure the same within 1/16 across the top, middle and bottom, and within 1/8 across the diagonals (this may vary for integral and side-by-side mull units). NOTE: Over-shimming can cause bowing and prevent proper Window (Required) After checking the operation of the Window , complete the fastening by placing fasteners in the provided nailing fin holes, spaced according to Chart 1 Figure 2 Consult local building codes to verify that sheathing is considered a framing 3 General InstallationFigure 4 IMPORTANT!
5 READ ALL Instructions BEFORE BEGINNING A Fastener Schedule for New Construction VinylNailfin Holes to Use for FastenersStandard: Every Other HoleImpact: Every HoleDistance From Window Corners4 or nearest holeBldg Framing Penetration1 min. (local code may dictate)Min. Corrosion-Resistant Nail Size3/8 Minimum Head diameterMin. Corrosion-Resistant Screw Size#8 or Larger Pan HeadNOTE: Mulled units may have additional Instructions attached to the REV. C