Transcription of PowerPoint Tutorial - apollolibrary.com
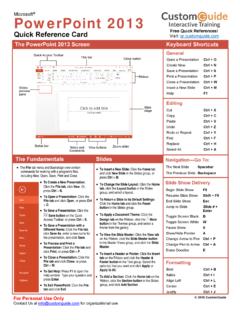
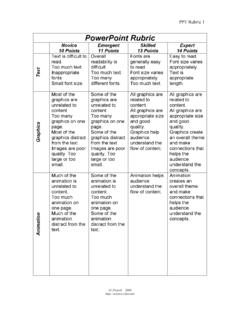
1 PowerPoint Tutorial TM. PowerPointTM is an exciting tool that assists in effectively presenting a summation of important ideas to an audience. PowerPointTM can often be intimidating to one who has never used the program. In reality, PowerPointTM can be as simple or involved as the creator's imagination, but at its foundation PowerPointTM is nothing more than giving life to an outline. In academic and professional levels a simple and clear PowerPointTM presentation is most effective. This Tutorial will walk through the basic steps of creating a simple PowerPointTM presentation. Then, it will show you where to find information on advanced PowerPointTM tools.
2 Finally, at the end of the Tutorial , there will be a list of important keys to remember to make your PowerPointTM. effective. Before you start, here are some terms to familiarize yourself with the tools used in PowerPointTM. Toolbar: Use to save, check spelling, similar to a word doc. Slide Tab: Use to navigate between slides and select slides to edit. Outline Tab: Use to insert, view, and edit text from the presentation. Slide Pane: Type and insert objects. Always type in the box with the dotted line around it (called the Task Pane: This gives you the options to choose from selected tools to create placeholder). your presentation. Now that you have reviewed the terms, you are ready to use the tools to create a PowerPointTM.
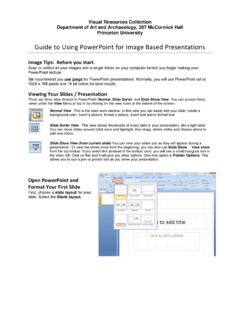
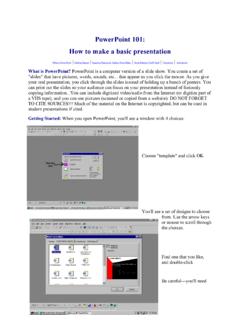
3 Presentation! Center for Writing Excellence 1. Basic Effective PowerPointTM Tools 1. When you first open PowerPointTM, a new presentation will open. The default slide design is a white background with black lettering. 2. To choose a new design background click on format from the toolbar, and then select slide design. Then simply click on the desired design. Select format from the toolbar and then slide design Select a slide design from the options that appear in the task pane. 3. Once you have selected the slide design, click in the placeholders to add the title and subtitle of the presentation. If the PowerPointTM is used to supplement a paper, then use the title of the paper.
4 If your paper does not have a subtitle, then you can include the names of those who participated in the presentation. Click on the placeholders to add a title, subtitle, and names of those who participated in the presentation. Center for Writing Excellence 2. 4. Now that the title slide is complete you are ready to create the next slide. To create a new slide, click on the insert tab from the toolbar and then select new slide. You can also click on the new slide tab located on the right side of the formatting toolbar. You can also select new slide on the formatting toolbar. Select insert from the toolbar, and then new slide . You can change the slide layout by selecting another option from the task pane.
5 5. The new slide that appears is the default layout. This has a title placeholder and a text placeholder. Notice that different slide layout options automatically appear in the task pane. To choose a different layout, simply click on one of the choices. 6. Continue this process until you have completed your presentation. 7. If you need to delete a slide select edit from the toolbar and then select delete slide. You can also move the mouse cursor over the slide you want to delete in the slide/outline tab. Then right click on the slide, and select delete slide. 8. During the creation of the presentation, you can go back and forth between slides by clicking on the slide you want to view in the slide/outline tab.
6 Center for Writing Excellence 3. 9. To view a slide show of your presentation, select slide show from the toolbar, and then select view show. To move between sides, click the mouse anywhere on the screen. Select slide show from the toolbar and then click on view show. Select a specific side from slide/outline tab to move between slides. These are the basic steps to completing an effective PowerPointTM presentation. There are other tools that can be used such as, inserting pictures (pictures from the internet often have copy right restrictions), transitions between slides, and music. However, music and sound effects are not generally acceptable for academic PowerPointTM presentations.
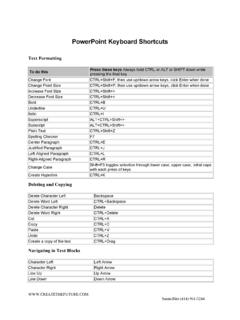
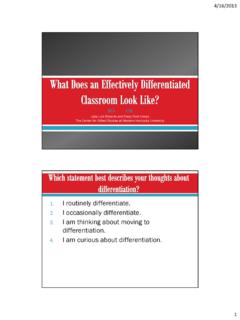
7 Center for Writing Excellence 4. Advanced PowerPointTM Tools To learn more about these individual PowerPointTM tools logon to the student webpage and then select the help icon from upper right hand corner of the screen. This takes you to the customer support online knowledgebase. Once you are there, select the folder on the left side of the navigation window titled Software use and troubleshooting. Then click on the Microsoft Office subfolder, and finally PowerPointTM. You can then select the appropriate article. Select software use and troubleshooting Select Microsoft Office Select PowerPointTM to view the instructional articles on using more PowerPoint tools Keys to effective PowerPointTM Presentations 9 Use no more than six words per line 9 Use no more than six lines per slide 9 Use no more than one topic per slide 9 Use clear simple fonts, such as Arial, as they are easier to read 9 Use light colored font on dark backgrounds, or dark colored fonts on light backgrounds 9 Insert a slide with a chart or graph to break up reading slides 9 When considering Clipart.
8 Use quality images or none at all 9 Remember copyright laws when taking an image from the internet Good luck and have fun creating your next PowerPointTM presentation! Center for Writing Excellence 5.