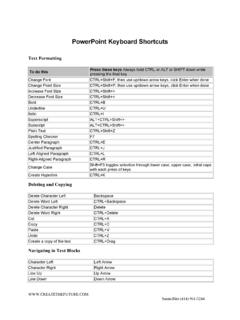
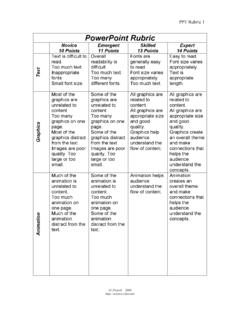
Transcription of Viewing Your Slides Presentation - Princeton …
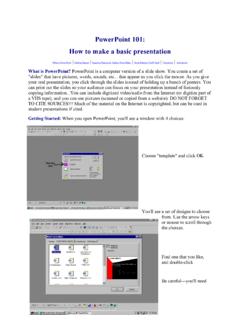
1 Visual Resources Collection Department of Art and Archaeology, 207 McCormick Hall Princeton university Guide to Using powerpoint for Image Based Presentations Image Tips: Before you start. Scan or collect all your images into a single folder on your computer before you begin making your powerpoint lecture. We recommend you use jpegs for powerpoint presentations. Normally, you will use powerpoint set to 1024 x 768 pixels and 16 bit colors for best results. Viewing your Slides / Presentation There are three view choices in powerpoint : Normal, Slide Sorter, and Slide Show View. You can access these views under the View Menu at top or by clicking on the view icons at the bottom of the screen: Normal View This is the main work window. In this view you can easily edit your slide, create a background color, insert a picture, format a picture, insert text and/or format text. Slide Sorter View This view shows thumbnails of every slide in your Presentation , like a light table.
2 You can move Slides around (click once and highlight, then drag), delete Slides and choose where to add new Slides . Slide Show View (from current slide) You can view your Slides just as they will appear during a Presentation . To view the whole show from the beginning, you can also use Slide Show View show from the top toolbar. If you select this (instead of the toolbar icon), you will see a small triangular tool in the lower left. Click on this and it will give you other options. One nice option is Pointer Options. This allows you to use a pen or pointer tool as you show your Presentation . Open powerpoint and Format your First Slide First, choose a slide layout for your slide. Select the Blank layout. Add a Background (color) to your Slide From the Design menu on top toolbar click Background. In the Format Background dialogue box click on the pull down color menu to see your color options. Black is recommended for the background. Choose a color or click on More Colors.
3 If you want to apply this color to the background of ALL your Slides click Apply to all. Add a grid display to your working view. Go to VIEW tab. Check box for gridlines. This will help you to place your images. Insert a Picture into your Slide Click the Insert tab, click Picture. Browse to find your image and double click. Adjust your Picture (size, position, adjustments) Size of picture on slide Select your picture by clicking on it once. You will see the circular handle bars outlining the image. To enlarge or make the image smaller, simply position your mouse over a corner circle. It will change to a double-headed arrow; click and drag. Always use a corner handle and drag diagonally. This will maintain the aspect ratio of the image and not distort it. Position on slide Make sure your object is selected (the handle bars should be showing). When you move your cursor into the center of the image, it will turn into a 4-headed arrow. Now you can move the entire image around on your slide- simply click and drag the picture to the desired location.
4 You can also use your keyboard arrow keys to move the object up and down and side to side. Picture Tools Select the picture to see the Picture Tools tab. Click Picture Tools to see options. In the Adjust box you can choose to make changes to your images such as brightness, contrast and color. This is also where the Compress function is found. Use Compress to reduce the size and resolution of an image and of your Presentation . For details, click the help icon and search Reduce file size of a picture . Cropping and sizing Cropping reduces the picture by removing part of the image at an edge. You can crop by clicking crop on the Picture Tools Ribbon and using the Crop handles that appear. You can also crop to a specific size or rotate the picture by clicking the arrow at the lower right corner of the size box on the ribbon to get the size dialog box. Adding additional images to a slide Repeat the steps to insert an image, while still working on the same slide.
5 Images can be moved and resized until they look good together. Adding Text Select Insert tab and click Text Box. Click where you want your text box and the box will appear. Grab a corner to resize the box. You can resize and move the box after you have added your text. Formatting Text Highlight the text. On the Home Tab, Select font and size and color. Other options are also found here. When your text box is active, you can click on the Drawing Tools Tab for more options. Adding a Hyperlink A Hyperlink allows you to connect to another slide, a web page or a file. Select the text or object that you want to use as a hyperlink. On the insert tab, select Hyperlink. In the hyperlink dialog box you can click the Browse the or just fill in the url in the address box. It is wise to copy and paste long urls to avoid typos. Always test your hyperlinks in your Presentation . Adding Additional Slides To add another slide, click New Slide on the ribbon.
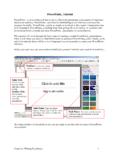
6 Or, when you have formatted your first slide, you can use the insert duplicate slide function by clicking on the dropdown for New Slide and choose Duplicate Selected Slides . Acquiring a folder of images: Photo Album Feature This allows you to take a whole folder of images and bring them all in at the same time, correctly sized. Go to the Insert tab, and select Photo Album. Select File/ Disk button and locate the file folder which you want to import. Open the folder and select all the items (click on them using mouse and the shift key). Now click on the Insert button. Select (highlight) images and click Insert button. You should now see the dialog box above. Make sure Fit to slide is selected in the Picture layout box, and click on the Create button. You will now have one slide for each image file, sized to the slide. To change all the backgrounds to black, simply follow the steps outlined above for Add a Background (color) to your Slide and Apply to all.
7 Save your Presentation and Save in Other Formats You should save both the original images in folders and your finished powerpoint lectures. You may wish to use the individual images again in different presentations. To save your Presentation Select Save under the Office Button. Browse to the location where you want to save your file. Once the correct location is showing, name your Presentation and Click on Save. If you are unsure of what computer you will be using, you may want to use the <Save As> function. From Office Button drop down, choose Save As. Select powerpoint 97-2003 if you will be presenting on an older computer. Select Adobe PDF if you wish to send or post your Presentation and you do not want a viewer to have access to your powerpoint . This is a great way to post PowerPoints for student review or tests. PowerPoitn2007 creates .pptx files, whereas saving as 97-2003 saves as .ppt files. The Save As PDF feature works best when your original file is a pptx.
8 Changing the Order of Slides in the Presentation In the Slide Sorter view, click once the slide to select/ highlight it. Then drag and release where you want your slide to go. You will see a thin line appear as you move your cursor this indicates where the slide will appear when you release your mouse button. You can also do this in the left sidebar of the Normal View. TIPS ALWAYS BACK UP your FILES. Plan ahead and confirm that the equipment you will need is available. Test the Presentation and equipment ahead of time so you are comfortable. Leave a margin around the edge of each slide to be sure nothing gets cut off. Mac users, be sure you have the vga adapter that came with your laptop so you can connect to projectors.