Transcription of PowerTeacher Quick Reference Card
1 PowerTeacher Quick Reference card Copyright 2008 Pearson Education, Inc. or its affiliates. All rights reserved. 1 of 2 PowerTeacher Quick Reference Taking Attendance An attendance indicator icon appears next to each class. The color of the dot indicates whether or not you've taken attendance for that class. 1. Click the chair icon next to the class for which you want to take attendance. 2. Choose the appropriate attendance code from the Current attendance code pop-up menu. 3. Click the cell next to each student who is absent or tardy to insert the code you chose from the pop-up menu. 4. Click Submit. Change Attendance Data 1. Click the chair icon next to the class for which you want to change past attendance, or mark future attendance.
2 2. Select a specific date for which to change attendance from the pop-up menu in the upper right corner of the page. 3. Click the cell next to each student s attendance codes (where applicable) to change the existing attendance code, or mark a future attendance code. 4. Click Submit. Submitting Lunch Counts 1. Click the utensil icon next to the class for which you want to submit a lunch count. 2. Enter the lunch counts in the fields. 3. Click Submit. Accessing Student Information 1. Click the backpack icon next to the class you want to view. 2. Click the student s name. 3. Choose a student page to access from the Select screens pop-up menu. Clicking on a student s last name takes you to the default student screen.
3 Clicking on their first name takes you to the last page you worked with. Creating a Seating Chart 1. Click on the two chairs to create a chart. 2. There are two ways to put the students onto the seating chart Left click and drag on students from bottom left corner of the screen. Click on the Alphabetical button 3. Once the students have been placed onto the seating chart you have the option of movingthem around. You can left click and drag thestudents to different spots. You can also Shuffle students, Clear Chart if you want to start over, Undo Changes that you had just made or make photos larger or smaller. You can also left click on student and pin them. This allows you not to move that students.
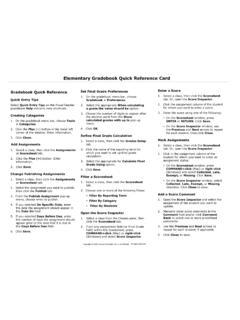
4 4. Print the chart by right clicking in the white space, not on a picture, and click print. 5. Click Save Chart when done. Accessing PowerTeacher Help To access the PowerTeacher Online Help, click the Help icon, which looks like a question mark. gradebook Quick Reference Quick Entry Tips Select Quick Entry Tips on the PowerTeacher gradebook Help menu to view shortcuts. Creating Categories 1. On the gradebook menu bar, choose Tools > Categories. 2. Click the Plus (+) button in the lower left corner of the window. Enter information. 3. Click Close. Add Assignments 1. Select a class, then click the Assignments or Scoresheet tab. 2. Click the Plus (+) button. Enter information. 3. Click Save. Change Publishing Assignments 1.
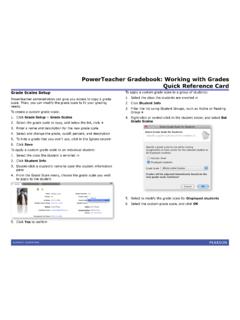
5 Select a class, then click the Assignments or Scoresheet tab. 2. Select the assignment you want to publish, then click the Publish tab. 3. From the Publish Assignment pop-up menu, choose when to publish. 4. If you selected On Specific Date, enter the date the assignment should appear in the Date On field. 5. If you selected Days Before Due, enter the number of days the assignment should appear prior to the date that it is due in the Days Before Due field. 6. Click Save. Continued on next page PowerTeacher Quick Reference card Copyright 2008 Pearson Education, Inc. or its affiliates. All rights reserved. 2 of 2 Set Final Grade Preferences 1. On the gradebook menu bar, choose gradebook > Preferences.
6 2. Select the appropriate When calculating a grade the value should be option. 3. Choose the number of digits to appear after the decimal point from the Store calculated grades with up to pop-up menu. 4. Click OK. Define Final Grade Calculation 1. Select a class, then click the Grades Setup tab. 2. Click the name of the reporting term for which you want to set up final grade calculation. 3. Select the appropriate for Calculate Final Grade Using option. 4. Click Save. Filter a Scoresheet 1. Select a class, then click the Scoresheet tab. 2. Choose one or more of the following filters: Filter By Reporting Term Filter By Category Filter By Students Open the Score Inspector 1. Select a class from the Classes pane, then click the Scoresheet tab.
7 2. From any assignment field (or Final Grade field) within the Scoresheet, press COMMAND+click (Mac) or right-click (Windows) and select Score Inspector. Enter a Score 1. Select a class, then click the Scoresheet tab. Or, open the Score Inspector. 2. Click the assignment column of the student for whom you want to enter a score. 3. Enter the score using one of the following: On the Scoresheet window, press ENTER or RETURN. Click Save. On the Score Inspector window, use the Previous and Next arrows to repeat for each student, then click Close. Mark Assignments 1. Select a class, then click the Scoresheet tab. Or, open the Score Inspector. 2. Click in the assignment column of the student for whom you want to enter an assignment status: On the Scoresheet window, press COMMAND+click (Mac) or right-click (Windows) and select Collected, Late, Exempt, or Missing.
8 Click Save. On the Score Inspector window, select Collected, Late, Exempt, or Missing checkbox. Click Close to save. Add a Score Comment 1. Open the Score Inspector and select the assignment of the student you want to update. 2. Manually enter score comments in the Comment field and/or click Comment Bank to select one or more predefined comments. 3. Use the Previous and Next arrows to repeat for each student, if applicable. 4. Click Close to save. Add a Final Grade Comment 1. Open the Score Inspector and select the final grade of the student you want to update. 2. Manually enter final grade comments in the Comment field and/or click Comment Bank to select one or more predefined comments. Use the Previous and Next arrows to repeat for each student, if applicable.
9 3. Click Close to save. Manually Override Final Grades 1. Select a class from the Classes pane, then click the Scoresheet tab. 2. Choose a term from the Filter By Reporting Term pop-up menu. 3. Open the Score Inspector and select the final grade of the student you want to update. The final grade field appears highlighted. 4. Select the Manual Override checkbox. Enter the new grade in the appropriate field, and enter any comments in the Comment field, if applicable. Use the Previous and Next arrows to repeat for each student, if applicable 5. Click Close to save. Reports The following reports are available on the gradebook Reports tab: Attendance Grid, Category Total, Final Grade a Comment Verification, Individual Student Report, Missing Assignment, Scoresheet, Student Multi-Section, and Student Roster.
10 gradebook Help To access the PowerTeacher gradebook Online Help, click Help > Contents on the menu bar.