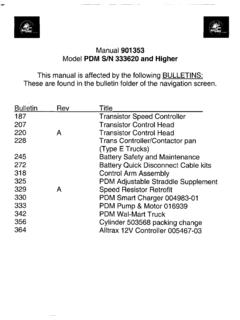
Transcription of PPT 45 901358 - bigjoesupport.com
1 PPT 45 Series Self-Propelled, pallet Lift Truck Serial Number 374782. and higher Operation Maintenance Repair Parts List Manual No. 901358 . 901358 i Rev A 07/05/07. SAFETY SECTION. SAFETY WARNINGS Energy Isolation Throughout this manual the following Warning Words During the servicing of the PPT 45 it may be required to will be used in conjunction with important operator work with and around electrical power. In most cases, instructions. The listing below shows the level of the the truck will be serviced with the batteries warnings. disconnected. However, some of the service procedures may require working with the battery DANGER. connected or within the battery charger.
2 As required, the lockout and tagout of the main power supply will be required and will need to be indicated as shown below. DANGER Lockout: The placement of a lockout device on an energy-isolating device (breaker panel, etc.), in accordance with an established procedure, ensur- This is the highest level statement. Failure to follow the ing that the energy- isolating device and the equip- listed instructions will most likely result in severe injury ment being controlled cannot be operated until the or death. lockout device is removed. WARNING Tagout: The placement of a tagout device on an energy- isolating device (circuit breaker), in accor- dance with an established procedure, to indicate WARNING that the energy-isolating device and the equipment being controlled cannot be operated until the tagout device is removed.
3 This is a statement of serious hazard. Failure to follow An appropriate locked out and tagged out power supply the listed instructions could place the individual at risk is shown in the illustration below. The tag, as of serious injury or death. The statements used with suggested by the illustration below, should accompany this level of warning deal with a safe operating lockout devices used for this safety function. procedure. If the procedure is ignored, the possibility of personal injury may exist. CAUTION. CAUTION. The statements used with this level of warning deal with a safe operating procedure. If the procedure is ignored, the possibility of personal injury may exist.
4 IMPORTANT. IMPORTANT. This type of statement is used to draw attention to a procedure that needs to be followed to prevent machine damage. ii 901358 . Table of Contents SECTION 1. DESCRIPTION. 1-1. INTRODUCTION ..1-1. 1-2. GENERAL DESCRIPTION ..1-1. 1-3. NAMEPLATE ..1-1. 1-4. SAFETY 1-5. SECTION 2. OPERATION. 2-1. 2-2. OPERATING PRECAUTIONS ..2-1. 2-3. GENERAL CONTROL OPERATION ..2-2. 2-4. DRIVING AND STOPPING PROCEDURES ..2-2. Standard Travel ..2-2. Creep 2-5. BELLY-BUTTON SWITCH. (Figure 2-1)..2-3. 2-6. STEERING ARM RETURN 2-7. LIFT AND LOWER 2-8. LOADING AND 2-9. SECTION 3. MAINTENANCE. 3-1. 3-2. OPERATOR DAILY CHECKS ..3-1. 3-3. MONTHLY AND QUARTERLY 3-4.
5 BATTERY CARE ..3-1. Battery Removal ..3-3. Testing and Charging of Lead Acid Battery ..3-3. 3-5. SECTION 4. ADJUSTMENT AND REPAIR. 4-1. 4-2. PART NUMBER IDENTIFICATION ..4-1. 4-3. STEERING ARM AND CONTROL HEAD ..4-1. Belly-Button Switch Potentiometer Testing and Adjustment ..4-2. Control Head Switch Steering Steering Arm Spring Replacement ..4-5. Electrical Control Cable 4-4. BRAKES ..4-9. 901358 iii Brake Pad Brake Pad 4-10. Replacement of Brake Assembly .. 4-11. Replacement of Dead-Man Switch ..4-12. Replacement of Creep Travel Switch .. 4-13. Replacement of Control Arm Shock 4-14. 4-5. DRIVE MOTOR, TRANSMISSION, DRIVE WHEEL, AND PIVOT TUBE ASSEMBLY.
6 4-14. Drive Motor Servicing..4-14. Inspect and replace worn brushes as follows:.. 4-14. Inspect commutator If the motor needs to be replaced, remove it from the transmission as follows:.. 4-16. Transmission Assembly Removal..4-18. 4-6. BASE, FRAME AND FORK SECTION .. 4-19. 4-19. Load Wheel Replacement ..4-19. Frame Assembly: Fork Section and Lift Linkage Repair and Replacement.. 4-20. 4-7. 4-22. Battery Removal and 4-22. Battery Cable Assemblies Replacement.. 4-23. Transistor/Contactor 4-25. Horn 4-26. Battery Charger .. 4-27. 24V Gel-Cell Batteries ..4-27. Medium Duty 24V Flooded Cell Battery 4-28. Heavy Duty 24V Steel Case Flooded Cell Industrial Battery (Not shown).
7 4-28. BATTERY DISCHARGE 4-32. Battery Discharge Indicator Replacement.. 4-32. HOURMETER.. 4-33. Hour meter Replacement.. 4-33. KEYSWITCH.. 4-33. WIRE HARNESS TESTING.. 4-33. 4-8. 4-36. Line and Fitting 4-36. Hydraulic Pump, Motor, and Reservoir Assembly.. 4-37. Motor Brush Replacement .. 4-37. Relief Valve Assembly .. 4-38. Solenoid Valve Assembly .. 4-38. Motor Starter Replacement .. 4-38. Hydraulic Strainer 4-38. Reservoir Assembly O-Ring .. 4-39. Replace Hydraulic Pump/Motor Assembly .. 4-39. Replace Hydraulic Pump Lift Cylinder Removal .. 4-41. Lift Cylinder Repair .. 4-41. Hydraulic Pressure Adjustment.. 4-42. 4-9. DECALS AND TRIM..4-43. Painting Requirements.
8 4-43. iv 901358 . Decals and SECTION 5. OPTIONS. 5-1. COLD CONDITIONING PACKAGE..5-1. 5-2. LOAD Replacement of existing Installation of a new backrest ..5-2. 5-3. LOAD STABILIZER..5-4. SECTION 6. TROUBLESHOOTING. 6-1. TROUBLESHOOTING CHART ..6-1. 6-2. Contactor Testing ..6-3. Contactor Testing ..6-3. Switch Testing..6-3. 6-3. TRANSISTOR CONTROLLER TROUBLESHOOTING ..6-5. Circuit GENERAL SYSTEM CHECKOUT..6-9. ADJUSTMENT ..6-10. 6-4. DIAGNOSTICS..6-11. Programmer Diagnostics ..6-12. Diagnostic Test the Fault Detection Circuitry ..6-12. 6-5. Maintenance ..6-12. Cleaning ..6-13. Transistor Control Electrical Panel 6-6. Troubleshooting ..6-13. Check for Power to the Controller.
9 6-14. Check for Contactor Operation and Keyswitch Input (KSI) ..6-14. Check Potentiometer Check for controller output ..6-15. SECTION 7. PARTS LIST. 7-1. Control Head Assembly ..7-2. 7-2. Steering Arm ..7-6. 7-3. Power Section Parts - Serial number 374782 to 7-4. Power Section Parts - Serial number 376880 and 7-5. Transmission, Motor and Brake Assembly - Serial number 374782 to 7-6. Transmission, Motor and Brake Assembly - Serial number 376880 AND HIGHER ..7-18. 7-7. Drive Motor Repair Parts ..7-20. 7-8. DECALS ..7-22. 7-9. Base and Frame Parts ..7-23. 7-10. Fork Section Parts ..7-24. 7-11. Hydraulic Cylinder Parts ..7-27. 7-12. Hydraulic pump, Motor, and Reservoir Parts.
10 7-28. 901358 v 7-13. Maintenance Free Battery PACK (FOUR 6V) with 120 VAC Charger .. 7-32. 7-14. Maintenance Free Battery PACK (FOUR 6V) with 230 VAC Charger .. 7-34. 7-15. Flooded Cell Battery Pack (FOUR 6V) with 120 VAC Charger ..7-36. 7-16. Flooded Cell Battery PACK (FOUR 6V) with 230 VAC 7-38. 7-17. Battery Installation, Two-12V Maintenance Free Battery Pack and Industrial BatterY .. 7-40. 7-18. Maintenace Free Battery Pack Wiring Diagrams .. 7-42. 7-19. Flooded Cell Battery Pack Wiring 7-44. 7-20. Contactor Panel Assembly Parts ..7-46. 7-21. Charger Circuit Board .. 7-48. 7-22. Load Wheels ..7-49. 7-23. Optional Equipment .. 7-50. Conditioning .. 7-50.