Transcription of Quick Reference Guide - DYMO
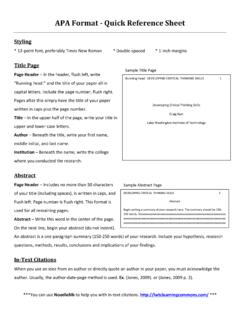
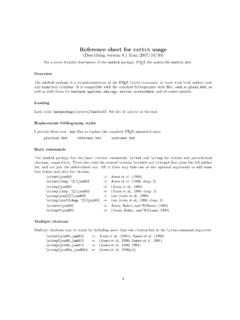
1 Getting to Know Your Label Maker About Your New Label Maker With your new DYMO LetraTag label maker, you can create a wide font Size # Lines CAPs Num Lock variety of high-quality, self-adhesive labels. The label maker uses DYMO LetraTag (LT) 1/2 inch (12 mm) label cassettes. LT label cassettes are available in a variety of colors and materials such as paper, plastic, metallic, magnetic, and iron-on. Visit for a complete User Guide , and for information Label Exit on obtaining labels for your label maker. LCD Display Product Registration Visit to register your label maker online. Settings Cutter Power Insert Print Cancel Format OK Getting Started Memory Save Navigation Memory Recall Follow the instructions in this section to print your first label. Num Lock 1 Inserting the Batteries CAPs 1. Remove the battery compartment cover. LT-100H Clear 2. Insert the batteries following the polarity Backspace markings (+ and ). W001835_C Rev.
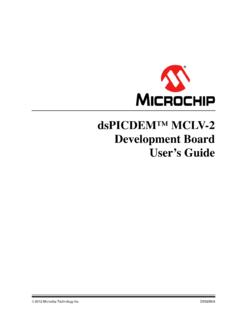
2 03/16. Space Bar 3. Replace the cover. Quick Reference Guide ! Remove the batteries if the label maker will not be used for a long period of time. Figure 1. 2 Inserting the Label Cassette 4 Setting the Date and Time Designing Your Label 1. Press and release the label 1. Press . Changing the font Size cassette cover to open the label 2. Select Set Date and press . The default date is displayed. compartment. See Figure 2. Five font sizes are available for your labels: Extra Small, Small, Medium, 2. Insert the cassette with the label Large, and Extra Large. positioned between the print 3. Use the left or right arrow key to move the cursor over each setting 1. Press the key. head and pinch roller. (month, day, and year) and use the up or down arrow key to increase 2. Select Size and press . 3. Press firmly until cassette clicks Figure 2. or decrease the value. 3. Select the desired font size and then press . into place. 4. When finished, press.
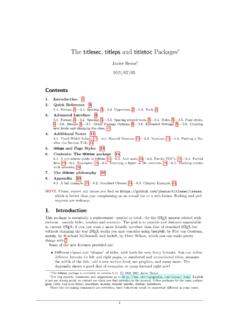
3 The default time is displayed. Adding font Styles 4. Close the label cassette cover and press to turn on the power. You can choose from six different font styles: Normal Outline 5. Use the left or right arrow key to move the cursor over each setting Bold Shadow (hours and minutes) and use the up or down arrow key to increase or decrease the value. Italic Vertical 6. When finished, press . Figure 3 1. Press . 3 Selecting a Language 5 Printing Your First Label 2. Select Style and press . 1. Enter text to create a simple label. 3. Select a font style and press . 1. Press . 2. Use the up or down arrow key to select Language and press . 2. Press . Creating Two-Line Labels 3. Use the up or down arrow key to select the language you want and 3. Press the cutter button to cut the label. 4. Remove the paper backing from the label to expose the adhesive, and 1. Type the text for the first line and press . press . then attach the label.
4 2. Select Second Line and press . A multi-line symbol is inserted at the end of the first line, but will not print on the label. 3. Type the text for the second line. Continued Adding the Date Adding Symbols Adding Symbols (continued). 1. Press . The label maker supports the symbols shown below. 1. Press , select Symbols, and press . The first row of symbols 2. Select Date and press . Row Position in Row Row Position in Row shown in the table appears in the display. Adding Box and Underline Styles 2. Use the arrow keys to move to the desired symbol. The left and right arrows move horizontally along a row of symbols. The up and down You can highlight your text by choosing a box or underline style. arrow keys scroll vertically through the rows of symbols. Underline Edged 3. When you locate the symbol, press to add the symbol to your label. Square Train Previewing Your Label Pointed Sweet Hearts 1. Press . Rounded Flowers 2. Select Preview and press.
5 Crocodile Clearing the Display 1. Press . Press to clear all label text and formatting from the display. 2. Select Borders, and press . Storing Label Text 3. Select underline or a box style and press . You can store up to nine specific labels you use frequently. Adding International Characters 1. Press . The label maker supports the extended Latin character set using RACE 2. Select a memory location and press . technology. Similar to using a mobile phone keypad, when you hold down a letter key for longer than one second, you will scroll through Recalling Stored Labels variations on that letter. To insert the character, release the key when the 1. Press . desired character appears. 2. Select a label to recall and press . To clear a memory field, first recall a label and then press . 1-Year Warranty for your DYMO Product What to do if your product is defective Your electronic DYMO product is sold with a 1-year warranty from the DYMO offers you the following service options: date of purchase against defects in material and workmanship.
6 DYMO DYMO. Web site: In most situations a visit to will will repair or replace your product free of charge on the following give you the right assistance. In the Customer Support area, you will conditions: find information about your DYMO product, such as Frequently Asked 1. Products returned under this warranty must be accompanied by a Questions and solutions to known problems. The User Guide also gives description of the defect together with a copy of the product's proof of you additional information. purchase and your full contact and delivery details: name, telephone, Dealer: Your DYMO dealer can help you to determine the exact nature complete address street, house number, postal code, city, country. of the problem and assist you further. 2. Products returned to DYMO must be adequately packaged. DYMO DYMO. Help Desk: You can also contact the DYMO Help Desk where an will accept no liability for goods lost or damaged in transit from the associate will help you to determine the exact nature of the problem customer.
7 And advise you what to do next: 3. Products must have been used strictly in accordance with operating US 1 877 724 8324. instructions supplied. DYMO will have no liability for defects caused Intl +44 203 564 8356. by accident, misuse, alteration or neglect. Repair Center: You can send your defective product to a DYMO repair 4. DYMO accepts no liability for any consequential loss, damage or center (please see the above-mentioned conditions 1 and 2 on how to expense of any kind resulting from the machines or accessories or replace a defective product). The address of your nearest DYMO repair the use thereof, save that liability for death or bodily injury caused by center can be found at or you can contact the DYMO. such products is not excluded. Help Desk 5. DYMO label printers are designed for use only with DYMO-branded labels. This warranty does not cover any malfunction or damage caused by the use of third-party labels. 2015 SANFORD, This warranty does not affect your statutory rights as a consumer.
8 DISTRIBUTED BY: DYMO, ATLANTA, GA 30328. CUSTOMER CARE: 877-724-8324.