Transcription of Quick Start Guide - Asus
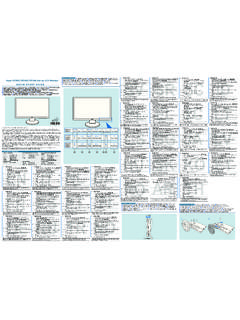
1 Quick Start GuideE16702 Quick Start GuideFront panel featuresNOTE. The illustrations in this Guide are for reference only. For detailedinformation on your system s specifications, refer to the user VOLUME +System power buttonLED panelPower LEDHDD LEDCard reader LEDS ystem volumedialNEXT buttonPREVIOUS buttonSTOP buttonPLAY/PAUSE buttonAudio DJ power buttonRemote sensor VOLUME +Optical S/PDIF port4-pin IEEE 1394 port6-pin IEEE 1394 portHeadphone portMic portSM card slotSD /MMC card slotUSB portsSlim optical driveDrive activity LEDSTOP/EJECT buttonEmergency eject pinholeMS /MS Pro card slotCF /Microdrive card slotExternal3 asus DiGiMatrix (AB-V10)1. Standby power LED2. HDD power plug(to HDD power connector)3. IDE cable (to HDDconnector)4. Chassis fan5. CPU fan6. DIMM sockets7. HDD metal tray8. Optical drive shieldMic portLine Out portLine In portAntenna portPS/2 mouse portGigabit LAN portEthernet LAN portVideo In portCable TV connectorDC In socketDC Out socketVGA portDVI portHDTV/TV portUSB portsPS/2 keyboard port12345678 Rear panel featuresInternal componentsSecondary IDEconnector4 Quick Start Guide213 Hand slot2145376 Removing the top coverInstalling a hard disk driveSlide the metalcover towardthe rear panelDisengage the sidehooks from the HDDtray and optical driveshieldInsert the tray metal tacks into thedrive screw holes (two on the sideand two at the bottom)Align the side hooks withthe tray rail and opticaldrive shield.
2 Slide themetal cover toward thefront panel until it fits inplace5 asus DiGiMatrix (AB-V10)12567834910 Installing a CPUU nlock the socket by pressing thelever sideways then lifting it up to a90 angleDisconnect the CPU fan cableRemove thebracket screwCAUTION! Make sure that the gold mark on the CPU matches the baseof the socket lever. The CPU fits only in one correct orientation. DO NOTforce the CPU into the socket to prevent bending the pins and damagingthe CPUD isconnect thechassis fan cableRe-install the chassis fan andheatsink assemblyRe-install the CPU fan6 Quick Start GuideFit the top cover tabswith the chassis rail andthe front panel covertabsTabs231344 CAUTION! A DDR DIMM is keyed with a notch so that it fits in only onedirection. DO NOT force a DIMM into a socket to avoid damaging a DIMM3 Press the retainingclips outwardAlign a DIMM on the socket suchthat the notch on the DIMM matches the break on the socketFirmly insert the DIMM tothe socket until theretaining clips snap backin place and the DIMM isproperly the top cover7 asus DiGiMatrix (AB-V10)Power adapter and cable312 Audio/Video cableRadio antenna12 Connecting cablesAntennaportPower cablePower outletPower adapterDC in power plugDC in socketAudio/Videocable plugS-VideoportHDTV cableNOTE.
3 You may also connect a regular TV set using the HDTV cable byconnecting the blue jack to the video input port of the TV set. The TV setonly receives video signals from the DiGiMatrix cable plugHDTV portHDTVRCA inputports1 Video out cable12 Audio out cableAudio I/Oports8 Quick Start GuideConnecting external devicesTo the front panelTo the rear panelPS/2 KBPS/2 MouseLine OutLine InMicRJ-45 VGAUSB MouseDVIDiGiMatrix subsystemCable TV VOLUME +MicHeadphoneHDDS cannerCameraAudio Devices