Transcription of R6100 WiFi Router User Manual - Netgear
1 350 East Plumeria DriveSan Jose, CA 95134 USAJuly 2013202-11240-01R6100 wifi RouterAC1200 Dual Band user Manual2R6100 wifi Router SupportThank you for selecting Netgear products. After installing your device, locate the serial number on the label of your product and use it to register your product at You must register your product before you can use Netgear telephone support. Netgear recommends registering your product through the Netgear website. For product updates and web support, visit (US & Canada only): (Other Countries): Check the list of phone numbers at , the Netgear logo, and Connect with Innovation are trademarks and/or registered trademarks of Netgear , Inc. and/or its subsidiaries in the United States and/or other countries. Information is subject to change without notice. Netgear , Inc. All rights 1 Hardware SetupUnpack Your Router .. 8 Hardware Features.. 8 Front and Side Panel .. 9 Rear Panel .. 10 Label .. 11 Position Your Router .
2 11 Chapter 2 Getting StartedRouter Setup Preparation.. 13 Use Standard TCP/IP Properties for DHCP .. 13 Gather ISP Information .. 13 Wireless Devices and Security Settings .. 13 Login and Access .. 13 Netgear genie Setup .. 14 Use Netgear genie after Installation.. 15 Upgrade the Firmware .. 15 Dashboard (BASIC Home Screen).. 16 Join Your Wireless Network .. 17 Manual Method .. 17Wi-Fi Protected Setup Method .. 17 Netgear genie App and Mobile genie App .. 18 Chapter 3 Basic SettingsInternet Setup .. 20 Parental Controls .. 22 Basic Wireless Settings .. 24 Change the Wireless Security Option.. 25 Wireless Network Settings .. 26 Wireless Security Options .. 26 Set Up a Guest Network.. 28 View Attached Devices.. 29 Chapter 4 Advanced Home SettingsNETGEAR genie Advanced Home Screen .. 31 Internet Connection Setup Wizard .. 31 WAN Setup.. 32 Default DMZ Server .. 334R6100 wifi RouterChange the MTU Size .. 34 LAN Setup .. 35 LAN TCP/IP Setup.
3 36 Use Router as DHCP Server .. 37 Address Reservation .. 37 Role of the Router as a DHCP Server .. 37 Address Reservation .. 38 WPS Wizard for wifi Connections.. 38 Quality of Service (QoS) Setup .. 39 WMM QoS for Wireless Multimedia Applications .. 39 Set Up Bandwidth Control .. 40 Set Up QoS for Internet Access .. 41 Chapter 5 USB StorageConnect a USB Storage Device to the Router .. 46 Safely Remove a USB Drive .. 46 Access the USB Storage Device .. 46 Sharing Files .. 48 Share Photos .. 48 Store Files in a Central Location for Printing .. 49 Share Large Files over the Internet .. 49 View a USB Device Attached to the Router .. 50 USB Storage Device Network and Access Settings.. 51 Available Network Folders .. 52 Specify Approved USB Devices .. 53 Media Server Settings .. 54 TiVo Support .. 55 Chapter 6 SecurityKeyword Blocking of HTTP Traffic .. 59 Block Services (Port Filtering) .. 60 Port Triggering to Open Incoming Ports.
4 61 Port Forwarding to Permit External Host Communications .. 62 How Port Forwarding Differs from Port Triggering .. 63 Set Up Port Forwarding to Local Servers .. 64 Add a Custom Service .. 64 Edit or Delete a Port Forwarding Entry.. 65 Application Example: Make a Local Web Server Public.. 65 Set Up Port Triggering .. 66 Schedule Blocking .. 68 Security Event Email Notifications .. 69 Chapter 7 AdministrationUpgrade the Router Firmware .. 71 View Router Status.. 72 Router Information .. 725R6100 wifi RouterInternet Port .. 72 Wireless Settings ( GHz and 5 GHz) .. 74 Specify Logs Settings .. 75 Manage the Configuration File .. 77 Back Up Settings .. 77 Restore Configuration Settings.. 77 Erase the Current Configuration Settings .. 78 Change the Password .. 78 Password Recovery .. 79 Chapter 8 Advanced SettingsAdvanced Wireless Settings .. 81 Control the Wireless Radio .. 81 Set Up a Wireless Schedule .. 82 View or Change WPS Settings.
5 82 Set Up a Wireless Access List by MAC Address .. 83 Wireless Access Point .. 85 Wireless Distribution System .. 86 Set Up the Base Station .. 87 Set Up a Repeater .. 88 Dynamic DNS .. 90 Static Routes .. 91 Remote Management .. 92 Universal Plug and Play .. 94 IPv6 .. 95 Requirements for Entering IPv6 Addresses .. 95 Auto Detect .. 96 IPv6 Auto Config.. 97 IPv6 6to4 Tunnel.. 98 IPv6 Pass Through .. 99 IPv6 Fixed.. 99 IPv6 DHCP .. 101 IPv6 PPPoE .. 102 Traffic Meter .. 104 Chapter 9 TroubleshootingQuick Tips.. 107 Sequence to Restart Your Network .. 107 Check Ethernet Cable Connections .. 107 Wireless Settings .. 107 Network Settings.. 107 Troubleshoot with the LEDs .. 108 Power LED Is Off or Blinking .. 108 Power LED Stays Amber .. 108 LEDs Never Turn Off .. 109 Internet LED Is Off .. 109 wifi LED Is Off .. 1096R6100 wifi RouterCannot Log In to the Router .. 109 Cannot Access the Internet .. 110 Troubleshoot PPPoE .. 111 Troubleshoot Internet Browsing.
6 112 Changes Not Saved .. 113 Wireless Connectivity .. 113 Troubleshoot Your Network Using the Ping Utility .. 113 Test the LAN Path to Your Router .. 114 Test the Path from Your Computer to a Remote Device .. 114 Appendix A Supplemental InformationFactory Settings .. 117 Technical Specifications .. 119 Appendix B Notification of Compliance711. Hardware SetupGetting to know your routerThe R6100 wifi Router delivers AC1200 wifi speeds with access up to three times faster than similar technology. This Router supports HD streaming and online gaming throughout your home, and a secure and reliable connection to the Internet. The R6100 is compatible with next-generation wifi devices and backward compatible with a/b/g/n devices. With speeds up to 3001 +867 Mbps and simultaneous dual-band wifi technology, the Router avoids wireless interference, ensuring top wifi speeds and reliable connections. If you already set up your Router , you can skip this chapter.
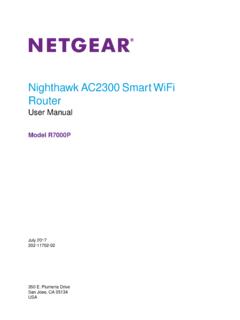
7 If you have not done that yet, this chapter covers the hardware setup. Chapter 2, Getting Started, explains how to access your Router to view or change its chapter contains the following sections: Unpack Your Router Hardware Features Position Your Router For more information about the topics covered in this Manual , visit the support website at Maximum wireless signal rate derived from IEEE standard specifications. Actual data throughput and wireless coverage will vary. Network conditions and environmental factors, including volume of network traffic, building materials and construction, and network overhead, lower actual data throughput rate and wireless coverage. Netgear makes no express or implied representations or warranties about this product s compatibility with any future standards. 1300 Mbps is approximately three times faster than 450 Setup8R6100 wifi Router Unpack Your RouterOpen the box and remove the Router , cables, and installation cableR6100 wifi Router Power adapterFigure 1.
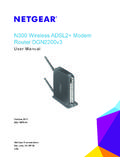
8 Check the package contentsYour box contains the following items: R6100 wifi Router AC power adapter (plug varies by region) Category 5 (Cat 5) Ethernet cable Installation guide with cabling and Router setup instructionsIf any parts are incorrect, missing, or damaged, contact your Netgear dealer. Keep the carton and original packing materials in case you return the product for repair. Hardware FeaturesBefore you cable your Router , take a moment to become familiar with the front, side, and back panels and the label. Pay particular attention to the LEDs on the front Setup9 R6100 wifi RouterFront and Side PanelThe Router front and side panels have the status LEDs and buttons shown in the following On/Off buttonWPS buttonFigure 2. Router front and side viewTable 1. Front panel LED descriptions LEDD escriptionPower Solid amber. The Router is starting up. Blinking amber. The firmware is upgrading, or the Reset button was pressed.
9 Solid green. The Router is ready. Blinking green. The firmware is corrupted. Visit Off. Power is not supplied to the Solid green. The Internet connection is ready. Solid amber. The Ethernet cable connection to the modem has been detected. Off. No Ethernet cable is connected to the Solid blue. The wireless radio is operating in either GHz or 5 GHz mode. Blinking. A wireless computer or device is using WPS to join the network. Off. The wireless radios are off for both GHz and 5 Solid blue. The Router has accepted the USB device. The USB device is ready to be used. Blinking blue. A USB device is plugged in and is trying to connect. Off. No USB device is connected, or someone clicked the Safely Remove Hardware button, and it is now safe to remove the attached USB device. The wifi and WPS buttons toggle the wifi and WPS functions on and off.
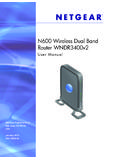
10 Hardware Setup10R6100 wifi Router wifi On/Off button. Pressing and holding this button for two seconds turns the GHz and 5 GHz wireless radios on or off. If the Wireless LED is lit, the wireless radios are on. If this LED is off, the wireless radios are turned off and you cannot connect wirelessly to the Router . WPS button. You can use this button to use WPS to add a wireless device or computer to your wireless network. The Wireless LED blinks blue when the Router is trying to add the wireless device or computer. The LED stays solid blue when wireless security is enabled in the PanelThe rear panel has the connections and buttons shown in the following On/OffPower connectorportLAN ports 1 4 ResetbuttonportFigure 3. Router rear panelThe Reset button restores the factory settings. See Factory Settings on page 117. Hardware Setup11 R6100 wifi RouterLabelThe label on the bottom of the Router shows the login information, MAC address, and serial number.