Transcription of Roof-Top Air Conditioner CARAVAN MODEL B3200
1 22 INSTALLATION & OPERATINGINSTRUCTIONSI mportant: These Instructionsmust stay with read manual must be read and understood before installation, adjustment,service, or maintenance is performed. This unit must be installed by a quali-fied service technician. Modification of this product can be extremely haz-ardous and could result in personal injury or property Air ConditionerCARAVAN MODEL B3200 TYPE OFFICED ometic CorporationFor No. , Dutch, English,Finnish, French, German,Greek, Italian, Norwegian,Portuguese, Spanish & Swedish 2005 5/05 Dometic GmbHD-57074 SiegenRECORD THIS UNIT INFORMATIONFOR FUTURE REFERENCE: MODEL NumberSerial NumberDate Purchased23 SAFETY INSTRUCTIONSThis manual has safety information and instruc-tions to help users eliminate or reduce the risk ofaccidents and SAFETY INFORMATIONThis is the safety-alert symbol. When you see thissymbol in this manual, be alert to the potentialfor personal recommended precautions and safe op-erating SIGNAL WORDSA signal word , WARNING OR CAUTION is usedwith the safety-alert symbol.
2 They give the levelof risk for potential injury. indicates a potentially hazard-ous situation which, if not avoided, could resultin death or serious a potentially hazard-ous situation which, if not avoided may result inminor or moderate without the safety alertsymbol indicates, a potentially hazardous situa-tion which, if not avoided may result in and follow all safety information and in-structions.!WARNING!CAUTIONCAUTION!GE NERAL features or specifications as described orillustrated are subject to change without This Air Conditioner Is Designed For:1. Installation on a CARAVAN during the timethe Cara-van is Mounting on the roof of a Roof construction with rafters/joists on minimum of406mm Minimum of 25mm and maximum of 100mm dis-tance between roof to ceiling of CARAVAN . Alternateinstallation methods will allow for roofs more than100mm ability of the air Conditioner to maintain the desiredinside temperature depends on the heat gain of preventative measures taken by the occupants ofthe CARAVAN can reduce the heat gain and improve theperformance of the air Conditioner .
3 During extremelyhigh outdoor temperatures, the heat gain of the Caravanmay be reduced by:1. Parking the CARAVAN in a shaded area2. Using window shades (blinds and/or curtains)3. Keeping windows and doors shut or minimizingusage4. Avoiding the use of heat producing appliancesOperation on High Fan/Cooling mode will give optimumor maximum efficiency in high humidity or high the air Conditioner early in the morning andgiving it a "head start" on the expected high outdoorambient will greatly improve its ability to maintain thedesired indoor a more permanent solution to high heat gain,accessories like an outdoor patio and window awning willreduce heat gain by removing the direct sun. They alsoadd a nice area to enjoy company during the cool of CondensationNote:The manufacturer of this air Conditioner will not beresponsible for damage caused by condensed moisture onceilings or other surfaces. Air contains moisture and thismoisture tends to condense on cold surfaces.
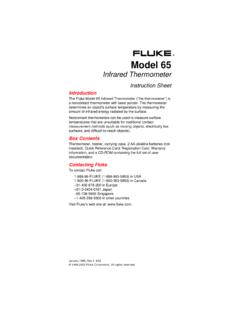
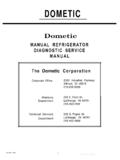
4 When airenters the CARAVAN , condensed moisture may appear on theceiling, windows, metal parts, etc. The air conditionerremoves this moisture from the air during normal doors and windows closed when this air conditioneris in operation will minimize condensed moisture on ** The Manufacturer gives GENERAL guidelines for gen-erator requirements. These guidelines come from experi-ences people have had in actual sizing the generator, the total power usage of yourCaravan must be considered. Keep in mind generators losepower at high altitudes and from lack of PrecautionsINSTALLATION INSTRUCTIONSB. Choosing Proper Location For The AirConditionerThis air Conditioner is specifically designed for installation onthe roof of a CARAVAN . When determining your coolingrequirements, the following should be considered: Size of CARAVAN ; Window area (increases heat gain); Amount of insulation in walls and roof; Geographical location where the CARAVAN will be used; Personal comfort level Normal Location-The air Conditioner is designed tofit over an existing roof vent 11/2 LLL1/3L2/3 LFIG.
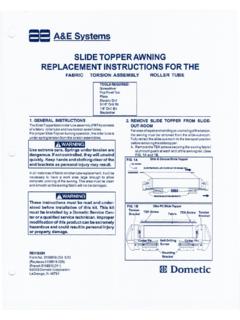
5 2It is preferred that the air Conditioner be installed on arelatively flat and level roof section measured with theCaravan parked on a level : A 8 slant to either side is acceptable, but a Front toBack slant is not 3 Font to Back Slope Is NOT ACCEPTABLEM odel CompressorCapacity (KW) Rating220-240 VAC 50Hz., 1 PhFull Load Amps(Compressor / Motor) / / Rotor Amps(Comp / Motor)24 / / Protection10 Amp Time Delay Fuse,or Circuit BreakerInput Power (KW) Wire SizeUp to 8 metersuse 1mm2, Copper** Generator Size1 Unit - Units - installation may damage equipment,could endanger life, cause serious injury and/or property Read Installation and Operating Instructions care-fully before attempting to start your air The Manufacturer will not be liable for any damagesor injury incurred due to failure in following Installation must comply with all applicable codesand/or NOT add any devices or accessories to this airconditioner except those specifically authorized byThe This equipment must be serviced by qualifiedpersonnel and some local codes and regulationsrequire these people to be Other Locations-When no roof vent is available oranother location is desired, the following is recom-mended:a.
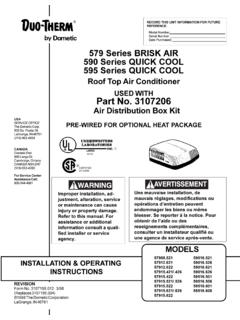
6 For one unit installation: The air conditionershould be mounted slightly forward of center(front to back) and centered from side to For two unit installations: Install one Air Condi-tioner 1/3 and one Air Conditioner 2/3 s fromfront of CARAVAN and centered from side to Roof Preparation1. Opening Requirements - Before preparing the ceil-ing opening, read all of the following instructionsbefore beginning the an existing roof vent opening will not be used a362mm x 362mm ( ) opening must be cutthrough the roof and ceiling of the CARAVAN . Thisopening must be located between the roof reinforc-ing may be electrical wiring between theroof and the ceiling. Disconnect 220 - 240 VoltAC power cord and the positive (+) 12 Volt DCterminal at the supply battery. Failure to fol-low this instruction may create a shock haz-ard causing death or severe personal 5 The 362mm x 362mm ( ) opening is part ofthe return air system of the Air Conditioner and mustbe finished in accordance with all Nation and localcodes and/or Roof Vent Removala.
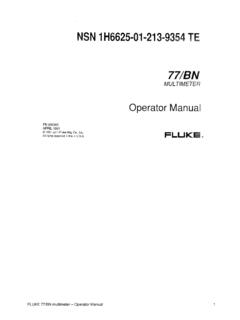
7 Unscrew and remove the roof Remove all caulking compound around Seal all screw holes and seams where the roofgasket is located. Use a good grade of allweather sealant. See FIG. "39"28-3/4"20"2-1/2"22"FIG. LineOf OpeningAir BoxPerimeterKeep This AreaFree FromObstructions105mm181mm181mm362mm x362mm( )Opening543mmCenter Line Of Unit305mm102mm102mmRearOfUnit362mm x362mm( )Opening3. After Location Has Been Selected:a. Check for obstructions in the area where airconditioner will be installed. See FIG. The roof must be designed to support 65 the CARAVAN is in motion. Normallya 100Kg. static load design will meet is the responsibility of the installer of thisair Conditioner system to ensure structural in-tegrity of the CARAVAN roof. Never create a lowspot on the roof where water will collect. Wa-ter standing around the air Conditioner mayleak into the interior causing damage to theproduct and the Check inside the CARAVAN for return air kitobstructions ( door openings, room dividers,curtains, ceiling fixtures, etc.)
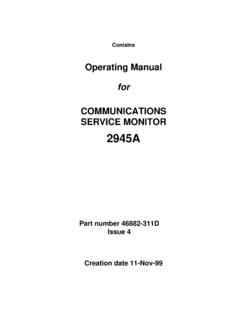
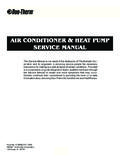
8 See FIG. 4 & 6 FIG. 7Do Not CutRoof StructureOr RaftersGood-RaftersSupported ByCross BeamsGood Location-Between RoofRaftersFrame Opening So ItWon't Collapse WhenBolting Down UnitLeave Access For PowerSupply Wiring375mm Min. AtFront of opening25mm If the opening exceeds 362mm x 362mm( ), it will be necessary to re-size theopening to 362mm x 362mm ( ).e. If the opening is less than 362mm x 362mm( ), it must be New Opening- (Installation Other Than Vent Open-ing)a. Mark a 362mm x 362mm ( ) square onthe roof and carefully cut the Using the roof opening as a guide, cut thematching hole in the The opening created must be framed to provideadequate support and prevent air from beingdrawn from the roof cavity. Lumber 25mm ormore in thickness must be used. Remember toprovide an entrance hole for power supplies atthe front of the opening. See FIG. is the responsibility of the installer of thisair Conditioner system to ensure structuralintegrity of the CARAVAN roof.
9 Never create alow spot on the roof where water will standing around the air Conditioner mayleak into the interior causing damage to theproduct and the Wiring Requirements1. 220 - 240 VAC Supply LineRoute a copper 1mm2, with ground, 220 - 240 VACsupply line from the time delay fuse or circuitbreaker box to the roof This supply line must be located in the frontportion of the 362mm x 362mm ( ) The power MUST be on a separate 10 Amp timedelay fuse or HACR circuit Make sure that at least 375mm of supply wireextends into the roof opening. This ensures aneasy connection at the junction Wiring must comply with all National and LocalWiring Codes and/or Use a steel sleeve and a grommet or equivalentmethods to protect the wire where it passes intothe Placing Air Conditioner On The RoofThis unit weighs approximately 45 prevent back injury, use a mechanical hoistto place Air Conditioner on 8Do not slide the unit. This may damage theroof gasket attached to the bottom and maycreate a leaky 9 FRONT1.
10 Remove the air Conditioner from the carton and dis-card carton. See FIG. Place the air Conditioner on the Lift and place the unit over the prepared openingusing the gasket on the unit as a guide. See FIG. 11 Step aRemove AtPerforationStep bRemove AtPerforationStep cUse AsPackagedUpper DischargeAir DuctLower DischargeAir DuctRear Of AirConditionerUpper DischargeAir DuctEdge WithoutFlange ToRear Of UnitFIG. 10If bolts are left loose there may not be an ad-equate roof seal or if over tightened, damagemay occur to the air Conditioner base or ceil-ing template. Tighten to torque specificationslisted in this 12 Slide Lower AirDischarge DuctOver Upper DuctRoofGasketHold Ceiling Template WithOne Hand And Install 3 Mounting Bolts Finger TightAir ConditionerReturn AirOpeningDisconnect 220 - 240 Volt AC. Failure to followthese instructions could create a shock hazardcausing death or severe personal !4. Place the Mechanical Air Distribution Box Kit insidethe CARAVAN .