Transcription of Serial Control Manual - Network Technologies Inc
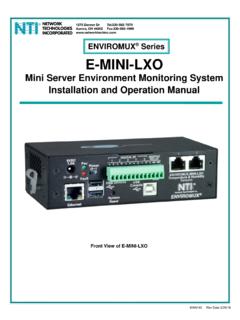
1 MAN154-SCM Rev Date 5/8/19 Serial Control Manual E-16D/-5D/-2D Enterprise Environment Monitoring System ENVIROMUX Series Front View of E-5D Front View of E-2D Front and Rear View of E-16D i TRADEMARK ENVIROMUX is a registered trademark of Network Technologies Inc in the and other countries. COPYRIGHT Copyright 2005, 2019 by Network Technologies Inc. All rights reserved. No part of this publication may be reproduced, stored in a retrieval system, or transmitted, in any form or by any means, electronic, mechanical, photocopying, recording, or otherwise, without the prior written consent of Network Technologies Inc, 1275 Danner Drive, Aurora, Ohio 44202. CHANGES The material in this guide is for information only and is subject to change without notice.
2 Network Technologies Inc reserves the right to make changes in the product design without reservation and without notification to its users. Firmware Version Current Firmware version Electrical E-16D: 100-240 VAC, 50-60Hz, @230 VAC E-5D: 100 to 240 VAC at 50 or 60 Hz via AC adapter; @9 VDC (9 VDC 3A power supply included) E-2D: 100 to 240 VAC at 50 or 60 Hz via AC adapter; @9 VDC (9 VDC 3A power supply included) RISK OF ELECTRIC SHOCK. Do not remove cover. No user serviceable components inside. All repairs and maintenance must be performed by authorized service personnel only. Turn OFF power to the ENVIROMUX and discharge your body s static electric charge by touching a grounded surface or use a grounding wrist strap before performing any connections to the unit.
3 For continued protection against fire and electric shock this device should only be connected to an AC mains outlet equipped with a proper ground terminal. CAUTIONCAUTIONCAUTION ii TABLE OF CONTENTS INTRODUCTION ..5 HARDWARE CONNECTION ..5 Terminal Ethernet Connection ..6 USB Console Installing Drivers ..7 Installing an Unsigned Driver in Windows 8 and 10 (x64) ..12 SOFTWARE Connect to ENVIROMUX from a Terminal Connect to ENVIROMUX from Command Connect Via Telnet ..14 Connect Via SSH ..14 USING THE TEXT MENU ..16 Monitoring ..16 Configure Remote Digital Inputs and Output System Configuration ..34 Enterprise Configuration ..36 Network Configuration ..36 User Configuration ..42 Security Configuration ..46 Event and Data Logs ..50 System Information.
4 53 Reboot ..53 Text Menu for Non-Administrative Monitoring ..54 User Accessible Settings ..56 TABLE OF FIGURES Figure 1- Connect a terminal for direct RS232 Serial Figure 2- Connect a terminal using USB Console port ..6 Figure 3- Connect ENVIROMUX to the Ethernet ..6 Figure 4- Connect terminal to USB Console port ..7 Figure 5- Text Menu Login screen ..13 Figure 6- Text Menu- Administrator Main Figure 7- Text Menu- User Main Menu ..15 Figure 8- Text Menu-Monitoring Figure 9- Text Menu-Sensor Status ..17 Figure 10- Text Menu- Digital Input Status ..17 Figure 11- Text Menu-View IP Figure 12- Text Menu- View Output Relay Figure 13- Text Menu-View Remote Digital Inputs ..19 Figure 14- Text Menu-View Remote Output Relays ..19 Figure 15- Text Menu-View Power Supply Status.
5 20 Figure 16- Text Menu-Configure Sensors list ..21 iii Figure 17- Text Menu-Configuration Menu for Figure 18- Text Menu-Sensor Settings ..22 Figure 19- Text Menu-Non-Critical and Critical Alert Figure 20- Text Menu-Sensor Data Figure 21- Configure Digital Input Figure 22- Digital Input Sensor Settings 25 Figure 23- Digital Input Alert Figure 24- Data Logging for Digital Input Figure 25- Text Menu-Configure IP Devices List ..27 Figure 26- Text menu-Configuration Menu for IP Devices ..27 Figure 27-Text Menu-IP Device Settings ..28 Figure 28- Text Menu-IP Device Alert Settings ..29 Figure 29- Text Menu-IP Device Data Figure 30- Text Menu- Select Configure Output Relay ..30 Figure 31- Text Menu- Output Relay Figure 32- Text Menu- Output Relay Alert Settings.
6 31 Figure 33- Text Menu- IP Camera List for Configuration ..32 Figure 34- Text Menu- IP Camera Settings ..32 Figure 35- Text Menu-Configure Remote Digital Inputs and Output Relays ..33 Figure 36- Text Menu- System Configuration ..34 Figure 37- Text Menu-Time Settings Figure 38- Text Menu-Restore Default Figure 39- Text Menu-Enterprise Figure 40- Text Menu- Network Configuration ..36 Figure 41- Text Menu-IPv4 Settings Menu ..37 Figure 42- Text Menu-IPv6 Settings Menu ..37 Figure 43- Text Menu-SMTP Server Settings ..38 Figure 44- Text Menu-SNMP Server Figure 45- Text Menu-Misc. Service Settings menu ..39 Figure 46- Text Menu-3G Data Connect Settings ..40 Figure 47- Text Menu-VLAN Settings ..41 Figure 48- Text Menu-User Figure 49- Text Menu-Confirm to add new user ..42 Figure 50- Text Menu-Configuration List for User.
7 43 Figure 51- Text Menu-User Account Settings ..43 Figure 52- Text Menu-User Contact Figure 53- Text Menu-User Activity Figure 54-Text Menu- SNMP User Figure 55- Text Menu-Security Configuration ..46 Figure 56- Text Menu-Authentication Settings ..47 Figure 57- Text Menu-IP Filtering ..48 Figure 58- Text Menu-Configure IP Filter Figure 59- Text Menu-Event & Data Figure 60- Text Menu-View Event Figure 61- Text Menu-View Data Log ..51 Figure 62- Text Menu-Event Log Settings ..52 Figure 63-Text Menu-Data Log Settings ..52 Figure 64-Text Menu-System Figure 65- Text Menu-Reboot the ENVIROMUX ..53 Figure 66- Text Menu-User Main Menu ..54 Figure 67-Text Menu-User Monitoring Menu ..54 Figure 68- Text Menu-User accessible status iv Figure 69- Text Menu-User Accessible Settings.
8 56 Figure 70- Text Menu-User Account Settings ..56 Figure 71- Text Menu-User Contact Figure 72- Text Menu-User Activity Figure 73- Text Menu-User SNMP v INTRODUCTION This Manual provides instruction for connection and Control of the E-16D/ E-5D and E-2D Enterprise Environment Monitoring Systems using Serial connection and the built-in text menu. The text menu can be accessed two ways: 1. using a terminal program on a PC connected through the RS232 port (E-16D only) or through the USB CONSOLE port (all models). 2. using Telnet or the SSH protocol through an Ethernet connection Only the user root can connect using a terminal connection, but up to 8 users can connect simultaneously using the Ethernet connection.
9 To quickly return to the main ENVIROMUX Manual , click here. HARDWARE CONNECTION Terminal Connection To use the RS232 port, connect one end of a CAT5 patch cable (supplied) to the port labeled RS232 on the rear of the E-16D (or the RS232 AUX on the E-5D). Plug the other end of the CAT5 cable into an RJ45-to-DB9F adapter (supplied), and connect the adapter to the RS232 port on the Control terminal. Follow the instruction under RS232 Connection on page 13 for configuration and use of the Serial Control feature. Figure 1- Connect a terminal for direct RS232 Serial communication NTI ENTERPRISE ENVIRONMENT MONITORING SYSTEM 6 To use the USB CONSOLE port, connect a USB cable (2 meter cable supplied) between the ENVIROMUX and your PC.
10 Then install the drivers as described on page 7. Figure 2- Connect a terminal using USB Console port Ethernet Connection To make a connection over the Ethernet, from anywhere on the local area Network , connect a CAT5/5e/6 Ethernet cable with RJ45 male connectors on the ends, wired straight through (pin 1 to pin 1, pin 2 to pin 2, etc.). Note: A direct connection from a computer s Ethernet port to the ENVIROMUX ETHERNET port may also be made using the same cable. Figure 3- Connect ENVIROMUX to the Ethernet NTI ENTERPRISE ENVIRONMENT MONITORING SYSTEM 7 USB Console Port To use the USB Console port, you will need to install drivers provided on your CD. Figure 4- Connect terminal to USB Console port Installing Drivers You will only need to install drivers the first time the ENVIROMUX is connected to your PC with Windows XP, 2000, Vista, Windows 7 and Windows 8 (32 and 64 bit versions).