Transcription of Speed Sensor and Cadence Sensor Instructions 2 4 ...
1 Speed Sensor and Cadence Sensor relatives au capteur de vitesse et au capteur de dei sensori di velocit e und Trittfrequenzsensor del Sensor de velocidad y del Sensor de es do Sensor de velocidade e do Sensor de cad voor snelheidsensor en til fartsensor og ja poljinanturin for hastighetssensor og f r hastighetsgivare och obs ugi czujnik w pr dko ci i and the Garmin logo are trademarks of Garmin Ltd. or its subsidiaries, registered in the USA and other countries. ANT+ is a trademark of Garmin Ltd.
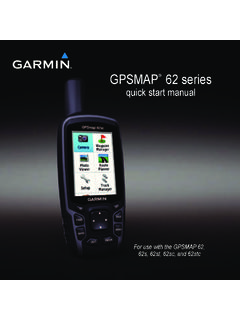
2 Or its subsidiaries. These trademarks may not be used without the express permission of product is ANT+ certified. Visit for a list of compatible products and 2014190-01694-90_0 CPrinted in TaiwanTA-2013/2434TA-2013/2431 TRAREGISTERED No:ER0128990/14 DEALER No:DA0061884/112 Speed Sensor and Cadence Sensor Instructions WARNINGSee the Important Safety and Product Information guide in the product box for product warnings and other important the Speed SensorNOTE: If you do not have this Sensor , you can skip this : Garmin recommends you secure your bike on a stand while installing the and hold the Speed Sensor on top of the wheel the strap around the wheel hub, and attach it to the hook on the Sensor may be tilted when installed on an asymmetrical hub.
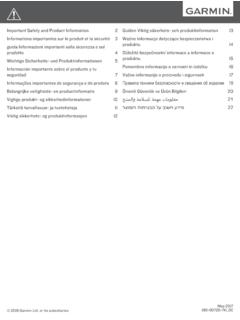
3 This does not affect the wheel to check for Sensor should not contact other parts of your : The LED flashes green for five seconds to indicate activity after two the Cadence SensorNOTE: If you do not have this Sensor , you can skip this : Garmin recommends you secure your bike on a stand while installing the the band size that fits your crank arm band you select should be the smallest one that stretches across the crank the non-drive side, place and hold the flat side of the Cadence Sensor on the inside of the crank the bands around the crank arm, and attach them to the hooks on the the crank arm to check for Sensor and bands should not contact any part of your bike or.
4 The LED flashes green for five seconds to indicate activity after two a 15 minute test ride and inspect the Sensor and bands to ensure there is no evidence of the Sensors with Your DevicePairing is the process of connecting an ANT+ wireless Sensor , like your Speed Sensor or Cadence Sensor , with a Garmin ANT+ compatible : The pairing Instructions differ for each Garmin compatible device. See your owner's manual. Bring the Garmin compatible device within 3 m of the ANT+ Sensor . Stay 10 m away from other ANT+ sensors while you pair the first time, your Garmin compatible device automatically recognizes the ANT+ Sensor each time it is Replaceable Batteries WARNINGDo not use a sharp object to remove the battery away from put batteries in mouth.
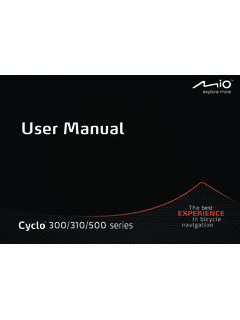
5 If swallowed, contact your physician or local poison control coin cell batteries may contain perchlorate material. Special handling may apply. See CAUTIONC ontact your local waste disposal department to properly recycle the the Speed Sensor or Cadence Sensor BatteryThe LED flashes red to indicate a low battery level after two the circular battery cover on the back of the the cover counter-clockwise until the marker points to unlocked and the cover is loose enough to the cover and the battery .4 Wait 30 the new battery with the positive side facing : Do not damage or lose the O-ring the cover clockwise until the marker points to : The LED flashes red and green for a few seconds after battery replacement.
6 When the LED flashes green and then stops flashing, the device is active and ready to send WarrantyThe Garmin standard limited warranty applies to this accessory. For more information, go to Sensor and Cadence Sensor SpecificationsBattery typeUser-replaceable CR2032, 3 voltsBattery lifeApproximately 12 months (1 hour per day)Operating temperature rangeFrom -20 to 60 C (from -4 to 140 F)Radio GHz ANT+ wireless communications protocolWater rating1 ATM**The device withstands pressure equivalent to a depth of 10 relatives au capteur de vitesse et au capteur de Cadence AVERTISSEMENTC onsultez le guide Informations importantes sur le produit et la s curit inclus dans l'emballage du produit pour prendre connaissance des avertissements et autres informations importantes sur le du capteur de vitesseREMARQUE : si vous ne poss dez pas ce capteur, vous pouvez ignorer cette t.
7 Garmin recommande de mettre votre v lo sur un support pendant l'installation du et tenez le capteur de vitesse au-dessus du sur la sangle autour du moyeu et fixez-la au crochet du est possible d'incliner le capteur dans le cadre d'une installation sur un moyeu asym trique. Cette configuration n'a aucune incidence sur le fonctionnement du syst tourner la roue pour v rifier le d capteur ne doit pas toucher les autres pi ces de votre v : le voyant LED clignote vert pendant cinq secondes pour signaler le bon fonctionnement apr s deux tours de du capteur de cadenceREMARQUE : si vous ne poss dez pas ce capteur, vous pouvez ignorer cette t.
8 Garmin recommande de mettre votre v lo sur un support pendant l'installation du lectionnez une sangle dont les dimensions sont adapt es une installation s re sur votre manivelle .Choisissez la sangle la plus petite possible pouvant tre tir e sur la le c t gauche du v lo, placez et tenez le c t plat du capteur de Cadence sur la partie interne de la sur les sangles autour de la manivelle et fixez-les aux crochets du tourner la manivelle pour v rifier le d capteur et les sangles ne doivent pas entrer en contact avec les pi ces de votre v lo ou votre.
9 Le voyant DEL clignote vert pendant cinq secondes pour signaler le bon fonctionnement apr s deux tours de un test en roulant 15 minutes et inspectez le capteur et les sangles pour v rifier qu'ils ne montrent aucun signe apparent de d t des capteurs avec votre appareilLe couplage consiste connecter un capteur sans fil ANT+, votre capteur de vitesse ou de Cadence par exemple, un appareil Garmin ANT+ : les Instructions de couplage sont diff rentes en fonction des mod les de Garmin compatibles. Reportez-vous au manuel d'utilisation.
10 Approchez l'appareil compatible Garmin 3 m du capteur ANT+. Tenez-vous au moins 10 m d'autres capteurs ANT+ pendant le s le premier couplage, votre appareil Garmin compatible reconna t automatiquement le capteur ANT+ chaque fois qu'il est activ .Piles rempla ables par l'utilisateur AVERTISSEMENTN'utilisez pas d'objet pointu pour retirer les la batterie hors de port e des mettez jamais les piles dans votre bouche. En cas d'ingestion, contactez votre m decin ou le centre antipoison le plus piles boutons rempla ables peuvent contenir du perchlorate.