Transcription of Table of Contents - Bob's Woodworking Plans - …
1 The pocket hole joint is one of the easiest joints to make. This joint is much faster and simpler than doweljoints because you only drill the hole in one of the pieces you need to join. Just apply some glue, clampthe pieces together and insert the screw. The screw stays in the joint and serves as both a dowel pin andpermanent clamp. Also, you can use ready made plugs to hide the holes if the surface is to be you can make pocket holes on your drill press. Pocket holes are normally drilled with an electrichand drill and a special step drill bit which cuts the larger (3/8") diameter hole for the screw head and thesmaller pilot hole in one pass. This jig makes it possible to use either a regular pocket hole step drill orforstner bits. For instance, you can use a 1/4 forstner bit for the outer hole and a 1/8 twist drill for theinner hole to make pocket holes for smaller screws. An added benefit is the extremely clean cut you getfrom forstner you want to plug your pocket holes, you can use a set of tenon/plug cutters and this jig to make yourown plugs.
2 Just cut a row of plugs in a piece of matching wood and use your Table saw to cut the bottomof the plugs from the surrounding : The drill press pocket hole jig is great for medium to small size work pieces. For larger workpieces, you ll still need a traditional pocket hole 2005 by Robert E. ReedyAll rights reservedTable of ContentsPlease read and follow all tool manufacturers safety and operatinginstructions before operating equipment. Always wear eye and List .. 1 Pocket Hole Jig Parts Drawings (A) .. 2 Pocket Hole Jig Parts Drawings (B) .. 3 Pocket Hole Jig Assembly Instructions (A) .. 4 Pocket Hole Jig Assembly Instructions (B) .. 4 IntroductionThank you for visiting I hope you will find our Drill Press Pocket Hole Jigto be a rewarding and useful project. The base is made of either 3/4 or 1/2 material. Thefront is made of 3/4 material because it requires 1/2 deep slots for the T-Track.
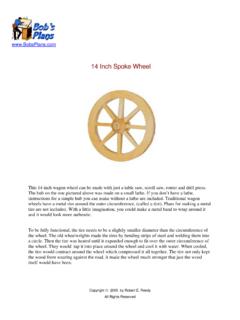
3 Thegussets, work support, and stiffener are made of 3/4 stock. You ll need one 11 1/2 and one7 1/2 strip of T-Track. You ll also need some knobs, clamps, and T-Track project has two 5/16 mounting holes that are spaced so it can be mounted to the drillpress Table for which free Plans are also offered on It was originallydesigned for use in making spokes for the 14 wagon wheel for which we offer Plans . But itcomes in handy any time there is a need to hold a small piece of stock for either drilling orsawing. Examples of how to use this jig can be seen at clean and accurate cuts, the work piece must be securely clamped to the jig. I highlyrecommend you glue sandpaper to the surfaces of the face of this jig. The sandpaper greatlyincreases the holding power of the for the T-Track and clamps you ll need are provided on the sponsor s 2005 by Robert E Reedy, Vandalia, OhioAll Rights reservedMaterials ListPage 1 Pocket Hole Jig Materials ListQtyItem NameSizeMaterial1 Base12" X 10"1/2 or 3/4 Stock1 Front11 1/2 X 8 3/4 Stock1 Work Piece Support11 1/2 X 1 1/2 3/4 Stock1 Stiffener7 1/2 X 1 3/4 Stock2 Gussets3 1/2 X 2 3/4 Stock1T-Track11 1/2"Aluminum T-Track2T-Track7 1/2 Aluminum T-Track2T-Track BoltsAssortedToggle ClampsHold Down ClampsStop BlocksCopyright 2005 by Robert E Reedy, Vandalia, OhioAll Rights reservedPocket Hole Jig Parts Drawings (A)Page 2 Copyright2005 by Robert E.
4 Reedy, Vandalia, OhiocAll Rights ReservedSide View15 8"Cut the pocket hole jig front from 3/4" stock (3'4" plywood will work fine). The 15 angle on the bottom is necessary because the front must tilt back by 15 so it holds the work piece at the correct "Pocket Hole Jig FrontCut two 3/4" wide by 1/2" deep slots for the T-Track as shown above. This only leaves 1/4" material thickness for the T-Track screws but the screws will be aligned with the gussets and stiffeners when the jig is 1/2"4 1/2"2"3 1/2"8"Pocket Hole Jig Front7 1/2"1 1/2"Pocket Hole Jig Parts Drawings (B)Page 3 Copyright2005 by Robert E. Reedy, Vandalia, OhiocAll Rights ReservedFor the base, either 1/2" or 3/4" stock will work fine. Drill the holes as shown above. The four 9/64" holes are for the # 6 flat head screws that secure the gussets. They should be countersunk on the underside of the base. The two 5/16" holes are for T-Track bolts. Since this jig is designed to be mounted on the drill press Table for which we also offer free Plans , these holes should have 6 1/4" between centers.
5 If you won't be using the pocket hole jig with our drill press Table , the holes should be spaced based on the way the jig will be secured to your drill press "7/8"3"3"1 1/4"1 1/4"2 7/8"2 7/8"Pocket Hole Jig Base5/16" " "12"75 3 1/2"2"75 Gusset(2 Required)Stiffener7 1/2"1"The Work Piece Support, Gussets and Stiffener are made from 3/4" stock. The Work Piece Support must have a 75 angle as shown in the end view. You can get the proper angle by setting your Table saw blade to 15 . (90 - 15 = 75 .)2 15/16"11 1/2"1 1/2"Work Piece SupportCopyright2005 by Robert E. Reedy, Vandalia, OhiocAll Rights ReservedTenon Jig Assembly Instructions (A)Page 41/2"1/4"Attach the Gussets to the base as shown above using 1 1/2" # 6 screws. 1 7/8"2 7/8"Mark the position of the Stiffener on the backside of the Front section. It should be centered over the slot for the upper by Robert E. Reedy, Vandalia, OhiocAll Rights ReservedTenon Jig Assembly Instructions (B)Page 5 Drill and countersink a 9/64" hole 5/8" from each end of the long piece of T-Track and 1 1/4" from each end of the short T-Track.
6 Then position the T-Track, Front, and Stiffener as shown above. Secure the Front to the Gussets with 1inch # 6 flathead screws through the lower T-Track. Apply some glue and clamp the Stiffener behind the Front section (centered behind the Upper T-Track) and secure the upper T-Track with 1 inch # 6 flathead screws. Next, Install the Work Piece Support with four 3/4 inch # 6 screws. The end screws should be about 1 inch from each end and the middle ones about 4 1/2" from each end. Don't glue the Work Piece Support to the Base because you'll want to be able to replace it from to completes your Drill Press Pocket Hole Plans from: TableWorkbenchDog HousePicnic TableOctagon Table6 Foot BarCorner DeskBook CaseMantel ClockRedwood PlanterWheelbarrowSpoke WheelPanel SawTrellisWheelbarrowPocket Hole JigTenoning JigTable Saw SledDrill Press Tabl