Transcription of ThinkPad Thunderbolt 3 Workstation Dock Gen 2 User Guide
1 ThinkPad Thunderbolt 3 Workstation Dock Gen 2 User :Before using this documentation and the product it supports, ensure that you read and understand the warranty information in the documentation that comes with the Edition (July 2019) Copyright Lenovo 2019. LIMITED AND RESTRICTED RIGHTS NOTICE: If data or software is delivered pursuant to a General Services Administration GSA contract, use, reproduction, or disclosure is subject to restrictions set forth in Contract No. GS- 1. About the dock.. 1 Product description.. 1 Operating system requirement.. 1In the box.. 1 Product overview.. 1 Statement on USB transfer rate.. 3 Chapter 2. Set up the dock.. 5 Install the dock.. 5 Install the dock driver.. 5 Chapter 3. Use the dock.. 7 Use the audio connector.. 7 Use the Ethernet connector.. 7 Use the video output connectors.. 8 Maximum resolutions.
2 8 Configure the external displays.. 8 Chapter 4. Troubleshooting.. 9 Appendix A. Accessibility information.. 11 Appendix B. Trademarks.. 13 Copyright Lenovo 2019iiiThinkPad Thunderbolt 3 Workstation Dock Gen 2 User GuideChapter 1. About the dockProduct descriptionThe dock is an expansion module. You can use it to connect your compatible computer to a local area network (LAN) and multiple devices, such as a headset, external displays, and Universal Serial Bus (USB) the list of compatible computers, go to select the entry for the system requirementMicrosoft Windows 10In the box ThinkPad Thunderbolt 3 Workstation Dock Gen 2 230- watt power adapter and power cord ThinkPad Thunderbolt 3 Workstation Dock Split Cable ThinkPad Workstation Dock Slim Tip Y Cable DocumentationContact your place of purchase if any item is missing or damaged.
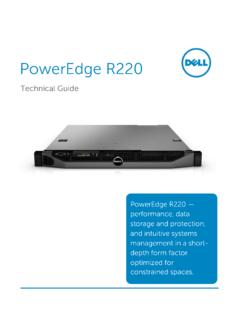
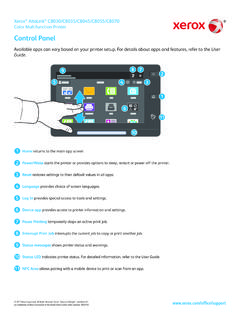
3 Ensure that you retain your proof of purchase and packing material. They might be required to receive warranty overview1 Indicator in ThinkPad logo: The indicator is solid on when the dock is connected to ac Audio connector: Connect a headphone or a headset with a ( ) and 4-pole USB-CTM connector ( Thunderbolt 3 compatible): Use the connector to transfer data (with high speed supported by the Thunderbolt 3 technology), charge your device, or connect to an external display. Notes: Copyright Lenovo 20191 This connector does not support the external display if your computer does not have a USB-C connector ( Thunderbolt 3 compatible). Do not connect your computer to this connector. 4 USB connector Gen 2: With greater data transfer rate, the USB connector Gen 2 is used to connect USB-compatible devices, such as a USB keyboard, a USB mouse, a USB storage device, or a USB 65w1 Security-lock slot: Lock your dock to a desk, table, or other fixture through a compatible security cable Power button with indicator: The power button works differently in the following situations: When you connect the dock only to ac power but not the computer, press this power button to turn on or turn off the dock.
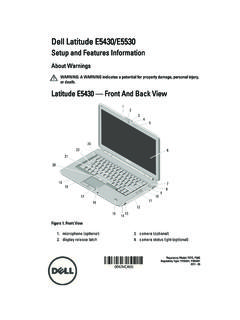
4 When you connect the dock to both ac power and the computer, this button has the same function as the computer power indicator in the power button shows the status of the dock and computer: Off: The dock is off, the computer is off, or the computer is in hibernation mode. White: The computer is on. White and blinking slowly: The computer is in sleep mode. Amber: The dock is Thunderbolt 3 Workstation Dock Gen 2 User Guide3 8 USB connector Gen 2: Connect USB-compatible devices, such as a USB keyboard, a USB mouse, a USB storage device, or a USB printer. For optimal data transfer, connect a USB device to a USB connector instead of a USB connector. Note:It is recommended that you connect the receiver of the wireless keyboard or mouse to the USB connector Gen 2 Always On USB connector Gen 2: Connect USB-compatible devices or charge mobile digital devices and smartphones when the dock is connected to ac Ethernet connector: Connect the dock to a local area network (LAN).
5 6 DisplayPort connectors: Connect a high-performance monitor, a direct-drive monitor, or other devices that use a DisplayPort HDMITM connectors: The High Definition Multimedia Interface (HDMI) connector is a digital audio and video interface. It enables you to connect the dock to a compatible digital audio device or video monitor, such as an ac power connector: Connect the ac power Thunderbolt 3 Workstation connector: Connect the dock to your computer with ThinkPad Thunderbolt 3 Workstation Dock Split on USB transfer rateDepending on many factors such as the processing capability of the host and peripheral devices, file attributes, and other factors related to system configuration and operating environments, the actual transfer rate using the various USB connectors on this device will vary and will be slower than the data rate listed below for each corresponding deviceData rate (Gbit/s) Gen 210 Chapter the dock34 ThinkPad Thunderbolt 3 Workstation Dock Gen 2 User GuideChapter 2.
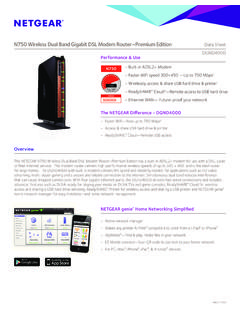
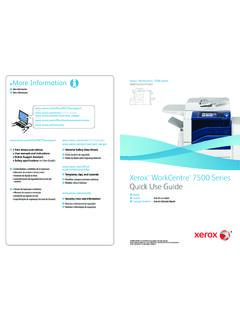
6 Set up the dockInstall the dockConnect the dock to ac power and your computerUse the accompanying ac power adapter, power cord, ThinkPad Thunderbolt 3 Workstation Dock Split Cable, and ThinkPad Workstation Dock Slim Tip Y Cable to install the dock. Depending on your computer, you can connect both connectors 7a or only the Thunderbolt 3 connector 7b to your dock supplies power to the computer when the dock is connected to ac power and your W7a7b65/135 W170 W65/135w170wEnable the dockTo enable the dock when connected to the computer for the first time, do either of the following: Confirm the change when prompted if you have the administrator privilege. Enter the ThinkPad Setup program (BIOS) and go to the Config menu. Select Thunderbolt (TM) 3 Security level No the dock driverThe dock driver is preinstalled on compatible computers and the dock is ready for use after you connect it to ac power and also can download the latest dock driver from the Lenovo Web site by doing the following: 1.
7 Go to Select the entry for the dock and then follow the on-screen instructions. Copyright Lenovo 201956 ThinkPad Thunderbolt 3 Workstation Dock Gen 2 User GuideChapter 3. Use the dockUse the audio connectorAfter setting up the dock, the audio connector on the dock is enabled and the one on the computer is disabled by default. To change the default settings: 1. Right-click the speaker icon in the Windows notification Click Playback devices. The Sound window is Click the Playback tab to select an audio line-out device, and then click Set Click the Recording tab to select an audio line-in device, and then click Set Click :You might need to restart the application that is using the audio devices to apply the changes. Use the Ethernet connectorTo use the Ethernet connector on the dock, connect the dock to a standard 10 Mbps, 100 Mbps, or 1000 Mbps network with an Ethernet Ethernet connector has two network status indicators.
8 When the green indicator is on, the computer is connected to a local area network (LAN). When the yellow indicator blinks, data is being following functions are available when the dock is connected to a LAN. Preboot eXecution EnvironmentThe Preboot eXecution Environment (PXE) technology makes the computer more manageable by enabling the computer to start from a server. MAC address Pass ThroughAfter enabling the MAC address Pass Through function, your dock MAC address is the same as that of your computer. Wake on LAN or Wake on LAN from DockThe network administrator can turn on a computer from a management console by using the Wake on LAN or Wake on LAN from Dock the Wake on LAN function is enabled, many operations, such as data transfer, software updates, and flash updates of the UEFI BIOS, can be done remotely. The updating process can perform after normal working hours and on weekends, so that the users are not interrupted during work, and the LAN traffic is kept to a minimum.
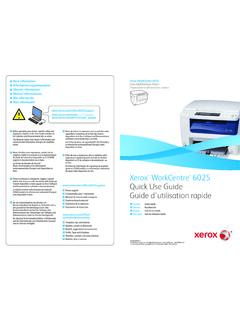
9 It saves time and increases productivity. Note:To use the Wake on LAN from Dock feature to wake the computer from hibernation mode or turn on the computer, ensure that the dock is connected to the USB-C connector on the can enable the Wake on LAN feature or the Wake on LAN from Dock feature through configuring the BIOS on your computer: 1. Restart the computer. When the logo screen is displayed, press F1 to start the ThinkPad Setup Select Config Network. The Network submenu is displayed. Copyright Lenovo 201973. Select a corresponding option for the Wake on LAN Press F10 to save the settings and the video output connectorsThe video output connectors on the rear of the dock support up to two external displays. The external displays connected to the dock will not be on until your computer enters the Windows operating system.
10 Do not use the DisplayPort connector and HDMI connector as shown at the same time. Otherwise, only the monitor connected to the DisplayPort connector will be on. 230w170w135w 65wMaximum resolutionsUp to 3840 x 2160 pixels / 60 Hz Note:The maximum resolution might vary depending on the the latest maximum display matrix, go to select the entry for the dock. Configure the external displaysYou can perform the following configurations for the external displays connected to your dock to meet your needs: Choose a display mode: extend mode, mirror mode, or single-display mode Rotate the external displays Set the resolution Set the color quality To configure the external displays: 1. Right-click on the desktop and select Display Follow the on-screen instructions to complete the more information, see the Windows help Thunderbolt 3 Workstation Dock Gen 2 User GuideChapter 4.