Transcription of Trabecular Metal™ Acetabular Revision System …
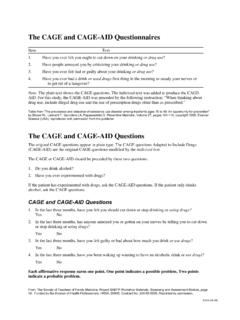
1 Trabecular metal Acetabular Revision System Cup- cage ConstructSurgical Technique 1 Trabecular metal Acetabular Revision System Cup- cage Construct Trabecular metal Acetabular Revision System Cup- cage Construct Surgical TechniqueTable of ContentsCup- cage Construct Surgical Technique 2 Prepare the Acetabulum 2 Implant the Revision Shell 3 Prepare Ischial Notch for Inferior Flange 4 Shaping the cage 4 Implant the cage 5 Insert the Acetabular Liner 6 Product Information 72 Trabecular metal Acetabular Revision System Cup- cage Construct Carefully assess any Acetabular bone defects intraoperatively, noting the location, extent, and defect type. Also assess the quality and location of the host bone that remains for support of the Acetabular reconstruction (Fig.)
2 1). Identify the hip center and use progressively larger reamers to size and shape the acetabulum for the Trabecular metal Revision Shell (Fig. 2). Hold the reamer steady in the intended position and orientation in which the shell will be the acetabulum to evaluate the quality of bone and defect type. Determine which Trabecular metal Material components will be used to reconstruct the acetabulum. If a Trabecular metal Restrictor Augment is to be used, it should be placed before the other components. Contained defects in the acetabulum may be filled with moreselized bone Construct Surgical TechniqueThe decision to use the Trabecular metal Acetabular Revision System cage to create a Cup- cage construct is made after the Trabecular metal Revision Shell, with or without augmentation, has been implanted and it is determined that there is not adequate stability for the Acetabular reconstruction.
3 A cage is then cemented into the Revision shell to supplement the immediate stability until biological fixation of the Trabecular metal Revision Shell can 2 Fig. 11 Acetabulum AssessmentUse morselized bone and structural graft as needed to reconstruct the acetabulum. Use ball impactors and/or reverse reaming to impact the bone graft. Identify the hip center and use the Acetabular reamers to size and shape the acetabulum for the Trabecular metal Revision Shell (Fig. 2). The diameter of the last reamer used to shape the acetabulum will match the labeled diameter of the Trabecular metal Revision Shell. The amount of press fit used should be determined at the time of surgery and be based upon bone the AcetabulumBone LossBone LossPelvic Discontinuity3 Trabecular metal Acetabular Revision System Cup- cage Construct Impact the shell into the prepared acetabulum, ensuring that the cluster of holes is positioned posterosuperiorly or where the best host bone contact can be achieved.
4 Use a depth gauge through the screw holes to assess the contact between the Acetabular cup and the host bone (Fig. 3). Then drill the screw holes and insert HGP II cancellous screws. Bicortical screw fixation is not necessary. Note: Do not overtighten the screws. Optional: Bone wax covering unused screw holes can prevent cement extrusion through the holes and potential interference with biologic ingrowth into the Trabecular metal Revision Shell. Additionally, covering screw heads may aid in screw removal if future Revision surgery is the Trabecular metal Revision Shell and/or other Trabecular metal Implant components in place, assess the stability of the construct within the acetabulum.
5 When additional stability is needed, the Trabecular metal Acetabular System cage can be used to provide initial stability until biological ingrowth within the Trabecular metal Material provides long-term stability (Fig. 4).Fig. 3 Fig. 43 Implant the Revision Shell4 Trabecular metal Acetabular Revision System Cup- cage Construct Fig. 7 Fig. 5 Fig. 6 Palpate the posterior rim of the acetabulum from superior to inferior to identify the ischium. Drill a small hole and use a depth gauge to confirm that the ischium has been located (Fig. 5). The depth gauge should indicate at least of bone. Drill additional holes to confirm the proper orientation, ensuring that the location is surrounded by adequate bone a small osteotome (or bent chisel) in line with the ischium and initiate a slot in the bone to accept the inferior flange of the cage (Fig.)
6 6). Note: By inserting the inferior flange into the ischium via the prepared notch, the sciatic nerve is protected. The inferior flange should not be fixed on the surface of the ischium. Insert the inferior flange of the cage provisional into the slot and use the flange to complete preparation of the ischial : If it is pre-determined that a Cup- cage construct is needed to provide stability prior to the implantation of the Revision Shell, preparation of the ischial notch can be performed before the Revision Shell is , disposable cage provisionals are provided. Contour the cage provisional by hand to obtain proper flange shape and fit (Fig. 7). The superior flanges are usually bent towards the ilium and the inferior flange is bent to accommodate the curve of the ischium.
7 Insert the inferior flange into the slot created in the ischium, and impact the dome of the cage Ischial Notch for Inferior Flange5 Shaping the Cage5 Trabecular metal Acetabular Revision System Cup- cage Construct Fig. 11 Fig. 8 After confirming the desired shape and fit of the cage provisional, remove the provisional component and contour the final implant to match that of the provisional component using plate benders (Fig. 8). WARNING: Avoid reverse or repeated bending of the titanium implant as this may weaken or break the flange. When bending the cage , care should be taken to avoid marring or damaging the is important to completely contour the implant before inserting screws so the cage will not be displaced when the screws are tightened (Fig.)
8 9).Fig. 9 Fig. 10 Once the desired shape of the cage has been achieved, insert the inferior flange into the ischial notch (Fig. 10). Use a spiked ball-pusher if necessary to fully seat the cage (Fig. 11). Next, position the superior flange against the lateral portion of the ilium. Then impact the dome of the cage . It is not necessary for the cage to bottom out in the the Cage6 Trabecular metal Acetabular Revision System Cup- cage Construct Fig. 12 Fig. 13* PALACOS is a trademark of Heraeus Kulzer GmbH. Under license from Heraeus Kulzer GmbH, Hanau, 14 Fig. 15 For additional stabilization, HGP II screws may be inserted through the existing holes in the dome and into the Trabecular metal Revision Shell (Fig.
9 12). Once the cage is in the proper position, insert screws (Trilogy or HGP II Bone Screws) through the holes in the superior flange of the cage (Fig. 13).7 Insert the Acetabular LinerApply doughy PALACOS * bone cement into the dome of the cage (Fig. 14). Finger pack to assure that cement passes through the holes in the cage to fill gaps between the cage and the Acetabular shell. Then insert the Longevity Highly Crosslinked Polyethylene Revision Shell Liner into the desired position with the liner rim fully seated on the face of the cage (Fig. 15). Revision Shell Liners are available in several head articulation options, including 28, 32, 36, and 40mm inner excess cement with a metal Acetabular Revision System Cup- cage Construct Trabecular metal Revision Shell Prod.
10 No. Description00-7000-048-20 48mm Cup Size 00-7000-050-20 50mm Cup Size 00-7000-052-20 52mm Cup Size 00-7000-054-20 54mm Cup Size 00-7000-056-20 56mm Cup Size 00-7000-058-20 58mm Cup Size 00-7000-060-20 60mm Cup Size 00-7000-062-20 62mm Cup Size 00-7000-064-20 64mm Cup Size 00-7000-066-20 66mm Cup Size 00-7000-068-20 68mm Cup Size 00-7000-070-20 70mm Cup Size 00-7000-072-70 72mm Cup Size 00-7000-074-70 74mm Cup Size 00-7000-076-70 76mm Cup Size 00-7000-078-70 78mm Cup Size 00-7000-080-70 80mm Cup Size Trabecular metal Acetabular Revision System CagesProd. No. Description00-7123-056-48 Short Flange cage 56/58/60 shell, 48 liner, right00-7123-062-54 Short Flange cage 62/64 shell, 54 liner, right00-7123-066-58 Short Flange cage 66/68/70 shell, 58 liner, right00-7123-072-64 Short Flange cage 72/74 shell, 64 liner, right00-7123-076-68 Short Flange cage 76/78/80 shell, 68 liner, right00-7124-056-48 Short Flange cage 56/58/60 shell, 48 liner, left00-7124-062-54 Short Flange cage 62/64 shell, 54 liner, left00-7124-066-58 Short Flange cage 66/68/70 shell, 58 liner, left00-7124-072-64 Short Flange cage 72/74 shell, 64 liner, left00-7124-076-68 Short Flange cage 76/78/80 shell, 68 liner.