Example: marketing
Tulip by Jill Finley - rileyblakedesigns.com
Cutting Instructions Cornflower: A - four 21/2" squares B - eight 11/2" squares Oxford: C - four 2" x 31/2" rectangles D - four 2" squares: E - two 3" squares F - four 2" squares Sewing Instructions 1. Draw a diagonal line on the wrong side of 8 B pieces and 8 M pieces. Place an M piece on the top right corner of an A piece and sew on the drawn ...
Tags:
Information
Domain:
Source:
Link to this page:
Documents from same domain

Daisy Chain by Lori Holt - rileyblakedesigns.com
www.rileyblakedesigns.comSewing Instructions 1. Sew the A and D rectangles together along the long edge. Press. Cut the A/D strip into 8 segments 13/4" x 3". Sew 2 A/D segments together as illustrated. Press. Repeat to make 4 four-patches (3" x 3"). 2. Draw a diagonal line on the wrong side of the B squares. Place a B square on the top right corner of an E rectangle.
Cozy Christmas Sew Along Guide - Riley Blake Designs
www.rileyblakedesigns.comCut 5 strips 21/2" x WOF for Border 2. White Sparkle Cut 9 strips 21/2" x WOF. Cut the strips into 144 squares 21/2" x 21/2" for Flying Geese and Blocks. Cut 4 strips 3" x WOF. Cut the strips into 48 squares 3" x 3" for Half Square Triangles. You may want more if you want your Half Square Triangles to be scrappier. Peony Solid Cut 3 strips 7" x ...
Autumn Love Sew Along Guide - Riley Blake Designs
www.rileyblakedesigns.comThe guide is intended to be used in conjunction with Lori Holt’s Sew Along. Join Lori on her blog every Monday starting August 20, 2018 at beeinmybonnetco.blogspot. ... Cut 64- 13/4" x 13/4" - Piece B (Harvest Star Block) SSP7372 Brown Squares Scrappy Sixth Panel Two Cut 1- 2" x 2" - Circle F-1 (Crow & Pumpkin Block) Cut 4- 2" x 2" - Circle F ...

Flea Market Flowers Sew Along. Join Lori on her blog every
www.rileyblakedesigns.comFlea Market Flowers Sew Along. Join Lori on her blog every Monday starting January 25, 2021 at beeinmybonnetco.blog-spot.com for weekly instructions. Don't forget to watch for her Bee prepared blog post on January 4, 2021. 7 Yards C10229 Cloud Bookkeeping 1 Yard C10214 Pebble Wallpaper 1/2 Yard C10214 Clover Wallpaper 3/4 Yard C10224 Pink ...

Little Mermaid - rileyblakedesigns.com
www.rileyblakedesigns.comLittle Mermaid ©2015 Riley Blake Designs Border 3 Refer to the quilt photo for placement of print 2½” x 7½” rectangles. Sew 7 print 2½” x 7½” rectangles together for the right side border. Sew 7 print 2½” x 7½” rectangles together for the left side border. Sew the right and left side borders to
Bloom - Riley Blake Designs
www.rileyblakedesigns.comFINISHED QUILT SIZE 60" x 72" Finished Block Size 12" x 12" This pattern requires a basic knowledge of quilting technique and terminology. The quilt and block diagrams portrayed are virtual images. The layout and look of your project may differ when using actual fabric. Join Lori on her blog every Monday from January 18 to June 6

RBD Block Challenge Invite - rileyblakedesigns.com
www.rileyblakedesigns.comC K A C H L L E N G E Join some of your favorite designers from Riley Blake Designs as you make 16 new and exciting 10’’ quilt blocks. Shh! We’re keeping the final quilt a secret! Whe˜? Starts January 4th and ends May 17th. You’ll receive a new block pattern every Tuesday, except the last Tuesday of the month, where we’ll pause

Bee Happy Sew Along - Riley Blake Designs
www.rileyblakedesigns.comBee Happy Sew Along Bluebird Jar Trim Honey Lid Honey Left Bee Right Bee Jam Tape to the window on a sunny day or use a light box to trace the embroidery lines. www.beeinmybonnetco.blogspot.com ©2017 Riley Blake Designs and Bee in my Bonnet. This guide is a free download. Not intended for resale.

Chicken Salad Sew Along Guide - rileyblakedesigns.com
www.rileyblakedesigns.com2022 t esale. 4 Chicken Salad Sew Along Guide C11758 Denim Cherries (Included in FQ Bundle) Cut 5 – 4½" x 4½" for Borders & Blocks Cut 3 – 4½" x 8½" for Borders & Blocks C11759 Cottage Dinner (Included in FQ Bundle) Cut 5 – 4½" x 4½" for Borders & Blocks Cut 3 – 4½" x 8½" for Borders & Blocks ...

Autumn Leaf by Kristy Lea
www.rileyblakedesigns.coman E square on the B square and sew on the drawn line. Trim away excess fabric, leaving 1/4" seam allowance. Press to make an E/B HST (21/2" x 21/2"). 2. Place an E square on the top right corner of an A rectangle. Sew along marked line. Trim away excess fabric, leaving 1/4" seam allowance. Press. Repeat to make 4 A/E rectangles (21/2" x 41/2").
Related documents
featuring SEASON & SPICE COLLECTION BY
liveartgalleryfabrics.comCUTTING DIRECTIONS ¼" seam allowances are included. WOF means width of fabric. • Ten ... 4½” squares from fabric E, and the HSTs following the diagram. • Join the small blocks to make one (1) block. ... Please read instructions carefully before starting the construction of this quilt. If desired, wash and iron your ...
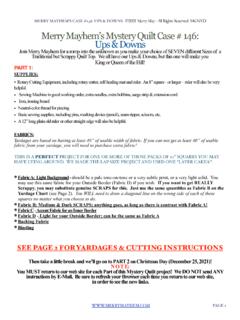
MERRY MAYHEM’S CASE #146: UPS & DOWNS Merry …
www.merrymayhem.comsquares no matter what you choose to do. Fabric B: Medium & Dark SCRAPS; anything goes, as long as there is contrast with Fabric A! Fabric C - Accent Fabric for an Inner Border Fabric D - Light for your Outside Border; can be the same as Fabric A Backing Fabric Binding SEE PAGE 2 FOR YARDAGES & CUTTING INSTRUCTIONS

Original Recipe - Quilting Digest
quiltingdigest.comalready 2 ½”, so simply lay out each strip on your cutting board, measure out 2 ½” across the length, and cut away. Using my patterns, cut 12 squares of the dark blue paisley, 12 squares of the white and blue tossed plums, 6 squares of the blue with white sprays of flowers, and 6 squares of the dark blue lattice with roses.

I Love to Make Quilts
patsloan.typepad.com- Cut 8 squares 2 3/4” x 2 3/4” I Love to Make Quilts.com A site for Passionate Quilters Hosted by Pat Sloan I hope you enjoy making this quilt. These instructions may not be reproduced by any mechanical or electronic means, including photocopying. Making copies for any purpose other than your own personal use is a violation of
Daisy Chain by Lori Holt - rileyblakedesigns.com
www.rileyblakedesigns.comSewing Instructions 1. Sew the A and D rectangles together along the long edge. Press. Cut the A/D strip into 8 segments 13/4" x 3". Sew 2 A/D segments together as illustrated. Press. Repeat to make 4 four-patches (3" x 3"). 2. Draw a diagonal line on the wrong side of the B squares. Place a B square on the top right corner of an E rectangle.

Coral Reef Quilt Coral Coral Reef Quilt Teal Swim Team ...
www.tildasworld.com• Press all fabrics before cutting. • Use ¼in (6mm) seams unless otherwise instructed. • Read all the instructions through before you start. Pillow Layout 1 The pillow uses a single swimming girl block, surrounded by a border. Refer to Fig A for the fabrics used and Fig B for the layout and the positions of the fabrics.
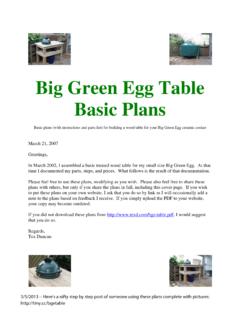
Big Green Egg Table Basic Plans
www.texd.comBasic plans (with instructions and parts list) for building a wood table for your Big Green Egg ceramic cooker March 21, 2007 Greetings, In March 2002, I assembled a basic treated wood table for my small size Big Green Egg. At that time I documented my parts, steps, and prices. What follows is the result of that documentation.

Chapter 5 Installing Balusters - Bayer Built
www.bayerbuilt.comThe instructions for this procedure are identical to the installation of square top balusters. Please note the prior section. Boring the Rail 1. Using a level or a plumb bob, make a mark on the bottom of the rail directly above and corre-sponding with the baluster center on the tread. 2. Drill a hole of the appropriate diameter in the bottom of ...