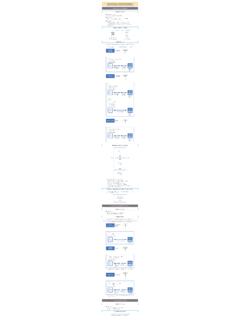
Transcription of WiFi Camera (V380) Installation Manual iPhone IOS Android
1 WiFi Camera (V380) Installation Manual iPhone IOS Android iPhone IOS Smart Phone Installation WiFi smart link Installation (with WiFi Network) 1. Open Apple App Store, search, download, and install V380 2. Connect the power plug to the Camera and place the Camera right next to your WiFi router. Camera sound: System is starting Camera sound: System startup completed 3. Press and hold the reset button on the back of the Camera until you hear the following sound: Camera sound: Restore factory default setting Camera sound: Waiting for WiFi smart link configuration 4. Open the app V380 Click on WiFi Smart Link 5. Your phone has to be connected to your WiFi network. You should then see your network name under WiFi Name. Enter your WiFi password and press next on the following screen: 6.
2 You will see the following screen, searching for the Camera through your WiFi connection Camera sound: Configuration received Camera sound: WiFi connecting Camera sound: WiFi connected 7. Successfully installed Note: Add manually option is for when a Camera is already connected to your home network and you would like add the Camera to another phone. You can simply press Lan Search or Type in the Device ID (located on the bottom of the Camera ) and click Add to list on the following page to add an already configured Camera to your phone. AP (Access Point) Installation (with or without WiFi Network) 1. Open Apple App Store, search, download, and install V380 2. Connect the power cable to the Camera Camera sound: System is starting Camera sound: System startup completed 3.
3 Press and hold the reset button on the back of the Camera to until you hear the following sound:. Camera sound: Restore factory default setting Camera sound: Waiting for WiFi smart link configuration 4. Press and hold the reset button again on the back of the Camera for 1-2 seconds Camera sound: Access point establishing Camera sound: Access point established 5. On your phone, go to Settings -> WLAN and connect to the WiFi network that starts with MV and ends with 8 digits. For example MV12345678. This is your Camera access point. 6. Open the app V380 Click on Add Manually 7. Your phone has to be connected to the Camera access point. On the following screen, you can simply press Lan Search or Type in the Device ID (located on the bottom of the Camera ) and click Add to list on the following screen to add the Camera to your device list: 8.
4 When your phone successfully connects to the Camera , you will see your Camera on the Device List. Now your Camera is setup to connect directly to your phone and can only be accessed when your phone is near the Camera access point signal. To configure your Camera to your WiFi network, please place the Camera next to your WiFi router the following steps. 9. Click Settings on the bottom menu will bring you to this screen. You will see your device ID at the top. Click Network. 10. Check Station (Work with router). The WIFI List Near the device will populate with nearby networks. Choose your WiFi network and type in your WiFi password and press return. Then click Save at the very top. Camera sound: WiFi connecting Camera sound: WiFi Connected 11. On your phone, go to Settings -> WLAN and connect to your WiFi network.
5 Reopen the V380 app and click Device List at the bottom. You should see the Camera on the device list. 12. Successfully Installed Android Smart Phone Installation WiFi smart link Installation (with WiFi Network) 8. Open Google Play Store, search, download, and install V380 9. Connect the power plug to the Camera and place the Camera right next to your WiFi router. Camera sound: System is starting Camera sound: System startup completed 10. Press and hold the reset button on the back of the Camera until you hear the following sound: Camera sound: Restore factory default setting Camera sound: Waiting for WiFi smart link configuration 11. Open the app V380 Click on WIFI quick setup 12. Your phone has to be connected to your WiFi network. You should then see your network name under WiFi name.
6 Enter your WiFi password and press Next step on the following screen: 13. You will see the following screen, searching for the Camera through your WiFi connection Camera sound: Configuration received Camera sound: WiFi connecting Camera sound: WiFi connected 14. Successfully installed Note: Searching device and Device Linked option is for when a Camera is already connected to your home network and you would like add the Camera to another phone. Simply clicking Searching device will add an already configured Camera to your phone. Or you can click the + icon on the top right and click Device Linked, then click Lan Search or Type in the Device ID (located on the bottom of the Camera ) and click Confirm Add on the following screen to add an already configured Camera to your phone.
7 AP (Access Point) Installation (with or without WiFi Network) 1. Open Google Play Store, search, download, and install V380 2. Connect the power cable to the Camera and place the Camera next to your WiFi router. Camera sound: System is starting Camera sound: System startup completed 3. Press and hold the reset button on the back of the Camera to until you hear the following sound:. Camera sound: Restore factory default setting Camera sound: Waiting for WiFi smart link configuration 4. Press and hold the reset button again on the back of the Camera for 1-2 seconds Camera sound: Access point establishing Camera sound: Access point established 5. On your phone, go to Settings -> WLAN and connect to the WiFi network that starts with MV and ends with 8 digits. For example MV12345678. This is your Camera access point.
8 6. Open the app V380 Click on WIFI quick setup Click on AP Quick Setup will bring you to the Quick Configuration screen. 7. You will see the Camera access point name under Quick Configuration. Click on the name to connect to the Camera . 8. You should see a list of nearby WiFi networks. Choose your WiFi network and type in your WiFi password and press return. Then click Save at the very top. If you don t see your network, press the back arrow and repeat step 7. Camera sound: WiFi connecting Camera sound: WiFi Connected 9. On your phone, go to Settings -> WLAN and connect to your WiFi network. Reopen the V380 app and click My Device at the bottom. You should see the Camera on the there. 10. Successfully Installed