Transcription of WINDOW REPLACEMENT INSTRUCTIONS FOR …
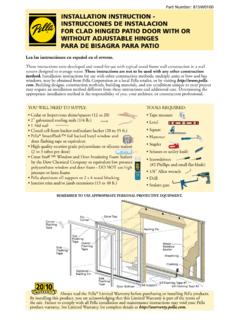
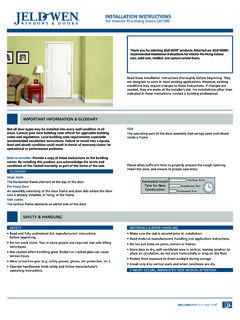
1 Part Number: 80WW0101 2012 Pella CorporationThese INSTRUCTIONS were tested and developed for replacing windows in wood-frame wall construction systems designed to manage moisture. Installation recommendations for other types of wall construction, wall systems or conditions, may be obtained from Pella Corporation or a local Pella retailer. Building designs, construction methods, building materials, and site conditions unique to your project may require an installation method different from these INSTRUCTIONS and additional care on your part. Determining the appropriate installation method is the responsibility of you, your architect, or other construction REPLACEMENT INSTRUCTIONS FORCASEMENT, DOUBLE-HUNG AND CLAD FRAME WINDOWSINTO EXISTING CASEMENT FRAME USING FRAME SCREWSYOU WILL NEED TO SUPPLY: Cedar or Impervious shims/spacers (12 to 20) Closed cell foam backer rod/sealant backer (12 to 30 ft.)
2 Pella SmartFlash foil backed butyl WINDOW and door flashing tape or equivalent Pella WINDOW and Door Installation Sealant or equivalent high quality, multi-purpose sealant (1 tube per WINDOW ) Low expansion, low pressure polyurethane insulating WINDOW and door foam sealant. DO NOT use high pressure or latex foams #8 x 3-1/4" Finish head screws (6 to 10 per WINDOW )TOOLS REQUIRED: Tape measure Level Sealant gun Prybar Utility knife Putty knife Hammer Screwdrivers (Flat & Phillips) Adjustable pliers Side cutters Roto-tool, reciprocating saw Wood chisel 1/8" drill bit DrillInstallation will require two or more persons for safety TO USE APPROPRIATE PERSONAL PROTECTIVE method of installation involves removing the sash only of the existing WINDOW .
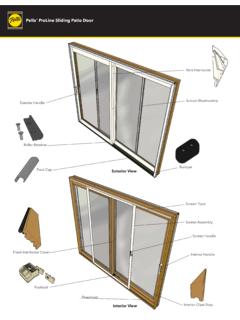
3 The original WINDOW frame will remain in place and only the existing sash, frame stops and frame hardware must be : Many windows in older homes are painted with lead-based paint. Removal of old windows may disturb this paint. Proper precautions must be taken to minimize exposure to dust and debris. Consult state or local authorities for more WINDOWINSTALLEDEXTERIORINSERT REPLACEMENTWINDOWEXISTING WINDOWEXTERIORREMOVE EXISTINGSASH and STOPSEXTERIORA lways read the Pella Limited Warranty before purchasing or installing Pella products. By installing this product, you are acknowledging that this Limited Warranty is part of the terms of the sale. Failure to comply with all Pella installation and maintenance INSTRUCTIONS may void your Pella product warranty.
4 See Limited Warranty for complete details at REMOVE THE EXISTING SASHNote: Remove the new WINDOW from its packaging. Inspect and measure the new WINDOW to confirm it will fit into the opening prior to removing the existing Remove the existing sash. This will vary per manufacturer of the existing WINDOW . Removing the hinge and operator fasteners will generally allow the sash to be removed from the existing Remove operator hardware and all head, jamb, and sill stops. This can usually be accomplished with a OPENING PREPARATIONA. Inspect the existing WINDOW frame and repair or replace any defective or rotted wood parts. Remove or seat any Clean the opening of any dirt, debris, or excess old paint before proceeding. Chisel off any high Apply one piece of sill flashing tape to the sill of the existing WINDOW frame.
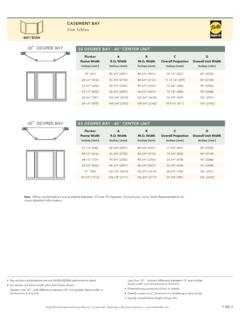
5 Cut the tape 12" longer than the existing WINDOW sill width. Apply the tape on the existing sill 6" up each jamb and press down firmly. The tape will not cover the sill depth completely under the new Install and level sill spacers. Place 1" wide by 3/8" thick spacers on the bottom of the WINDOW opening 1/2" from each side and 1/2" back from the interior surface of where the new WINDOW will rest. Spacers are also required at points where windows are joined in multiple WINDOW combinations. Add shims as necessary to ensure the spacers are : Improper placement of shims or spacers may result in bowing the bottom of the STOPHEAD STOPJAMB STOPS1B2B2C6 TWO OR MORE PEOPLE ARE REQUIRED FOR THE FOLLOWING WINDOW PREPARATIONA. Casement: On the room side of the WINDOW drill 1/8" diameter clearance holes through the head, jambs and sill of the frame.
6 Space the holes a maximum of 6" from each end and a maximum of 16" on : On vent casements, place the holes so they do not interfere with the roto operator and the latch points on the lock side of the SillDrill 1/8"clearance hole3AB. Double-hung and Clad Frame: On the room side of the WINDOW , drill 1/8" diameter clearance holes through the frame at the locations shown. Space the holes a maximum of 6" from each end and a maximum of 16" on : The lower sash must be raised to drill the holes in the sill of the double-hung "6"6"EVERY16"6"6"EVERY16"6"16"EVERYD esigner Series and ProLine Architect Series Double-HungDrill 1/8"clearance holeDouble-Hung Jamb1/4"Double-Hung HeadDrill 1/8"clearance hole1/2"Double-Hung SillDrill 1/8"clearance hole1/2"Clad Frame SillDrill 1/8"clearance hole1"Clad Frame HeadDrill 1/8"clearance hole1"Double-Hung SillDouble-Hung HeadDrill 1/8"clearance holeDrill 1/8"clearance holeDouble-Hung JambDrill 1/8"clearance holeC.
7 Continue placing shims at each pre-drilled hole as needed to plumb and square the WINDOW . Check the WINDOW for square by making sure the diagonal measurement from corner to corner of the REPLACEMENT WINDOW is within 1/8" in both directions. Insert a 3-1/4" finish wood screw into each pre-drilled hole in the frame. Finish inserting the top screw in each : DO NOT shim above the WINDOW . DO NOT over SETTING AND FASTENING THE WINDOWTWO OR MORE PEOPLE ARE REQUIRED FOR THE FOLLOWING : Because there are no stops in the opening to place the WINDOW against, be sure to hold the WINDOW in place when performing Steps 4A thru Insert the REPLACEMENT WINDOW in the opening by first placing the bottom of the WINDOW on top of the shims on the sill of the opening.
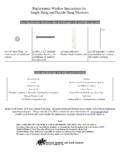
8 Tip the WINDOW upright into the : Use of a suction cup on the glass will assist in handling the : Each existing WINDOW frame and wall depth will vary in different applications; therefore there is not a standard measurement for the overhang of the WINDOW frame to the exterior or for the distance from the interior face of the WINDOW to interior trim. When performing Steps 4B thru 4C, installing the frame screws, be sure to keep the distance consistent all around the : On the exterior, there must be enough room for backer rod and 3/8" sealant Place shims aligned with the top pre-drilled hole in one jamb of the WINDOW frame. Keep shims back 1/2" from interior face of WINDOW . Partially insert one 3-1/4" finish wood screw. Repeat on the other : Position the shims to ensure they allow at least 1/2" from the exterior surface of the WINDOW to allow for placement of backer rod and VIEW4B 5 INTERIOR SEALCAUTION: Ensure use of low pressure polyurethane WINDOW and door insulating foams and strictly follow the foam manufacturer s recommendations for application.
9 Use of high pressure foams or improper application of the foam may cause the WINDOW frame to bow and hinder Apply insulating foam sealant. From the interior, insert the nozzle of the applicator approximately 1" deep into the space between the WINDOW and the rough opening and apply a 1" deep bead of foam. This will allow room for expansion of the foam and will minimize squeeze out. Apply sealant across interior surface of shims to create a continuous seal. For windows with jamb extensions installed, ensure the foam is placed between the WINDOW frame and the rough opening, not between the jamb extension and the rough opening. Follow foam manufacturer s Check the WINDOW operation (vent units only) by opening and closing the : If the WINDOW does not operate correctly, check to make sure it is still plumb, level, square, and the jambs are not bowed.
10 If adjustments are required, remove the foam with a serrated knife. Adjust the shims and reapply the insulating foam EXTERIOR SEALA. Insert backer rod into the space around the WINDOW . This should provide at least 3/8" clearance between the backer rod and the exterior face of the : Backer rod adds shape and depth for the sealant Place a bead of sealant at the jambs and head between the existing WINDOW frame and the REPLACEMENT WINDOW Begin the sill sealant bead 1/2" from one jamb, running it across the sill and stopping 1/2" from the opposite jamb. This 1/2" sealant gap on each side of the sill allows for incidental water Shape, tool, and clean excess sealant. When finished, the sealant should be the shape of an : This method creates a more flexible sealant line capable of expanding and Interior Finish or Trim: The space between the new WINDOW and the existing WINDOW s frame will need to be covered with trim.