Transcription of WIRELESS 433 MHz WEATHER STATION - technoline-berlin.de
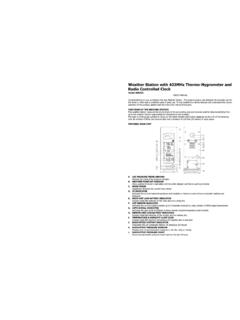
1 WIRELESS 433 mhz WEATHER STATION Instruction Manual INTRODUCTION: Congratulations on purchasing this WEATHER STATION with WIRELESS 433 mhz transmission of outdoor temperature and humidity and display of indoor temperature and humidity. It is further featuring a DCF-77 radio controlled clock with date display and two alarms. With eight easy to use function keys, this innovative product is ideal for use in the home or office. FEATURES: The WEATHER STATION Detachable stand Function Keys Battery cover LCD Display Hanging Hole DCF-77 Radio controlled time with manual setting options Time reception ON/OFF 12/24 hour display 29 Hour and minute display, seconds indicated by flashing dot Time zone option 12hours Features 2 alarms with snooze function Snooze setting Date and month / weekday and date calendar display selectable WEATHER forecasting with 3 WEATHER icons and WEATHER tendency indicator WEATHER forecasting icon sensitivity setting Temperature display in degrees Celsius ( C) or Fahrenheit ( F)
2 Selectable Indoor and outdoor temperature display with MIN/MAX recording Indoor and outdoor humidity reading displayed as RH% with MIN/MAX recordings All MIN/MAX temperature recordings show date and time received All MIN/MAX recordings can be reset Indoor comfort level indicator - happy or sad face icons Can take up to three outdoor transmitters LCD contrast setting Low battery indicator Wall mounting or table standing The Thermo-Hygro Outdoor Transmitter Remote transmission of outdoor temperature and humidity to WEATHER STATION by 433 mhz signals LCD showing outdoor temperature and humidity Wall mounting case 30 SETTING UP: 1. First, insert the batteries into the WEATHER STATION (see How to install and replace batteries in the WEATHER STATION below).
3 Once the batteries are in place, all segments of the LCD will light up briefly and a short signal tone will sound. Following some test data display, the indoor temperature and humidity, the time as 0:00 the date as and the WEATHER icons sun and clouds will be displayed. If the indoor temperature and humidity are not displayed after 30 seconds, remove the batteries and wait for at least 10 seconds before reinserting them. Once the indoor data is displayed proceed to step 2. 2. Within 3 minutes of activating the WEATHER STATION , place the batteries into the transmitter (see How to install and replace batteries in the Thermo-Hygro outdoor transmitter below). 3. After inserting the batteries into the transmitter, the WEATHER STATION will start receiving data from the transmitter.
4 The outdoor temperature and humidity should then be displayed on the WEATHER STATION . If this does not happen after 15 minutes, the batteries will need to be removed from both units and reset from step 1. 4. The WEATHER STATION can take up to 3 remote transmitters. If you have purchased additional transmitters, follow step 2 for all extra transmitters. However, ensure that you leave 10 seconds in between the reception of the last transmitter and the set-up of the following transmitter. The WEATHER STATION will number the transmitters in the order of set-up, the first transmitter will have the temperature displayed with the number 1 against it and so on. 5. Before all the transmitters are set up, there is a testing period, during which the display switches quickly between all the received transmitters at random, according to which random transmission it receives.
5 Pressing any key will stop this process. The process also stops automatically if up to 3 transmitters are received or no keys are pressed for a few minutes. 6. Once the remote temperature and humidity have been received and displayed on the WEATHER STATION , the DCF-77 time code reception is automatically started. This takes typically between 3-5 minutes in good conditions. This time period is an excellent opportunity to locate the transmitter(s) in suitable location(s) outdoors. In order to ensure sufficient 433 mhz transmission however, this should under good conditions be 31no more than 25 meters from where the WEATHER STATION will be finally positioned (see notes on Positioning and 433 mhz Reception ). 7. If after 10 minutes, the DCF time has not been received, use the SET key to manually enter a time initially The clock will automatically attempt to receive the DCF time at each full hour.
6 When this is successful, the received time will override the manually set time. The date is also updated with the received time. (Please refer also to notes on Radio controlled Time Reception and Manual Time Setting ). HOW TO INSTALL AND REPLACE BATTERIES IN THE WEATHER STATION The WEATHER STATION uses 2 x AA, IEC LR6, batteries. When batteries will need to be replaced, the low battery icon will appear on the LCD. To install and replace the batteries, please follow the steps below: 1. Insert finger or other solid object in the space at the bottom center of the battery compartment and lift up to remove the cover. 2. Insert batteries observing the correct polarity (see marking). 3. Replace compartment cover.
7 HOW TO INSTALL AND REPLACE BATTERIES IN THE THERMO-HYGRO OUTDOOR TRANSMITTER The Thermo-Hygro Outdoor Transmitter uses 2 x AAA, IEC, LR3, batteries. To install and replace the batteries, please follow the steps below: 1. Unscrew the screw on the back of the compartment and remove the cover. 2. Insert the batteries, observing the correct polarity (see marking). 3. Replace the battery cover on the unit and seal by re-screwing. 32 Note: In the event of changing batteries in any of the units, all units need to be reset by following the setting up procedures. This is because a random security code is assigned by the transmitter at start-up and this code must be received and stored by the WEATHER STATION in the first 3 minutes of power being supplied to it.
8 BATTERY CHANGE: It is recommended to replace the batteries in all units on an annual basis to ensure optimum accuracy of these units. Please participate in the preservation of the environment. Return used batteries to an authorised depot. FUNCTION KEYS: WEATHER STATION : The WEATHER STATION has eight easy to use function keys, 4 on the outside and four behind a shutter inside the lower compartment: Indoor Outdoor Date Alarm 2 Setting Alarm 1 Snooze Channel 33 SET key (Setting): To enter the set mode for the following functions: LCD contrast, Time zone, Time Reception ON/OFF, 12/24 hour display, Manual time, Year, Date, snooze time duration, C/ F, and WEATHER forecasting icon sensitivity settings. Note: The year can be displayed in the set mode (not displayed in normal mode) To stop the alarm IN key (Indoor) To toggle between the current/ minimum / maximum indoor temperature and humidity To press for over 3 seconds to reset the indoor maximum and minimum temperature and humidity records (will reset all records to current level) Note: the Time/date information is only available for MIN/MAX temperature data, and will be changed to default time after the reset operation To change LCD contrast, time zone, Time Reception ON/OFF, 12/24 hour display, hour, year, month, day, snooze time duration, C/ F and WEATHER forecasting icon sensitivity in setting modes Note.
9 In 24hr time display mode, the day is set by using the IN key. In 12hr time display mode, the month is set by using the IN key To change alarm hour in alarm setting mode To stop the alarm OUT key (Outdoor) To toggle between the current/ minimum/ maximum outdoor temperature and humidity Press for around 3 seconds to reset the outdoor maximum and minimum temperature and humidity records (will reset all records to current level of the relative transmitter being reset- each transmitter s data must be reset separately) Note: the time/date information of MIN/MAX temperature will be reset to default time as well. To change minute, day, month units in setting modes 34 Note: in 24hr time display mode, the month is set by using the OUT key.
10 In 12hr time display mode, the day is set by using the OUT key To change alarm minute in alarm setting mode To stop the alarm CH key (Channel) To toggle between the Thermo-Hygro outdoor transmitters 1, 2 and 3 (if more than 1 transmitter is used) To exit manual setting mode and alarm setting mode To stop the alarm AL1 key (Alarm 1) To display the time set for Alarm ((1)) and to simultaneously switch Alarm ((1)) ON/ OFF Press for about 3 seconds to enter the Alarm ((1)) setting mode To stop the alarm AL2 key (Alarm 2) To display the time set for Alarm ((2)) and to simultaneously switch Alarm ((2)) ON/ OFF Press for about 3 seconds to enter the Alarm ((2)) setting mode To stop the alarm DATE key To toggle between the two date display modes and the two alarm times To stop the alarm SNZ key (Snooze) To activate the snooze function for the alarm To view alarm time setting in normal operation mode To exit manual setting mode and alarm setting mode 35 LCD SCREEN.