Transcription of WOODWORKING TOOLS, MATERIALS, AND METHODS
1 AreCHAPTER 3 WOODWORKING TOOLS, MATERIALS, ANDMETHODSAs a Builder, hand and power WOODWORKING toolsessential parts of your trade. To be a proficientwoodworking craftsman, you must be able to use andmaintain a large variety of field and shop perform your work quickly,accurately, and safely, you must select and use thecorrect tool for the job at hand. Without the propertools and the knowledge to use them, you waste time,reduce efficiency, and may injure yourself or tools not only are essential in performingspecific jobs, but also play an important role in yourdaily work in mind that you areresponsible for knowing and observing all safetyprecautions applicable to the tools and equipment youoperate. For additional information on the topicsdiscussed in this chapter , you are encouraged to studyTools and Their Uses, NAVEDTRA that publication contains a detaileddiscussion of common tools used by Builders, we willnot repeat that information in this this chapter , several of the most commonpower tools used by Builders are briefly uses, general characteristics, attachments, andsafety and operating features are outlined.
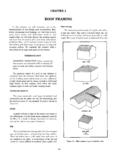
2 To becomeskilled with these power tools and hand tools, youmust use should also study themanufacturer s operator and maintenance guides foreach tool you use for additional guidance. We willalso be covering materials and METHODS TOOLSLEARNING OBJECTIVE: Upon completingthis section, you should be able to determinethe proper use and maintenance requirementsof portable power duties as a Builder include developing andimproving your skills and techniques when workingwith different power tools. In this section, we llidentify and discuss the most common power toolsthat are in the Builder s workshop or used on thejobsite. We ll also discuss safety precautions as theyrelate to the particular power tool under must keep in mind and continually stress to yourcrew that WOODWORKING power tools can bedangerous, and that safety is everyone s TOOLSAs a Builder, you might be assigned to a , you will need to know some of thecommon power tools and equipment found Radial Arm SawFigure 3-1 illustrates a typical shop radial armsaw.
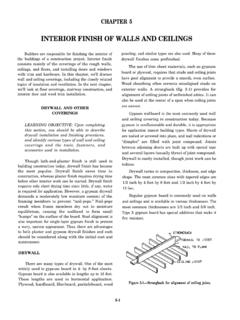
3 The procedures used in the operation,maintenance, and lubrication of any shop radial armsaw are found in the manufacturers operator andmaintenance manuals. The safety precautions to beobserved for this saw are found in these samemanuals. The primary difference between this sawand other saws of this type (field saws) is the locationof Table Bench SawA tilt-arbor table bench saw (figure 3-2) is sonamed because the saw blade can be tilted for cuttingbevels by tilting the arbor. The arbor, located beneaththe table, is controlled by the tilt handwheel. Inearlier types of bench saws, the saw blade remainedstationary and the table was tilted. A canted (tilted)saw table is hazardous in many ways; most moderntable saws are of the tilt-arbor rip stock, remove the cutoff gauges and set therip fence away from the saw by a distance equal to thedesired width of the piece to be ripped off.
4 The pieceis placed with one edge against the fence and fedthrough with the fence as a cut stock square, set the cutoff gauge at 90 tothe line of the saw and set the ripping fence to theoutside edge of the table, away from the stock to becut. The piece is then placed with one edge against3-1 Figure 3-1. A shop radial arm 3-2. Tilt-arbor bench cutoff gauge, held firmly, and fed through bypushing the gauge along its procedure for cutting stock at an angleother than 90 (called miter cutting) is similar,except that the cutoff gauge is set to bring thepiece to the desired angle with the line of the ordinary ripping or cutting, the saw bladeshould extend above the table top 1/8 to 1/4 inchplus the thickness of the piece to be sawed. Thevertical position of the saw is controlled by thedepth of cut handwheel, shown in figure 3-2.
5 Theangle of the saw blade is controlled by the tilthandwheel. Except when its removal is absolutelyunavoidable, the guard must be kept in slot in the table through which thesaw blade extends is called the throat. The throatis contained in a small, removable section of thetable called the throat plate. The throat plate isremoved when it is necessary to insert a wrench toremove the saw blade is held on the arbor by the arbor nut. A sawis usually equipped with several throat plates,containing throats of various widths. A wider throat isrequired when a dado head is used on the saw. A dadohead consists of two outside grooving saws (whichare much like combination saws) and as manyintermediate chisel-type cutters (called chippers) asare required to make up the designated width of thegroove or dado.
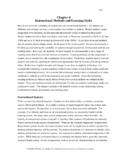
6 Grooving saws are usually I/S-inchthick; consequently, one grooving saw will cut a1/8-inch groove, and the two, used together, will cut a1/4-inch cutters come invarious the following safety precautions whenoperating the tilt-arbor table bench saw:Do not use a ripsaw blade for crosscutting or acrosscut saw blade for ripping. When rippingand crosscutting frequently, you should installa combination blade to eliminate constantlychanging the blade. Make sure the saw blade issharp, unbroken, and free from cracks beforeusing. The blade should be changed if itbecomes dull, cracked, chipped, or sure the saw blade is set at proper heightabove the table to cut through the the hazard of being hit by materialscaused by kickbacks by standing to one side ofthe use a push stick to push short, narrowpieces between the saw blade and the stock and scraps from accumulating onthe saw table and in the immediate reach over the saw to obtain materialfrom the other cutting, do not feed wood into the sawblade faster than it will cut freely and leave the saw unattended with the SawAlthough the band saw (figure 3-3) is designedprimarily for making curved cuts, it can also be usedfor straight cutting.
7 Unlike the circular saw, the bandsaw is frequently used for freehand band saw has two large wheels on which acontinuous narrow saw blade, or band, turns, just as abelt is turned on lower wheel, locatedbelow the working table, is connected to the motordirectly or by means of pulleys or gears and serves asthe driver upper wheel is the saw blade is guided and kept in line by twosets of blade guides, one fixed set below the table andone set above with a vertical sliding adjustment. Thealignment of the blade is adjusted by a mechanism onthe backside of the upper wheel. Tensioning of theblade tightening and loosening-is provided byanother adjustment located just back of the gauges and ripping fences are sometimesprovided for use with band saws, but you ll do mostof your work freehand with the table clear.
8 With thistype of saw, it is difficult to make accurate cuts whengauges or fences are size of a band saw is designated by thediameter of the wheels. Common sizes are 14-, 16-,18-, 20-, 30-, 36-, 42-, and 48-inch-diameter wheelmachines. The 14-inch size is the smallest practicalband saw. With the exception of capacity, all bandFigure 3-3. Band are much the same with regard to maintenance,operation, and rule of thumb used by many Seabees is that thewidth of the blade should be one-eighth the minimumradius to be cut. Therefore, if the piece on hand has a4-inch radius, the operator should select a 1/2-inchblade. Don t construe this to mean that the minimumradius that can be cut is eight times the width of theblade; rather, the ratio indicates the practical limit forhigh-speed band saw , or bands, for band saws are designated bypoints (tooth points per inch), thickness (gauge), andwidth.
9 The required length of a blade is found byadding the circumference of one wheel to twice thedistance between the wheel centers. Length can varywithin a limit of twice the tension adjustment saw teeth are shaped like the teeth in a handripsaw blade, which means that their fronts are filed at90 to the line of the saw. Reconditioning proceduresare the same as those for a hand ripsaw, except thatvery narrow band saws with very small teeth mustusually be set and sharpened by special the following safety precautions whenoperating a band saw:Keep your fingers away from the the table clear of stock and scraps so yourwork will not catch as you push it the upper guide just above the work, notexcessively t use cracked blades. If a blade developsa click as it passes through the work, theoperator should shut off the power because theclick is a danger signal that the blade is crackedand may be ready to break.
10 After the saw bladehas stopped moving, it should be replaced withone in proper the saw blade breaks, the operator shouldshut off the power immediately and not attemptto remove any part of the saw blade until themachine is completely the work binds or pinches on the blade, theoperator should never attempt to back the workaway from the blade while the saw is in motionsince this may break the blade. The operatorshould always see that the blade is workingfreely through the band saw should not be operated in alocation where the temperature is below 45 blade may break from the a small saw blade for large work orforcing a wide saw on a small radius is badpractice. The saw blade should, in all cases, beas wide as the nature of the work will saws should not be stopped by thrusting apiece of wood against the cutting edge or sideof the band saw blade immediately after thepower has been shut off; doing so may causethe blade to saws with36-inch-wheel diameters and larger shouldhave a hand or foot care should be taken whensharpening or brazing a band saw blade toensure the blade is not overheated and thebrazed joints are thoroughly united andfinished to the same thickness as the rest of theblade.