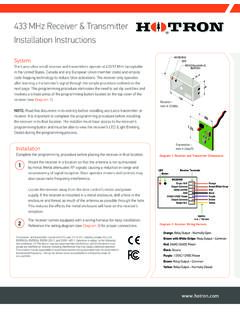
Transcription of WS-9151U Wireless 433 MHz Weather Station Instruction …
1 WS-9151 UWireless 433 MHzWeather StationInstruction ManualContentsLanguagePageEnglish2 French14 Spanish27 FCC DISCLAIMERThis device complies with part 15 of the FCC rules. Opera-tion is subject to the following two conditions:(1) This device may not cause harmful interference.(2)This device must accept any interference received, includ-ing interference that may cause undesired OF CONTENTST opicPageQuick Setup3 Inventory of Contents4 Detailed Setup GuideBattery Installation5 Setting the Time6 FeaturesMinimum and Maximum Temperatures6 Resetting Minimum and Maximum Temperatures 6 Adding additional remotetemperature sensors (optional)6 Weather Forecast7 Weather Icons7 Tendency Arrow8 Mounting9 Troubleshooting9 Maintenance and Care10 Specifications11 Warranty Information11 QUICK SETUPHint: Use good quality Alkaline Batteries and avoid recharge-able the indoor temperature Station and remote tempera-ture sensor 3 to 5 feet Batteries should be out of both units for 10 Place the batteries into the remote temperature sensorfirst then into the indoor temperature Station .
2 (All remote temperature sensors must be started beforethe indoor temperature Station )4. DO NOT PRESS ANY BUTTONS FOR 10 this time the indoor temperature Station and remote tem-perature sensor will start to talk to each other and the displaywill show both the indoor temperature and an outdoortemperature. If the indoor temperature Station does not dis-play both temperatures after the 10 minutes please retry theset up as stated above. After both indoor and outdoor tem-peratures are displayed for 10 minutes you can place yourremote temperature sensor outdoors and set your remote temperature sensor should be placed in a dry,shaded area. The remote temperature sensor has a rangeof 80 feet. Any walls that the signal will have to pass throughwill reduce distance. An outdoor wall or window will have 20to 30 feet of resistance and an interior wall will have 10 to 20feet of resistance. Your distance plus resistance should notexceed 80 ft. in a straight : Fog and mist will not harm your remote temperaturesensor but direct rain must be complete the set up of your indoor temperature stationafter the 10 minutes have passed please follow the steps inthe detailed set up guide on page OF CONTENTS1.
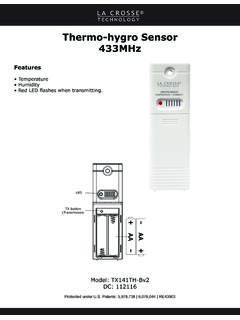
3 The indoor Weather Station (Figure 1) remote temperature sensor (TX6U) and mountingbracket. (Figure 2)3. 3 each, 1/2" Philips One strip of double sided adhesive Instruction manual and Warranty EQUIPMENT (not included)1. 1 Philips 2 Fresh AA Alkaline 2 Fresh AA Alkaline batteriesDETAILED SETUP GUIDEB attery Installation1. Install 2 AA batteries in the remote temperature sure they do not spring free, or start-up problemsmay 2 AA batteries in the indoor Weather Station . Donot press any buttons for at least ten 1 Figure the time1. Press and hold the SET key for 4 The hour will Press and release the + key to advance the Press and release the SET The minute is Press and release the + key to advance the Press and release the SET key to exit and Maximum Temperatures1. Press and release the MIN/MAX button, MAX appearsbetween the indoor and remote The recorded maximum indoor and remote temperatureis Press and release the MIN/MAX MIN appears between the indoor and The recorded minimum temperature is Press and release the MIN/MAX button to exit view optional additional sensors, press and release the CH button while viewing the minimum or Min and Max TemperaturesTo reset both the minimum and maximum temperatures-pressand hold the MIN/MAX button for 5 Additional Remote Temperature Sensors(optional)The WS-9151U is able to receive signals from 3 different re-mote temperature sensors.
4 Following are some brief instruc-tions for the basic set-up of remote temperature sensor unitswith the WS-9151U . These extra remote temperature sen-sors can be purchased through the same dealer as this unit,or by contacting La Crosse Technology directly. A TX6U willmonitor temperature only, a TX3U will monitor temperatureand display the temperature on its LCD, and the TX3UP willmonitor the temperature of water or soil via a setting up multiple remote temperature sensors, it isimportant to remove the batteries from all existing units inoperation, then to insert batteries first into all the remote tem-perature sensors. Second install batteries into the indoorweather Station and do not press any buttons for ten problems will arise if this is not done view the temperature of a different remote temperaturesensor unit, press and release the CH button. A shift fromone number to the next should be observed in the ForecastThe Weather forecasting feature is estimated to be 75%accurate.
5 The Weather forecast is based solely upon thechange of air pressure over time. The WS-9151U averagespast air-pressure readings to provide an accurate forecast,creating a necessity to disregard all Weather forecasting for12-24 hours after the unit has been set-up, reset, or movedfrom one altitude to another ( from one floor of a buildingto another floor). In areas where the Weather is not affectedby the change of air pressure, this feature will be less IconsThere are 3 possible Weather icons that will be displayed inthe FORECAST LCD:Sunny-indicates that the Weather is expected to improve (notthat the Weather will be sunny).Sun with Clouds-indicates that the Weather is expected tobe fair (not that the Weather will be sunny with clouds).Clouds with Rain-indicates that the Weather is expected toget worse (not that the Weather will be rainy).The Weather icons change when the unit detects a change inair pressure. The icons change in order, from sunny to partlysunny to cloudy or the reverse.
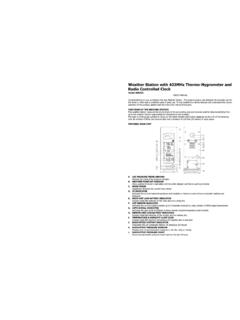
6 It will not change from sunny directly to rainy , although it is possible for the changeto occur quickly. If the symbols do not change then the weatherhas not changed, or the change has been slow and Tendency ArrowsOther possible displays in the FORECAST LCD are 2 weathertendency arrows, one that points up (on the left side of theLCD) and one that points down (on the right side of the LCD).These arrows reflect current changes in the air pressure. Anarrow pointing up indicates that the air pressure is increasingand the Weather is expected to improve or remain good. Anarrow pointing down indicates that the air pressure is decreas-ing and the Weather is expected to become worse or remainpoor. No arrow means the pressure is : To achieve a true temperature reading, avoid mount-ing in direct sunlight. We recommend that you mount the re-mote temperature sensor on a North-facing wall. The send-ing range is 80ft; obstacles such as walls, concrete, and largemetal objects will reduce the range.
7 Place both units in theirdesired location before permanently Temperature SensorRemove the mounting bracket from the remote temperaturesensor. Mount the bracket in the desired location with eitherscrews or adhesive tape. Insert remote temperature sensorinto mounting Weather StationThe indoor Weather Station comes with the table stand al-ready mounted. If you wish to use the table-stand all that isrequired is to place the indoor Weather Station in an appropri-ate wall mount the indoor Weather Station first remove the tablestand. Next insert an appropriate screw in your desiredlocation. Using the integrated hanging hole on the back ofthe unit, slip indoor Weather Station over the screw and pulldown to : For problems not solved, please contact La CrosseTechnology via e-mail or phone, or visit our website, :The LCD is faintSolution:Replace batteriesProblem:No outdoor temperature is all batteries, reinsert into remote temperaturesensor first, then into the indoor Weather remote temperature sensor closer to the indoorweather Be sure all batteries are remote temperature sensor and indoor Weather sta-tion in position so the straight-line signal is not passingthrough more than two or three :Temperatures do not match if units are placed next to.
8 Each temperature sensor is manufactured to be accurate towithin 1 degree plus or minus and under normal conditions,so two sensors could be as much as 2 degrees , the difference can be exaggerated further becausethe sensors are designed for different working indoor sensor is less responsive to ambient air currentsbecause of the shielding effect of the display s case. Inaddition, the case can act as a heat sink to absorb and storeheat from external sources ( handling of the case or radi-ant heat). Also, the much greater range of the outdoor tem-perature sensor requires a different calibration curve than theindoor range. Error is usually greater at the extreme ends ofa range, making it harder to compare different ranges withdifferent curves. Under non-laboratory conditions, it is diffi-cult to compensate for the above factors and obtain an accu-rate AND CARE instructions Extreme temperatures, vibration, and shock should beavoided to prevent damage to the units.
9 Clean displays and units with a soft, damp cloth. Do notuse solvents or scouring agents; they may mark the dis-plays and casings. Do not submerge in water. Do not subject the units to unnecessary heat or cold byplacing them in the oven or freezer. Opening the casings invalidates the warranty. Do not tryto repair the unit. Contact La Crosse Technology Frequency 433 MHzMeasuring TemperaturesIndoor Weather Station32 F to F with F resolution(0 C to C with C resolution)Remote Temperature F to F with F resolution( C to C with C resolution)Temp accuracy+/- 1 F (+/- .5 C)Transmitting rangeMaximum 80 feet (25m) open spaceTemperature checkIndoorEvery 10 secondsOutdoorTwice in 10 minutesBatteries-(Alkaline recommended)Remote Temperature Sensor2 x AA, Weather Station2 x AA, : (H x L x W)Indoor Weather " x " x "(160 x 92 x mm)Remote Temperature " x " x "(128 x 40 x 23 mm)Battery lifeApproximately 1 yearWARRANTY INFORMATIONLa Crosse Technology, Ltd provides a 1-year limited warrantyon this product against manufacturing defects in materialsand limited warranty begins on the original date of purchase,is valid only on products purchased and used in North Americaand only to the original purchaser of this product.
10 To receivewarranty service, the purchaser must contact La CrosseTechnology, Ltd for problem determination and serviceprocedures. Warranty service can only be performed by aLa Crosse Technology, Ltd authorized service center. Theoriginal dated bill of sale must be presented upon request asproof of purchase to La Crosse Technology, Ltd or La CrosseTechnology, Ltd s authorized service Crosse Technology, Ltd will repair or replace this product,at our option and at no charge as stipulated herein, with newor reconditioned parts or products if found to be defectiveduring the limited warranty period specified above. All re-placed parts and products become the property of La CrosseTechnology, Ltd and must be returned to La CrosseTechnology, Ltd. Replacement parts and products assumethe remaining original warranty, or ninety (90) days, which-ever is longer. La Crosse Technology, Ltd will pay all ex-penses for labor and materials for all repairs covered by thiswarranty.