Transcription of YOUNGSTER’S T-BUCKET FRAME PLANS
1 YOUNGSTER S T-BUCKET FRAME PLANS Version , Released February 25th, 2008 In the early 1960's my hot rodder friends and I were always on the look out for a model A or T coupe for a hot rod project. Then in November of 1964 Car Craft magazine started a series on building a T bucket roadster. Well, that changed everything! A company called Almquist had been advertising a 'glass body for a couple of years. It was a poor body, but it only cost $99. One of those bodies, coupled with an model A front end (about $10-$15), a '50 Ford donor car from the back row at the local used car lot (about $50), and you had the makings of a T - and a roadster to boot! Mine got finished, sort of - the older guys where quick to point out ''better ways to do this or that''. That's where it all started. I got a lot of help from those who had been there before me. Over the years I got a lot of help from a countless number of people and it hasn't stopped yet, I'm still learning and I hope to God I never stop!
2 Now I feel it s time to try and pay back a little of what I owe, that's the reason I've decided to put together this set of PLANS for a T-BUCKET chassis. I've seen a lot of stuff done that is sub-standard and down right unsafe. I've either built, or had a hand in building, several T's over the last 40 years and I'd like to pass along some of the information to those who can use it. I don't want anything for these PLANS , all I ask is that you freely pass them along to others. Now, about the PLANS - The chassis is one that I've used on the last 6 or so cars. The PLANS start out with dimensions for the FRAME rails and a procedure for welding them together. They proceed on to the front and rear suspension and include a parts list with sources and a procedure for welding and installing those components on your FRAME . That's where I stop. I want you to build your car.
3 I'm not going to dictate how you should build it, that's where you can make it yours. I'll be around to answer questions and for you to bounce your ideas off of and I ll be more than happy to help. I currently frequent the T-BUCKET Forums at if you have questions or comments please stop by and post a note. Please understand that I m by no means a tech writer. You may find some spelling and grammatical errors but I think the intent will be clear. I ve also included several illustrations to help, but I m not a technical illustrator either. I hope things are clear but if they are not then by all means post a note to the site listed above and I ll try to help all I can. If needed I can easily release an updated plan set with any clarifications or additions deemed necessary included. And finally, I would like to gratefully acknowledge the help of Steve Robertson (SLR_65) for helping me create this pdf file.
4 --Ron Young, February 25th, 2008 Please Note Several of the illustrations are full size illustrations, but if you do not have Adobe Acrobat setup up properly they may not print full size. To insure they are printing at full size please click on file and then print from within Adobe Acrobat. A printer setup screen should now appear, a little more than half way down on the left side of that screen is an option titled page scaling with a drop down menu next to it, click on the downward facing arrow on the right side of the drop down menu to reveal the options available and choose the first option ( none ), then click on OK in the lower right corner of the screen and it should begin printing your plan set at the intended size. These dimensions are for a 101" wheelbase chassis. That is to say a body with a 20" pickup bed would be the best choice for this chassis.
5 If you are building a modified with a gas tank behind the body this FRAME should work just fine for you. If you want to use a turtle deck on the back, then add 4" to the length of the rear top rails for a 105" wheelbase. The 105" wheelbase is the longest you can build out of a 20' length of tubing. Some manufacturers offer a 14" box also. I prefer the 20" version because it gives you a little more room for a gas tank, battery, etc. inside the box. You will find your build will go faster if you have the major components before you start the build. At a minimum having the body, pickup box, engine and transmission, rims and tires that are close to the height of the ones you plan on running. It makes it a lot easier to reference the location of future parts and assemblies. Then to, you can mock everything up, climb in and make some really disgusting noises.
6 Just don't let the wife and kids catch you. When you get around to setting up the engine in your chassis, think about using a dummy engine and trans. If you can come up with a block, heads, pan, water pump, dizzy, intake manifold and a trans housing, you'll be all set. It's sure a lot easier to move around in the chassis. With the dummy you can set up all of your mounts, build headers, check for clearance issues, cut your firewall, build the trans hump, just to name a few reasons. Look around. You can likely find most of the pieces for little or nothing. The same goes for rims and tires. There is no reason to have your good set of wheels around during your build. A set of OEM rims and tires that are at least close to the height of the ones you are going to run will help keep the cost down during the build. I've even gone so far as to build a mock up radiator.
7 You can use 1x2's and cardboard or thin plywood for materials. I used pieces of an old hand rail for the inlet and outlets. A couple of sheet metal brackets for the shell and the FRAME mounts and your in business. Radiators get dinged up real easy. When you do buy yours, cut a couple of panels out of a box and tape them on the front and the back of your cooler. That will help keep those nicks and bent fins from showing up. Speaking of cardboard, when it comes time to build your gas tank, cardboard is a lot more forgiving than metal and it s cheaper too. With some searching if you can find a box that is close to the size of your battery, the battery tray can be built. A good source of posterboard for templates is as close as the nearest liquor store. Most of the signs they use are made of the thicker stuff. You can cut it with a band saw or a sabre saw.
8 It even sands well with sandpaper. Well, there you go. You can build your FRAME now. The front and rear suspensions are next. One last thing - if you are at all in doubt about your welding skills, find someone who you trust to weld up your FRAME and suspension. These are the backbone of your car and you don't want to compromise them. A little money spent here could make a big difference in enjoying your T. Page 1 This is a set of PLANS for a T bucket FRAME that I have been using for the last 15 years or so. To date there are 9 cars with this FRAME under them on the road. I would hope to add your T to this list. The chassis is set up for a small block Chevy, but most all of the 4 cylinder and V6 engines will fit also. One of the finished cars is running a flathead with this chassis. If you are planning on using another make of engine, you will need to add to the length of the front rails.
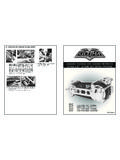
9 Measure the engine you want to use from the water pump flange or the lower crankshaft pulley, which ever one is the furthest forward, to the back of the most rearward head. If your engine has a rear mounted distributor, to the back of it. Now subtract 33 from this measurement. This is how many inches you will have to add to the front FRAME rails. I use 1-1/2 x 3 11 ga. Tubing for my chassis. Some like 2 x 3 10 or 11 ga. tubing. The choice is up to you. All of the dimensions here are for the 1-1/2 x 3 tubing, so if you use the 2 x 3 tubing you will have to make the dimension adjustments. For the FRAME you will need to buy a 20 length of 1-1/2 x 3 11 ga. tubing and 2 of 2 x 3/16 wall round tubing. The drawing below has the dimension for cutting your tubing. To keep a clean look, layout your cuts so the seam in the tubing is on the side of the FRAME rails.
10 Before you start cutting, lay out all the pieces on your tubing. Lay out the front main rails on each end with the 60 degree angle toward the center of the tube, then lay out the kick, rear rails, and then the rear crossmember. The piece of tubing for the rear crossmember needs to be trimmed back on each end to form the caps for the side rails. Below is the layout for it. You will be cutting 3 sides off leaving 1 side as the cap. Page 2 Now that you ve got your tubing cut, we can start on the main tapers. The drawing below has the dimensions. I would recommend using a cut off wheel in a die grinder, it seems to give you the control you need to make straight cuts. If you don t have an air compressor, a sabre saw with a 24 tooth blade will work. Using a plasma cutter seems to put a lot of heat in the metal causing it to warp. The relief cut to the outside of the rail is inch at the end of the long cut.