Search results with tag "Step 1 step 2"

Step 1 Step 2 - hrsa.gov
www.hrsa.govStep 1 Step 2 1. Hold the red filament by the paper handle, as shown in Step1. 2. Use a smooth motion to touch the filament to the skin on your foot. Touch the filament along the side of and NOT directly on an ulcer, callous, or scar. Touch the filament to your skin for 1-2

Step 1 Step 2 - kineticsnoise.com
kineticsnoise.comStep 1 Attach clips per Kinetics layout guidelines for walls or ceilings. See attached layout drawings. Step 2 Secure clips with a single fastener on one end only. Wood - Use #8 x 2-1/2" coarse thread screws Steel - Use #8, 10, or 12 x 1-5/8" self-tapping Type S screws

Step 1 Step 2 completes the evaluation
www.etsu.eduEdited: 2/15/2018 Page 2 of 4 Step Instructions Step 1: Supervisor activates the performance review plan Supervisor: When the new employee is entered into the eVals system, you will receive an email to create the Probationary Evaluation Plan and the task will be added to your Action Items.

Step 1 Step 2 - peba.sc.gov
www.peba.sc.govStep 8 Step 5 Step 6 Step 7 Member Access is the online resource that allows you, as a member of a retirement system administered by PEBA, to view and

Step 1 Step 2 - Space Math at NASA
spacemath.gsfc.nasa.govStep 2 - Draw a second circle centered on Earth with a radius of 1 centimeter. Label this 'Earth Orbit'. Step 3 - Using the string and thumbtack, draw a second circle with a radius of 30 centimeters. Label this 'Orbit of Moon'. Step 4 - Draw a
STEP 1 STEP 2 - Blinds.com
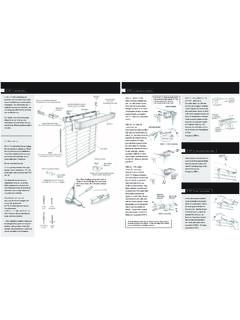
media.blinds.comSTEP 1 Your New blind STEP 2 Attaching your brackets STEP 3 Attaching the valance clips Check blind to ensure that all cords and ladders hang freely. Open the bracket door latches by pushing up on bottom of bracket while lifting the bottom of bracket door up. Slide the headrail into the mounting

STEP 1 STEP 2 - Brother
download.brother.comSTEP 1 STEP 2 Quick Setup Guide Setup is Complete! Setting Up the Machine Installing the Driver & Software MFC-7840W Before you can use the machine, you …

STEP 1 STEP 2 - Brother Industries
download.brother.comSTEP 1 STEP 2 Quick Setup Guide Setup is Complete! Setting Up the Machine Installing the Driver & Software MFC-7840W Before you can use the machine, you …

STEP 1 STEP 2 - boxcarchallenge.com
boxcarchallenge.comSTEP 1 Graph the boundary line for the inequality. Use a dashed line for < or > and a solid line for≤ or ≥. STEP 2 Test a pointnot on the boundary line to determine whether it is a solution of the inequality. If it is a solution, shade the half-plane containing the point. If it is not a solution, shade the other half-plane.

Step 1 Step 2 - Canadian Arctic Co-operatives Services ...
www.arcticco-op.comstep 1 personalize your programming ᐊᐅᓚᓂᖅ 1 ᐃᓕᓐᓅᓕᖅᑎᓪᓗᒋᑦ ᑕᑯᓐᓇᖃᑦᑕᖅᑕᑎᑦ basic / ᐊᑭᖓ $37.95

STEP 1 STEP 2 - hqmc.marines.mil
www.hqmc.marines.milSTEP 1. After the senior rating official has approved the appraisal and the employee has acknowledged receipt of the appraisal, the appraisal is ready to be filed in the repository. Before you begin, save the appraisal to your desktop or other location on your computer.

Step 1 Step 2 - Gemporia
www.gemporia.comStep 1 CALIBRATE YOUR GUIDE Before printing, ensure your print settings are set to ‘none’ - do not print to scale. Once printed, calibrate the form by checking the two scales measure correctly, the

Step 1 Step 2 - davidbach.com
davidbach.comStep 2) Developing Empowering Goals – Here you will develop empowering goals and techniques, get your "nancial goals down on paper and make them real. We will focus on making your goals meaningful and speci"c – and thereby attainable.