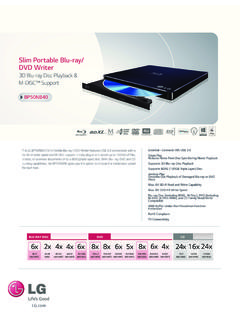
Transcription of 1 SETTINGS ENGLISH - LG Electronics
1 1. ACCESSING installation MENU. ENGLISH . 1 Press and hold the SETTINGS button for more than 5 seconds. 2 Press the 0 button four times. Press the OK button. 3 When the installation Menu is displayed, select the item you want. --LG Digital Signage Setup --USB Cloning --Password Change --Set ID Setup --Configuration Setup --Lock Mode --Fail Over --SuperSign Server Setup --Easy Brightness Control NOTE. Images in the manual may look different from the actual product. 2. installation MENU. ENGLISH . NOTE. Some features described in the installation manual may not be supported in certain models.
2 LG Digital Signage Setup Menu This menu is used after installation to configure the Digital Signage. Signage Mode Operation Decide to work all functions of Signage Mode Operation or not by setting Signage Mode Operation as Yes (Work) or No (Do Not Work). When Signage Mode Operation is set to Yes(Work), all functions of Signage Mode apply. When Signage Mode Operation is set to No(Do Not Work), all functions of Signage Mode Do Not apply and runs on initial value. Power On Status Select the status of the monitor set when turning on the main power.
3 You can set with PWR, STD, or LST. PWR always turns the monitor ON with the main power. STD turns the monitor on in the STAND-BY mode. LST turns the monitor to its previous status. If the main power were turned off in POWER ON status, the monitor would power up in POWER ON. If it were turned off in STAND-BY status, it would power up in STAND-BY. Key Operation This feature manages the usability of the local/front keys and your remote control with regard to their operations. This feature works according to the IR Operation and Local Key Operation SETTINGS .
4 IR Operation Set LG IR Operation to On (Work) or Off (Do Not Work) to enable or disable the remote control. (0 - Normal, 1 - Use PWR Only, 2 - Block All). Selecting Block All sets your monitor to block all key signals coming from general LG remote controls. Selecting Use PWR Only sets your monitor to block all key signals coming from general LG remote controls except for the Power key signal. Selecting Normal sets your monitor to receive all key signals coming from LG remote controls normally. There are keys that must be operated in Service mode when Use PWR Only or Block All is selected.
5 (In-Start, In-Stop, Power-Only, ADJ, installation Menu, P-Check, S-check). NOTE. When all IR key signals or all local key signals are blocked, the Power On Status value switches to PWR. Changing this value has been made impossible to ensure the operation of powering on. (To prevent mistakes by the user). Limited Mode This feature enables you to inhibit particular operations of the Signage functions. This feature works according to the Input Source Change, Menu Display or OSD Display SETTINGS . Input Source Change Decide to change input source or not by setting Input Source Change as On (Change possible) or Off (Change impossible).
6 When Input Source Change is set to Off (Change impossible) INPUT key doesn't work. When Input Source Change is set to On (Change possible), then changing input source is available. 3. Menu Display ENGLISH . Set On (Work) or Off (Do Not Work). Even if it is set to Off, press the Menu button for five seconds or more to go back to the installation Menu. OSD Display Decide to display OSD or not by setting OSD Display as On (Mark) or Off (Off Mark). When OSD Display is set to Off (Off Mark), all OSD is not displayed except installaion menu.
7 Power On Default (Input Source, Video Setting, Aspect Ratio). With the power turned on, you can set the Input Source, A/V Setting and Aspect Ratio options. Set to Yes (Work) or No (Do Not Work). If Power On Default is set to No, Input Source and Volume are deactivated. When Power On Default is set to Yes, it can set by entering the subordinate menu. Input Source Set whether it is turned on by the set input source or by the last stored input source. It is turned on by the Last Memory Input if the Input source is turned off.
8 All sources supported by the said model can be set as Input source. If both the Input source and the ON TIME are set, the Input source takes the priority. A/V Setting (Video Setting). When your monitor is powered on, you can set certain options for A/V. If you set this feature to Yes, the A/V values you set before entering the installation Menu are saved, and even if you have changed A/V values before powering off, the saved values are restored when you power on your monitor again. Saves video values: Picture Mode, DPM Select, Smart Energy Saving, Backlight, Contrast, Brightness, Sharpness, Color, Tint and Color Temp.
9 Saves audio values: Sound Mode and Balance. Aspect Ratio This feature enables you to set the screen size that will be applied to your monitor upon powering on. Selecting Disable sets the screen size of your monitor upon powering on to Aspect Ratio. Selecting Set By Program sets the screen size of your monitor upon powering on to Set By Program. Selecting 4:3 sets the screen size of your monitor upon powering on to 4:3. Selecting 16:9 sets the screen size of your monitor upon powering on to 16:9. Wake On LAN. Sets whether to use Wake On LAN.
10 It can be set to On or Off. On: Wake On LAN is enabled, and you can turn on the product remotely via LAN. Off: Wake On LAN is disabled. DPM. Sets whether to use DPM (Display Power Management). It can be set to Off, 5 sec, 10 sec, etc. Others: If there is no input signal, the product enters into standby mode. Off: DPM is disabled. 4. Digital Audio Input ENGLISH . You can set the audio for each input as Analog or Digital. In the case of RGB input, audio is fixed as Analog. In the case of Digital input, you can set the audio as Analog or Digital.